
Japanese Sweet Potato Crème Brûlée
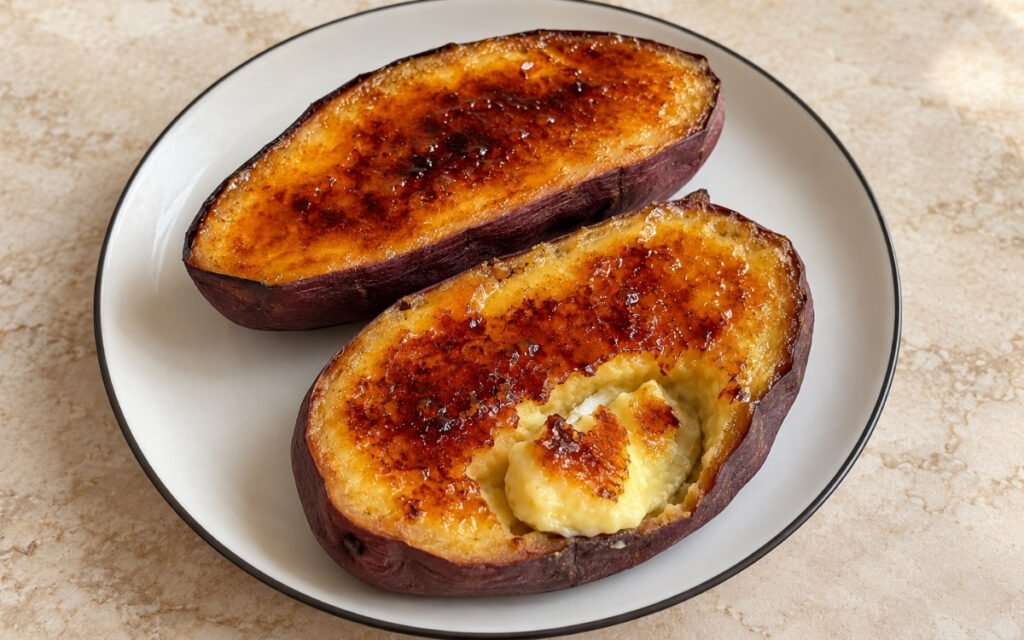
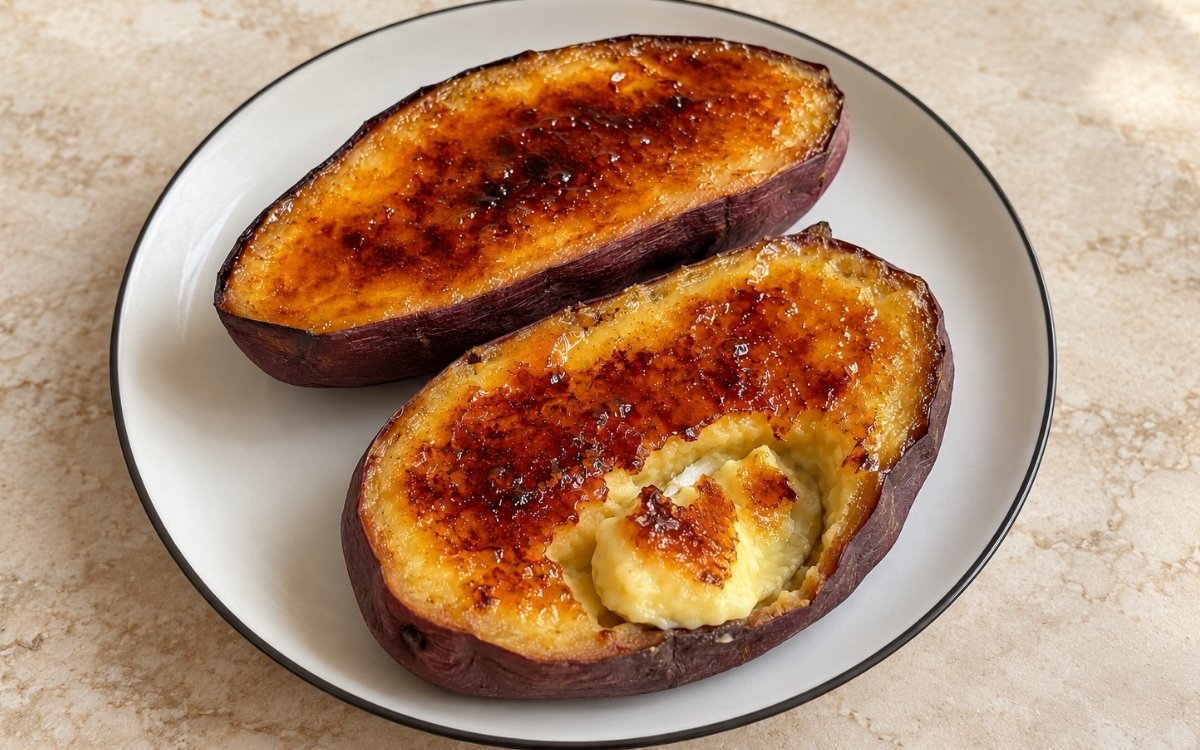
Roasted Japanese sweet potatoes filled back into their own purple skins with a smooth sweet potato custard, then chilled and brûléed with a thin crackly caramel top, the result creamy, buttery, gently sweet, and deeply roasted, with the contrast of purple skin, golden custard, and glossy amber sugar. Roasting the sweet potatoes until genuinely, fully soft all the way through is the technique this whole custard depends on for its own real smoothness — potatoes with any firmness left in the centre would leave the finished custard grainy, the same fully-tender-first principle used elsewhere in this collection whenever a starchy vegetable’s own eventual blended texture depends on complete, thorough cooking before it’s ever mashed or puréed. Straining the custard base through a fine sieve is what removes any residual fibrous texture roasted sweet potato commonly retains even after blending. Blotting away any surface condensation before the sugar goes on is what protects the brûlée from turning wet and patchy instead of thin and glassy. The payoff is a dessert with real, striking contrast — purple skin around golden, creamy custard, finished with a crisp, glossy amber sugar crust.
Prep Time : 25 min
Cook Time : 1 hr, 30 min
Servings : 4
25 min
1 hr, 30 min
4
Ingredients
For the Sweet Potato Shells
• 2 large Japanese sweet potatoes, about 350–450g each
• 1 tsp neutral oil, for rubbing the skins
• Pinch of fine salt
For the Sweet Potato Custard
• 320g roasted Japanese sweet potato flesh
• 220ml heavy cream — this one on Amazon
• 60ml whole milk — this one on Amazon
• 4 large egg yolks
• 45g granulated sugar
• 30g unsalted butter, softened — this one on Amazon
• 1 tsp vanilla extract — this one on Amazon
• ¼ tsp fine salt
For the Brûlée Topping
• 40–50g caster sugar / superfine sugar (about 2–3 tsp per sweet potato half)
This post may contain affiliate links. As an Amazon Associate I earn from qualifying purchases, at no additional cost to you.
Directions
- Roast the Sweet Potatoes
Heat the oven to 190°C / 375°F. Scrub the sweet potatoes well and dry them. Rub lightly with neutral oil and a small pinch of salt. Place on a parchment-lined tray. Roast for 50–70 minutes, depending on size, until completely tender when pierced with a skewer. Let cool for 15–20 minutes, just until you can handle them. The potatoes must be fully soft all the way through. If the centers are firm, the custard will be grainy. That genuinely complete tenderness reflects real, thorough starch breakdown throughout the flesh — any remaining firmness at the centre would carry directly into the blended custard as an unwanted, grainy texture. - Cut and Hollow the Shells
Cut each sweet potato in half lengthwise. Carefully scoop out the flesh into a bowl, leaving about 8–10mm of potato attached to the skin so each half keeps its shape. Measure 320g roasted sweet potato flesh for the custard. Reserve any extra for another use. Place the hollowed shells on a tray. If they wobble, nest them in crumpled foil so they sit level. Do not scrape the skins too thin. The shells need structure after filling and chilling. That deliberately preserved thickness of remaining flesh is what gives each shell real, structural integrity — scraped too thin, they’d risk collapsing or tearing under the weight of the custard still to come. - Make the Custard Base
Blend or mash the 320g roasted sweet potato flesh with the softened butter, sugar, salt, vanilla, cream, and milk until smooth. Add the egg yolks and blend again briefly until fully combined. For the smoothest texture, pass the mixture through a fine sieve. The custard should be thick, smooth, and pourable, like loose pastry cream. If it is stiff, add 1–2 tbsp more cream. That final straining step is what actually removes any residual fibrous texture the roasted sweet potato commonly retains even after thorough blending — a step blending alone genuinely can’t fully accomplish. - Fill the Sweet Potato Shells
Lower the oven to 150°C / 300°F. Divide the custard evenly between the 4 sweet potato halves, filling each almost to the top. Smooth the surface gently with the back of a spoon. The shells need to sit level before baking. If they tilt, the custard will set unevenly and the brûlée layer will be harder to torch cleanly. That level, stable positioning protects the custard’s own surface from setting unevenly, which would directly complicate torching a genuinely thin, even brûlée layer later. - Bake the Custard
Bake for 18–25 minutes, until the custard is just set. It should look matte around the edges and still have a slight wobble in the center when gently moved. Remove from the oven and cool to room temperature, then refrigerate for at least 3–4 hours, preferably overnight. Do not overbake. The custard should stay creamy and spoonable, not firm like a baked sweet potato mash. That specific wobble-check, rather than waiting for full visual firmness, accounts for real, continued carryover setting the custard undergoes as it cools — pulling it too late would leave it firm and dense rather than genuinely creamy and spoonable. - Dry the Surface Before Brûlée
Before torching, lightly blot the surface of each custard with paper towel if there is any condensation. Sprinkle each half with a thin, even layer of caster sugar. Condensation ruins the brûlée. The sugar needs a dry surface to melt into a thin glassy crust instead of turning wet and patchy. That deliberate blotting step removes real, residual moisture the chilled custard’s own surface would otherwise carry, protecting the sugar’s ability to melt into a genuinely thin, glassy crust rather than a wet, uneven one. - Brûlée the Tops
Use a kitchen torch to caramelize the sugar until amber-brown and glossy, with a few darker mahogany spots. Let sit for 1 minute so the caramel hardens. Serve immediately. The caramel should be thin and crisp enough to crack with a spoon. If the sugar layer is too thick, it becomes hard and bitter. That specific, checkable target — thin enough to genuinely crack with a spoon — protects against a heavier sugar layer, which would harden into something considerably tougher and more bitter than this dessert’s own delicate crust is meant to be.
*Notes :
- Roasting the sweet potatoes until genuinely, fully soft all the way through deserves recognition as the technique most directly responsible for whether this custard achieves real smoothness. The recipe’s own explicit warning that firm centres “will be grainy” reflects a real, common failure point — that complete tenderness is what lets the flesh blend into a genuinely smooth base rather than carrying unwanted texture through into the finished custard.
- Straining the custard base through a fine sieve deserves genuine attention as the technique responsible for the custard’s own clean, refined texture. The recipe’s own explicit note that “roasted sweet potato can stay fibrous even after blending” reflects real understanding of a limitation blending alone can’t fully overcome, and straining is specifically what corrects it.
- Blotting away any surface condensation before the sugar is added deserves genuine respect as a small but consequential detail specific to this dessert’s brûlée topping. The recipe’s own explicit warning that “condensation ruins the brûlée” reflects a real, direct cause-and-effect relationship — a wet surface prevents the sugar from ever properly melting into the thin, glassy crust this dish depends on.
- Keeping the torch flame moving in small, continuous circles deserves attention as the detail responsible for protecting both the sugar and the delicate sweet potato skin beneath it. The recipe’s own explicit warning that lingering “too long in one spot burns the sugar and can scorch the potato skin” reflects a real, narrow margin this final finishing stage depends on watching closely.
Why This Recipe Works
This recipe works because the sweet potatoes are roasted until genuinely, fully soft, protecting the custard’s own real smoothness. The shells are hollowed with deliberate care, leaving enough flesh behind for real structural integrity.
The custard base is strained, removing residual fibrous texture blending alone can’t fully correct. It’s baked only until a genuine wobble remains, accounting for real carryover setting during chilling.
The surface is blotted dry before the sugar goes on, and the torch is kept constantly moving, together delivering the crisp, thin, glassy brûlée crust this dessert depends on for its whole final contrast.
Ingredient Breakdown
Fully, Genuinely Roasted Sweet Potatoes
The critical technique — complete tenderness throughout protects the custard from any grainy texture.
Carefully Hollowed Shells (Not Scraped Too Thin)
The critical technique — leaves enough structure for the shells to hold the custard through baking and chilling.
Strained Custard Base
The critical technique — removes residual fibrous texture blending alone can’t fully correct.
Wobble-Check Doneness Cue
The critical technique — accounts for real carryover setting, protecting the custard from becoming dense and firm.
Blotted, Dry Custard Surface
The critical technique — protects the sugar’s ability to melt into a thin, glassy crust rather than a wet, patchy one.
Constantly Moving Torch
The critical technique — protects both the sugar and the sweet potato skin from burning.
Flavor Structure Explained
This Japanese sweet potato crème brûlée follows a layered balance model:
- Natural, aromatic vessel (roasted, hollowed purple sweet potato shell)
- Smooth, creamy centre (strained sweet potato custard)
- Deep, roasted depth (fully roasted sweet potato flesh)
- Rich, buttery body (cream, milk, butter, egg yolks)
- Sharp, crackly finish (torched sugar crust)
A roasted, hollowed purple sweet potato shell provides this dessert’s own natural, aromatic vessel, chosen specifically for its dense, sweet, creamy character. A strained sweet potato custard fills that shell with a smooth, genuinely creamy centre. Fully roasted sweet potato flesh contributes deep, real roasted depth throughout. Cream, milk, butter, and egg yolks build a rich, buttery custard body. A final, thin, torched sugar crust finishes the dessert with a sharp, crackly contrast that ties this striking, purple-skinned dessert together.
Common Mistakes to Avoid
- Pulling the Sweet Potatoes Before They’re Fully Soft – This leaves the custard grainy once blended. Always roast until genuinely tender all the way through.
- Scraping the Shells Too Thin – This risks the shells collapsing or tearing once filled and chilled. Always leave 8 to 10mm of flesh attached to the skin.
- Skipping the Straining Step – This leaves residual fibrous texture in the finished custard. Always pass the mixture through a fine sieve.
- Overbaking the Custard – This makes it firm like baked sweet potato mash rather than creamy and spoonable. Always pull it while a genuine wobble remains.
- Torching Sugar Over a Wet or Condensation-Covered Surface – This turns the brûlée wet and patchy rather than thin and glassy. Always blot the surface dry first.
Variations
Warmer-Served Version
Serve slightly warmer than fridge-cold, per the recipe’s own note, for a creamier centre, accepting a slightly less crisp crack than the fully chilled version provides.
Extra-Vanilla Version
Increase the vanilla extract slightly in the custard base for a more pronounced, warm aromatic note throughout the finished dessert.
Make-Ahead Version
Bake and chill the filled sweet potato halves up to overnight, per the recipe’s own guidance, adding the sugar and torching only right before serving.
Thinner Brûlée Version
Use a genuinely light hand with the sugar layer, per the recipe’s own explicit warning against too much sugar, for the thinnest, easiest-to-crack crust possible.
Storage & Make-Ahead
Japanese sweet potatoes are genuinely ideal for this recipe because they’re dense, sweet, creamy, and have the distinctive purple-burgundy skin this dish is specifically built around visually.
Do not skip the straining step for the custard base, since roasted sweet potato can stay fibrous even after thorough blending, and straining is what gives this dessert its genuinely clean, refined crème brûlée texture.
This custard is moderately sweet by design, since Japanese sweet potatoes already carry considerable natural sweetness of their own, so resist the urge to add significantly more sugar than the recipe specifies.
Torch the sugar topping only right before serving, since the caramel genuinely softens if refrigerated afterward, and keep the flame moving in small circles throughout, since staying too long in one spot burns the sugar and can scorch the potato skin beneath.
If the custard cracks once baked, it was likely baked too hot or too long, so use lower heat next time and pull it while the center still wobbles slightly; this dessert can be served chilled for a cleaner crack or slightly warmer for a creamier center.
Frequently Asked Questions
Why do the sweet potatoes need to be roasted until completely, genuinely soft?
Any remaining firmness at the centre carries directly through into the blended custard as an unwanted, grainy texture. Complete tenderness throughout is what lets the flesh actually blend into a genuinely smooth base.
Why does the custard base need to be strained even after thorough blending?
Roasted sweet potato can stay genuinely fibrous even once blended smooth. Straining is what corrects that limitation, delivering the clean, refined texture this dessert’s own crème brûlée character depends on.
Why does the custard’s surface need to be blotted dry before the sugar is added?
Any surface condensation prevents the sugar from properly melting into a thin, glassy crust, causing it to turn wet and patchy instead. Blotting protects the brûlée’s whole intended crisp, glossy finish.
Why does the torch need to stay constantly moving rather than holding in one spot?
Lingering too long in a single area risks both burning the sugar and scorching the delicate sweet potato skin directly beneath it. Constant, gentle movement distributes the heat evenly across the whole surface.
Are there other classic custard-based, roasted sweet potato, or Portuguese pastry dishes worth trying?
Basque Burnt Cheesecake and No-Bake Biscoff Cheesecake both offer other classic rich, baked dessert directions worth exploring. Panna Cotta is also worth trying for a different, elegant chilled custard, and Honey Roasted Sweet Potatoes and Pastéis de Nata offer other satisfying sweet potato and custard-based treats worth exploring.
Nutrition Facts
( Per Serving — 1 filled half )
Calories
~380 kcal
Protein
6 g
Fat
23 g
Carbs
32 g
Calories
~380 kcal
Protein
6 g
Fat
23 g
Carbs
32 g
Related Recipes
Related Recipes

Vietnamese Turmeric Sticky Rice (Xôi Xéo)
Golden turmeric sticky rice topped with soft crumbled mung bean, crispy fried shallots, and glossy scallion oil.
Crispy Potato Galette with Smoked Salmon
Whole Yukon Gold potatoes pressed in butter until deeply golden on both sides — crème fraîche, folded smoked salmon, soaked red onion, capers, and dill. The lox bagel as a crispy potato galette. Gluten-free.
Pork Chile Verde
Browned pork shoulder braised tender in a roasted tomatillo-green chile sauce, thick and glossy with poblano body.


You might also like
You might also like
Karaage — Japanese Fried Chicken
Bite-sized double-fried chicken thigh pieces marinated in soy sauce, sake, ginger and garlic, coated in potato starch for a deeply golden, craggy crust.
Pink Grapefruit Lemonade
Grapefruit and orange peels steeped off heat in syrup — pulp mashed in the pitcher, fresh grapefruit juice, restrained sugar, salt. Bold, bitter-dry, and vibrant.
Tiramisu Iced Latte
Strong espresso and cold milk topped with a soft, flowing mascarpone cream cap and a light cocoa dusting.



Japanese Sweet Potato Crème Brûlée
Ingredients
Method
- Heat the oven to 190°C / 375°F. Scrub the sweet potatoes well and dry them. Rub lightly with neutral oil and a small pinch of salt. Place on a parchment-lined tray. Roast for 50–70 minutes, depending on size, until completely tender when pierced with a skewer. Let cool for 15–20 minutes, just until you can handle them. The potatoes must be fully soft all the way through. If the centers are firm, the custard will be grainy. That genuinely complete tenderness reflects real, thorough starch breakdown throughout the flesh — any remaining firmness at the centre would carry directly into the blended custard as an unwanted, grainy texture.
- Cut each sweet potato in half lengthwise. Carefully scoop out the flesh into a bowl, leaving about 8–10mm of potato attached to the skin so each half keeps its shape. Measure 320g roasted sweet potato flesh for the custard. Reserve any extra for another use. Place the hollowed shells on a tray. If they wobble, nest them in crumpled foil so they sit level. Do not scrape the skins too thin. The shells need structure after filling and chilling. That deliberately preserved thickness of remaining flesh is what gives each shell real, structural integrity — scraped too thin, they’d risk collapsing or tearing under the weight of the custard still to come.
- Blend or mash the 320g roasted sweet potato flesh with the softened butter, sugar, salt, vanilla, cream, and milk until smooth. Add the egg yolks and blend again briefly until fully combined. For the smoothest texture, pass the mixture through a fine sieve. The custard should be thick, smooth, and pourable, like loose pastry cream. If it is stiff, add 1–2 tbsp more cream. That final straining step is what actually removes any residual fibrous texture the roasted sweet potato commonly retains even after thorough blending — a step blending alone genuinely can’t fully accomplish.
- Lower the oven to 150°C / 300°F. Divide the custard evenly between the 4 sweet potato halves, filling each almost to the top. Smooth the surface gently with the back of a spoon. The shells need to sit level before baking. If they tilt, the custard will set unevenly and the brûlée layer will be harder to torch cleanly. That level, stable positioning protects the custard’s own surface from setting unevenly, which would directly complicate torching a genuinely thin, even brûlée layer later.
- Bake for 18–25 minutes, until the custard is just set. It should look matte around the edges and still have a slight wobble in the center when gently moved. Remove from the oven and cool to room temperature, then refrigerate for at least 3–4 hours, preferably overnight. Do not overbake. The custard should stay creamy and spoonable, not firm like a baked sweet potato mash. That specific wobble-check, rather than waiting for full visual firmness, accounts for real, continued carryover setting the custard undergoes as it cools — pulling it too late would leave it firm and dense rather than genuinely creamy and spoonable.
- Before torching, lightly blot the surface of each custard with paper towel if there is any condensation. Sprinkle each half with a thin, even layer of caster sugar. Condensation ruins the brûlée. The sugar needs a dry surface to melt into a thin glassy crust instead of turning wet and patchy. That deliberate blotting step removes real, residual moisture the chilled custard’s own surface would otherwise carry, protecting the sugar’s ability to melt into a genuinely thin, glassy crust rather than a wet, uneven one.
- Use a kitchen torch to caramelize the sugar until amber-brown and glossy, with a few darker mahogany spots. Let sit for 1 minute so the caramel hardens. Serve immediately. The caramel should be thin and crisp enough to crack with a spoon. If the sugar layer is too thick, it becomes hard and bitter. That specific, checkable target — thin enough to genuinely crack with a spoon — protects against a heavier sugar layer, which would harden into something considerably tougher and more bitter than this dessert’s own delicate crust is meant to be.