Easy Breakfast Shakshuka
Butter rather than olive oil — the specific choice that gives this shakshuka a richer, more rounded base than the North African original while keeping it firmly in the weekday breakfast territory where quick, comforting, and skillet-to-table matters more than strict tradition. Spices pushed to the bare pan surface for 20–30 seconds before being stirred back into the vegetables — the dry-toast step that releases their aromatic compounds directly into the cooking fat rather than simply dissolving them into the tomato sauce. Crushed tomatoes simmered for 5–7 minutes until visibly thickened. Eggs nested in shallow wells with a spoonful of hot sauce beneath each to warm the base before the yolk settles in, then the whole skillet transferred to a 190°C oven for 8–12 minutes depending on preferred yolk doneness. Feta crumbled directly from the oven, cilantro scattered over. Eaten from the skillet. Under 30 minutes including the oven time.

Prep Time : 10 min
Cook Time : 20 min
Servings : 2
10 min
20 min
2
Ingredients
For the Shakshuka
• 60g unsalted butter — this one on Amazon
• 1 red bell pepper, diced
• 1 sweet onion, thinly sliced
• 4 garlic cloves, finely chopped
• 1 tsp ground cumin — this one on Amazon
• 1 tsp sweet paprika
• Small pinch of chili flakes — optional, for additional heat
• 425g crushed tomatoes — one standard 15oz can
• 6 large eggs
• 60g feta cheese, crumbled
• Fresh cilantro, for garnish
• Kosher salt and freshly ground black pepper, to taste
• Bread, for serving — optional
This post may contain affiliate links. As an Amazon Associate I earn from qualifying purchases, at no additional cost to you.
Directions
- Preheat the Oven and Sauté the Vegetables
Preheat the oven to 190°C. An oven-safe skillet — cast iron is the specific recommendation, for its ability to maintain even heat across the base during stovetop cooking and transfer seamlessly to the oven without temperature shock — should be heating on the stovetop simultaneously so it is ready for the vegetables without delay. Melt the 60g of unsalted butter in the skillet over medium heat. Butter is the specific fat choice in this recipe rather than the olive oil of a more traditional shakshuka — butter’s milk solids and lower smoke point produce a richer, more rounded, slightly sweet base flavour that works specifically well with the sweet paprika and cumin, and its richness contributes to the finished skillet’s satisfying, cosy character. Allow it to foam and settle before adding the vegetables. Add the diced red bell pepper and thinly sliced sweet onion. Cook for 4–5 minutes, stirring occasionally, until both have softened and the onion has turned translucent with slightly golden edges. The onion’s natural sugars begin caramelising during this period alongside the butter’s milk solids — producing a sweet, slightly browned aromatic base. Add the 4 finely chopped garlic cloves and continue cooking for a further 1 minute until fragrant. Season with kosher salt and black pepper. - Dry-Toast the Spices
Push the softened vegetables to one side of the skillet — creating a small cleared space on the bare pan surface. Add the 1 tsp of cumin, 1 tsp of sweet paprika, and the optional pinch of chili flakes directly onto the exposed hot pan surface rather than onto the vegetables. Leave for 20–30 seconds without stirring. The direct contact between the ground spices and the hot butter-coated surface allows the spices’ aromatic volatile compounds to bloom — releasing their essential oils into the surrounding fat at higher intensity than if they were simply stirred into the vegetable mixture. At 20–30 seconds the spices will be visibly fragrant and slightly darkened at their edges; beyond 30 seconds they risk burning. Stir immediately back into the vegetables, folding the spice-infused butter through the entire skillet. - Build and Reduce the Tomato Base
Pour in the 425g of crushed tomatoes and stir to combine everything thoroughly — the tomatoes incorporating the spice-infused butter and the caramelised vegetable base into a unified sauce. Bring to a simmer over medium heat. Simmer uncovered for 5–7 minutes, stirring occasionally. During this time the sauce visibly thickens as its excess water evaporates — reducing to a concentration where the tomato flavour is more intense and the sauce is thick enough to hold an egg in place without the white spreading too widely. The sauce is ready when it has reduced to a consistency that coats the back of a spoon rather than running freely, and the individual tomato pieces have broken down into the sauce. Taste and adjust with additional salt and pepper — the tomato base should be well-seasoned before the eggs are added, as the eggs will draw their seasoning entirely from the sauce beneath and around them. - Nest the Eggs
Reduce the heat to low. Using the back of a large spoon, create 6 shallow wells in the tomato sauce — pressing down gently to form a depression wide enough to contain an egg. Before adding each egg, spoon a small amount of hot sauce into each well — this warms the base of the depression so the egg white begins setting from the bottom as soon as it is cracked in, rather than sitting in cool sauce that delays bottom-setting while the oven heats the top. Crack one egg carefully into each warm well, ensuring the yolk remains intact and centred in its depression. - Bake to Preferred Doneness
Transfer the skillet to the preheated 190°C oven immediately. Bake for 8–12 minutes depending on yolk preference — the oven’s surrounding heat cooks the eggs from all sides simultaneously, producing the specific gently set white and warm yolk that stovetop-only shakshuka struggles to achieve evenly. Check at 7–8 minutes for runny yolks — the whites should be just set with no visible translucency, and the yolk surface should have a thin, opaque skin from the oven’s dry heat while remaining completely liquid when pressed gently. At 10–12 minutes the yolks are softly set throughout — firm enough to break rather than pour when pierced. The eggs continue cooking from residual skillet heat after removal from the oven; always pull 1 minute earlier than the target doneness. - Finish and Serve
Remove the skillet from the oven. Immediately crumble the 60g of feta cheese evenly across the entire surface — the skillet’s residual heat softens the feta slightly, warming it without melting it, so it retains its specific crumbly, slightly briny character. Scatter the fresh cilantro generously over the surface. Bring the skillet directly to the table and serve immediately — shakshuka held for more than 2–3 minutes continues cooking from the cast iron’s retained heat and the yolks progress beyond the intended doneness. Serve with bread for dipping alongside.
*Notes :
- The dry-toasting of spices directly on the hot pan surface before stirring into the vegetables is the specific technique that makes the finished sauce taste more aromatic than a version where the spices are simply added to the wet vegetable mixture. Ground spices contain their aromatic essential oils in a form that blooms — becomes more volatile and therefore more aromatic — when the oil is heated directly. In a wet environment the temperature around the spice particles never reaches the dry heat level at which this blooming is optimal. The 20–30 second dry toast achieves temperatures at the pan surface that release the volatile aromatics directly into the cooking fat, which then carries them through the entire dish.
- Shakshuka’s doneness window is the most time-sensitive element of the recipe and varies significantly between ovens and skillets. Cast iron’s high heat retention produces faster egg cooking from below than a stainless skillet. A convection oven cooks the eggs from above faster than a conventional oven. Always check at 7 minutes regardless of the recipe’s stated time — the difference between a perfectly runny yolk and a fully set yolk can be under 90 seconds in a well-heated cast iron in a hot oven.
Why This Recipe Works
This recipe works because it applies the dry-toast technique to the spices for maximum aromatic release, reduces the tomato base to a sufficient thickness before the eggs are added so they nest and hold rather than spreading, and uses the oven rather than the stovetop for finishing the eggs — the surrounding oven heat producing the evenly set white that stovetop heat-from-below cannot achieve without overcooking the base. The butter’s richness connects all components under a common, rounded flavour note that makes this shakshuka taste specifically more indulgent than olive oil versions.
Ingredient Breakdown
Unsalted Butter (Rather Than Olive Oil)
The flavour decision — butter’s milk solid richness and rounded sweetness produce a specifically more indulgent, more breakfast-oriented base than olive oil’s fruitier, more assertive character.
Dry-Toasted Spices (Direct Pan Contact, 20–30 Seconds)
The aromatic technique — direct dry heat releases the volatile essential oils in ground cumin and paprika more completely than wet-environment heating.
Crushed Tomatoes (Simmered 5–7 Minutes)
The base reduction — excess moisture evaporating concentrates the tomato flavour and produces the consistency thick enough to hold six eggs in distinct wells.
Warm Sauce in Each Well Before the Egg
The base-warming technique — the pre-warmed well starts the egg white setting from the bottom immediately rather than sitting in cool sauce during the early oven phase.
Oven Finishing (190°C, 8–12 Minutes)
The egg-cooking technique — surrounding heat from all sides produces evenly set whites that stovetop heat-from-below cannot achieve without burning the base.
Feta Added After the Oven
The finishing element — crumbled while still residually hot, the feta warms and slightly softens while retaining its briny, crumbly character.
Flavor Structure Explained
This shakshuka follows a layered balance model:
- Warm spiced tomato core (cumin, paprika, tomatoes)
- Rich comforting layer (butter, egg yolks)
- Bright acidic balance (reduced tomatoes)
- Sharp briny finish (feta)
- Fresh herbal lift (cilantro)
The tomato base defines the structure with cumin’s earthy warmth and paprika’s mild sweetness bloomed into butter for deep aromatic flavor. Butter and runny egg yolks create the rich, comforting layer that gives shakshuka its satisfying body. Tomato acidity cuts through that richness, keeping the dish vivid and balanced rather than heavy. Feta adds sharp salinity and briny contrast that intensify the surrounding flavors. Cilantro finishes with fresh herbal brightness that lifts the entire skillet and completes the composition.
Common Mistakes to Avoid
- Not Dry-Toasting the Spices – Spices stirred directly into the wet vegetable mixture without direct pan contact produce a noticeably less aromatic sauce. The 20–30 seconds on the bare surface is the step most often skipped and most noticeably missed.
- Not Reducing the Tomato Base Sufficiently – A thin, watery base allows the egg whites to spread uncontrollably rather than setting in distinct pools. Always simmer until the sauce coats the back of a spoon before adding eggs.
- Not Pre-Warming the Wells – Eggs cracked into cold sauce wells take longer to set from the base, resulting in overcooked tops before the whites have fully set at the bottom.
- Pulling from the Oven Too Late – The eggs continue cooking from the skillet’s retained heat after removal. Always pull 1 minute before the target doneness.
- Burning the Dry-Toasted Spices – Beyond 30 seconds without stirring the spices will begin to burn and produce a bitter, acrid flavour. Always stir back into the vegetables immediately at the 20–30 second mark.
- Serving from a Cold Plate – The shakshuka is specifically designed to be served from the skillet — which maintains the sauce’s warmth and continues the gentle finishing of the eggs through the meal.
Variations
With Harissa
Add 1–2 tbsp of harissa paste to the tomato base alongside or instead of the chili flakes — its fermented, deeply spiced, North African chili character amplifies the shakshuka’s heat and complexity significantly, shifting it toward the more assertively spiced Tunisian tradition.
With Tomato Paste
Stir 1–2 tbsp of tomato paste into the spice step alongside the dry-toasted cumin and paprika — it cooks briefly in the butter-spice fat, caramelising slightly and adding a concentrated, roasted tomato depth that enriches the sauce beyond crushed tomatoes alone.
With Chili Oil at Serving
A drizzle of good chili oil over each finished bowl provides a bright, sharp, oil-carried heat that contrasts specifically with the feta’s brininess and the egg yolk’s richness.
With Labneh Instead of Feta
Substitute 60g of thick Authentic Labneh in place of crumbled feta — the labneh’s tangy, creamy character pools into the warm sauce and provides a different dairy register that is more melting and smooth against the tomato.
Storage & Make-Ahead
The shakshuka tomato base, without the eggs, can be made up to 3 days in advance and refrigerated. When ready to serve, reheat it in the skillet until it reaches a full simmer, adjust the seasoning if needed, and then continue with the step where the eggs are added.
Fully assembled shakshuka is not suitable for storage, since the eggs continue to cook from the residual heat even after the dish is removed from the oven. For the best result, always cook the eggs fresh just before serving.
Frequently Asked Questions
What bread should I serve with shakshuka?
Shakshuka is specifically best with bread that can hold up to the sauce’s weight and absorb it without disintegrating — you want a crust that shatters on the surface and a crumb with open structure that soaks up the tomato sauce. The best options from this site: a thick slice of Sourdough Bread with its open crumb, slight tang, and firm crust; a Ciabatta Roll or Semi-Baguette with the irregular, airy crumb structure that soaks sauce beautifully; or a torn piece of Classic French Baguette for the crust-to-crumb ratio that makes each dipped bite specifically satisfying.
Why butter instead of olive oil?
Butter’s milk solids provide a rounded, slightly sweet richness that works specifically well with sweet paprika and cumin in a breakfast context — producing a more indulgent, more comforting result. Olive oil works well and is more traditionally correct; butter makes this specific version taste more like a weekend breakfast and less like a dinner preparation.
Can I make this entirely on the stovetop without the oven?
Yes — after nesting the eggs, cover the skillet tightly and cook over the lowest possible heat for 6–10 minutes until the whites are set and the yolks are at preferred doneness. The stovetop method produces uneven whites (set around the edges, potentially undercooked at the top surface) compared to the oven’s surrounding heat. If using stovetop only, covering is essential to trap steam that sets the top of the whites.
Why warm the wells before adding the eggs?
An egg cracked into a cold or room-temperature tomato well sits in a heat-neutral environment until the oven reaches the base of the sauce — delaying the bottom-setting of the white and producing an uneven cooking sequence where the top dries before the bottom has set. Pre-warmed wells start the setting process immediately from the bottom when the egg is cracked in.
How do I know when the eggs are done?
Check at 7 minutes: fully set whites with opaque surfaces and yolks that feel completely liquid when the surface is pressed very gently — these are runny yolks. At 10 minutes the yolks are softly set — slightly resistant to pressing but still yielding. At 12 minutes they are fully firm. Always pull the skillet 1 minute before your target doneness as the cast iron continues cooking the eggs after removal.
Nutrition Facts
( Per Serving, without bread )
Calories
~470 kcal
Protein
23 g
Fat
33 g
Carbs
18 g
Calories
~470 kcal
Protein
23 g
Fat
33 g
Carbs
18 g
Related Recipes
Related Recipes

Crispy Hash Brown Potatoes
Golden crispy hash browns pan-fried to perfection—restaurant-quality breakfast potatoes in 35 minutes.
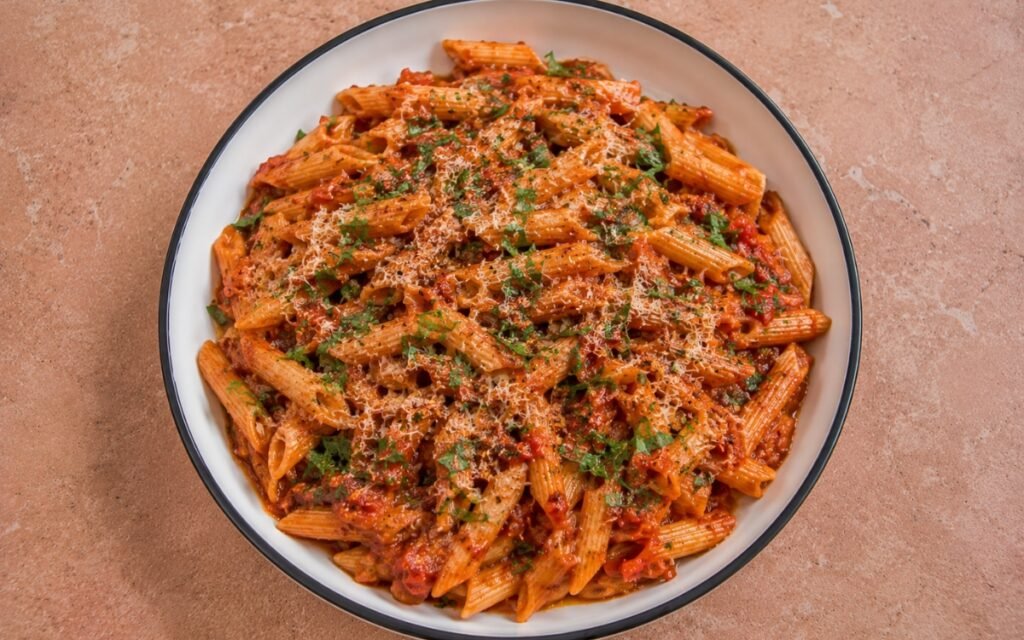
Calabrian Chili Penne Arrabbiata
Calabrian chili paste bloomed in olive oil with pale-golden garlic, hand-crushed tomatoes simmered glossy — penne finished in the sauce, 25 minutes.
Crispy Falafel Plate with Hummus & Pickled Cabbage
Soaked chickpeas blended with parsley, cilantro, garlic, and spices into a coarse falafel mixture — rested, shaped, and fried until crisp and deeply golden. Served with Classic Hummus, pickled red cabbage, and warm pita.


You might also like
You might also like
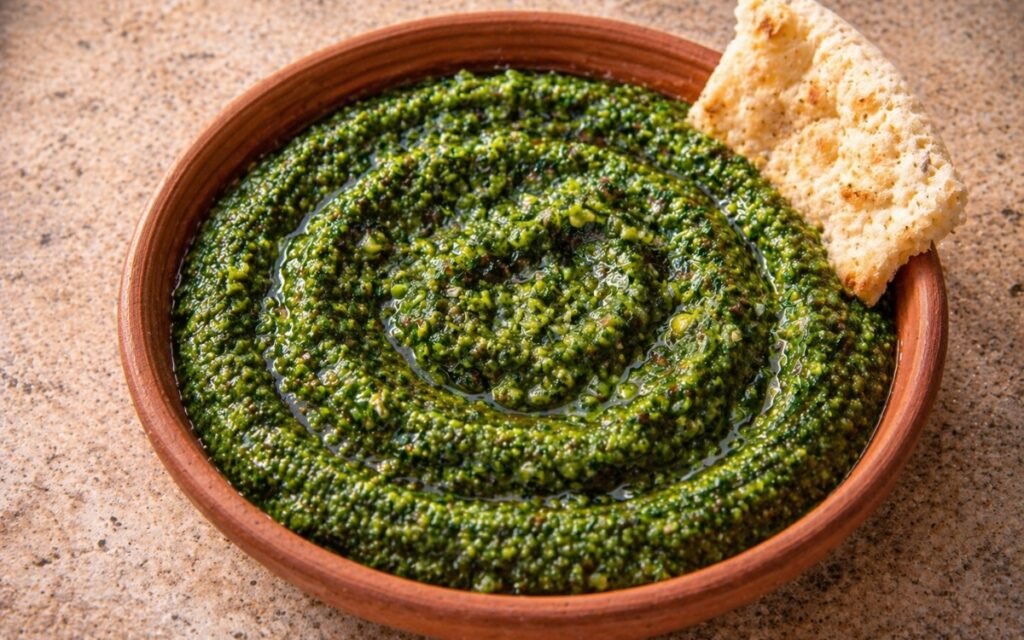
Green Zhoug
Fresh jalapeños, a whole bunch of cilantro, mint, garlic, and lime pulsed into a thick, coarse Yemeni herb sauce — ten minutes, no cooking, and the condiment that improves everything it touches.
Crispy Potato Galette with Smoked Salmon & Crème Fraîche
Whole Yukon Gold potatoes pressed in butter until deeply golden on both sides — crème fraîche, folded smoked salmon, soaked red onion, capers, and dill. The lox bagel as a crispy potato galette. Gluten-free.
Bacon Egg and Cheese Bagels
Cold-pan bacon, eggs scrambled 70% then shaped and seared for structure, melted cheese and cream cheese — rested 3–5 minutes on a toasted bagel. 20 minutes.


Easy Breakfast Shakshuka
Ingredients
Method
- Preheat the oven to 190°C. An oven-safe skillet — cast iron is the specific recommendation, for its ability to maintain even heat across the base during stovetop cooking and transfer seamlessly to the oven without temperature shock — should be heating on the stovetop simultaneously so it is ready for the vegetables without delay. Melt the 60g of unsalted butter in the skillet over medium heat. Butter is the specific fat choice in this recipe rather than the olive oil of a more traditional shakshuka — butter’s milk solids and lower smoke point produce a richer, more rounded, slightly sweet base flavour that works specifically well with the sweet paprika and cumin, and its richness contributes to the finished skillet’s satisfying, cosy character. Allow it to foam and settle before adding the vegetables. Add the diced red bell pepper and thinly sliced sweet onion. Cook for 4–5 minutes, stirring occasionally, until both have softened and the onion has turned translucent with slightly golden edges. The onion’s natural sugars begin caramelising during this period alongside the butter’s milk solids — producing a sweet, slightly browned aromatic base. Add the 4 finely chopped garlic cloves and continue cooking for a further 1 minute until fragrant. Season with kosher salt and black pepper.
- Push the softened vegetables to one side of the skillet — creating a small cleared space on the bare pan surface. Add the 1 tsp of cumin, 1 tsp of sweet paprika, and the optional pinch of chili flakes directly onto the exposed hot pan surface rather than onto the vegetables. Leave for 20–30 seconds without stirring. The direct contact between the ground spices and the hot butter-coated surface allows the spices’ aromatic volatile compounds to bloom — releasing their essential oils into the surrounding fat at higher intensity than if they were simply stirred into the vegetable mixture. At 20–30 seconds the spices will be visibly fragrant and slightly darkened at their edges; beyond 30 seconds they risk burning. Stir immediately back into the vegetables, folding the spice-infused butter through the entire skillet.
- Pour in the 425g of crushed tomatoes and stir to combine everything thoroughly — the tomatoes incorporating the spice-infused butter and the caramelised vegetable base into a unified sauce. Bring to a simmer over medium heat. Simmer uncovered for 5–7 minutes, stirring occasionally. During this time the sauce visibly thickens as its excess water evaporates — reducing to a concentration where the tomato flavour is more intense and the sauce is thick enough to hold an egg in place without the white spreading too widely. The sauce is ready when it has reduced to a consistency that coats the back of a spoon rather than running freely, and the individual tomato pieces have broken down into the sauce. Taste and adjust with additional salt and pepper — the tomato base should be well-seasoned before the eggs are added, as the eggs will draw their seasoning entirely from the sauce beneath and around them.
- Reduce the heat to low. Using the back of a large spoon, create 6 shallow wells in the tomato sauce — pressing down gently to form a depression wide enough to contain an egg. Before adding each egg, spoon a small amount of hot sauce into each well — this warms the base of the depression so the egg white begins setting from the bottom as soon as it is cracked in, rather than sitting in cool sauce that delays bottom-setting while the oven heats the top. Crack one egg carefully into each warm well, ensuring the yolk remains intact and centred in its depression.
- Transfer the skillet to the preheated 190°C oven immediately. Bake for 8–12 minutes depending on yolk preference — the oven’s surrounding heat cooks the eggs from all sides simultaneously, producing the specific gently set white and warm yolk that stovetop-only shakshuka struggles to achieve evenly. Check at 7–8 minutes for runny yolks — the whites should be just set with no visible translucency, and the yolk surface should have a thin, opaque skin from the oven’s dry heat while remaining completely liquid when pressed gently. At 10–12 minutes the yolks are softly set throughout — firm enough to break rather than pour when pierced. The eggs continue cooking from residual skillet heat after removal from the oven; always pull 1 minute earlier than the target doneness.
- Remove the skillet from the oven. Immediately crumble the 60g of feta cheese evenly across the entire surface — the skillet’s residual heat softens the feta slightly, warming it without melting it, so it retains its specific crumbly, slightly briny character. Scatter the fresh cilantro generously over the surface. Bring the skillet directly to the table and serve immediately — shakshuka held for more than 2–3 minutes continues cooking from the cast iron’s retained heat and the yolks progress beyond the intended doneness. Serve with bread for dipping alongside.