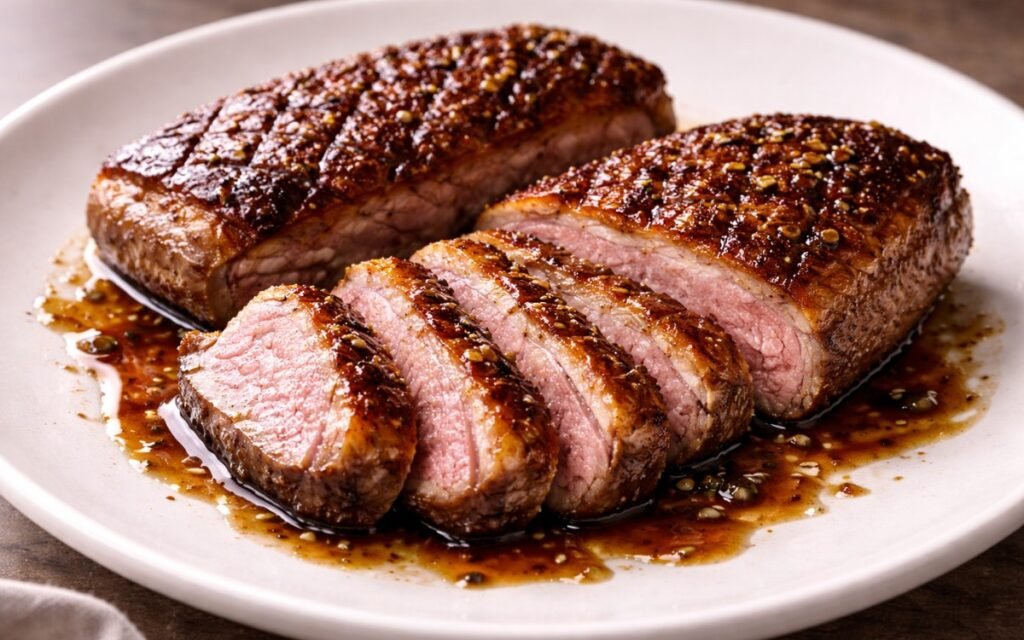
Crispy Pan-Seared Duck Breast
Crispy-skinned duck breast with a perfectly rendered fat layer and tender, rosy interior, finished with a glossy honey-balsamic reduction. This method relies on slow fat rendering and controlled heat rather than aggressive searing — transforming a fatty cut into something structured, crisp, and balanced.
Prep Time : 10 min
Cook Time : 18 min
Servings : 4
10 min
18 min
4
Ingredients
For the Duck
• 800g duck breast (2 large breasts)
• 10g fine sea salt — this one on Amazon
• 5g freshly ground black pepper
• 3g Chinese five-spice powder (optional)
For the Pan Sauce
• 15ml honey — this one on Amazon
• 15ml balsamic vinegar — this one on Amazon
This post may contain affiliate links. As an Amazon Associate I earn from qualifying purchases, at no additional cost to you.
Directions
- Score for Controlled Rendering
Using a sharp knife, score the duck skin in a crosshatch pattern, cutting through the fat layer but not into the meat. The cuts should be evenly spaced about 1cm apart. This step is critical — it creates channels for fat to escape during cooking, preventing the skin from tightening and trapping fat underneath. Without proper scoring, the fat layer remains thick and rubbery instead of crisp. - Season and Temper
Season both sides with salt, pepper, and five-spice if using. Let the duck sit at room temperature for 30 minutes. This reduces the temperature gap between the surface and the center, allowing more even cooking and preventing the exterior from overcooking before the interior reaches target doneness. - Start in a Cold Pan
Place the duck breasts skin-side down in a completely cold, dry pan — no oil. Turn the heat to medium-low and allow the fat to begin rendering gradually. Starting in a cold pan is essential because it allows the fat beneath the skin to melt slowly instead of sealing shut under high heat. - Render Slowly and Control Heat
Cook the duck skin-side down for 12–14 minutes, adjusting heat as needed to maintain a steady, gentle sizzle. During this time, large amounts of fat will render out into the pan — periodically pour off excess fat to prevent shallow frying instead of crisping. Proper rendering transforms the thick fat layer into a thin, crisp structure while keeping the meat insulated and moist. - Increase Heat for Final Crisp
Once most of the fat has rendered and the skin is golden, increase the heat slightly to finish crisping. This final stage develops a deep, evenly browned surface through the Maillard reaction, which creates complex flavor compounds and texture contrast. - Sear the Flesh Side
Flip the duck and cook the flesh side for 3–4 minutes over medium-high heat. This is a quick finishing step — the majority of cooking happens on the skin side. Remove the duck when it reaches approximately 54°C (130°F) for medium-rare, where the texture remains tender and juicy. - Build the Pan Sauce
Remove the duck and let it rest. In the same pan, add honey and balsamic vinegar, swirling to combine with the remaining drippings. The residual heat reduces the mixture quickly into a glossy, lightly thickened sauce that balances sweetness and acidity. - Rest and Slice
Rest the duck for 5 minutes, then slice against the grain into thin pieces. Drizzle with the sauce just before serving. Resting stabilizes the internal juices and prevents them from spilling out when cut.
*Notes :
- Duck breast behaves more like steak than poultry. It has a thick fat layer and benefits from medium-rare cooking rather than full doneness. Overcooking tightens the muscle fibers and eliminates the signature tender texture.
- The defining process here is fat rendering. Duck skin contains a significant amount of subcutaneous fat, and if cooked too quickly, that fat stays trapped beneath the skin, resulting in a rubbery texture. Starting in a cold pan allows gradual melting, turning that fat into both a cooking medium and a flavor component.
- Scoring enhances this process. Without it, the fat has limited pathways to escape, and the skin contracts unevenly. Proper scoring ensures consistent rendering and a flatter, crisp result.
- The cold-pan method is counterintuitive but essential. Unlike most meats that require high heat for searing, seared duck benefits from slow heat first, then finishing heat later. This reverses the typical cooking order and is the key difference between average and professional-level results.
- Rendered duck fat is not waste — it is one of the most valuable cooking fats. It can be stored and used for roasting potatoes, vegetables, or even eggs, adding depth and richness to other dishes.
Why This Recipe Works
This method works because it prioritizes fat rendering before browning. By starting in a cold pan, the fat melts gradually, allowing the skin to crisp evenly instead of sealing prematurely and trapping fat inside.
At the same time, finishing with higher heat ensures proper browning and texture contrast without overcooking the interior. The result is a balanced combination of crisp skin and tender meat — something that cannot be achieved with high heat alone.
Ingredient Breakdown
Duck Breast
High-fat protein where the fat layer must be rendered properly to achieve both texture and flavor.
Salt
Enhances flavor and helps draw out moisture from the skin for better crisping.
Black Pepper
Adds subtle heat and depth.
Five-Spice Powder
Optional aromatic layer adding warmth and complexity.
Honey
Provides sweetness and helps create a glossy, lightly caramelized sauce.
Balsamic Vinegar
Adds acidity and depth, balancing the richness of the duck.
Flavor Structure Explained
This duck breast recipe follows a rich, contrast-driven structure:
- Deep savory base (duck with natural richness and depth)
- Crisp skin layer (rendered fat creating texture and intensity)
- Fat richness (duck fat amplifying mouthfeel and flavor)
- Sweet glaze (honey adding contrast and roundness)
- Acidic balance (balsamic cutting through fat)
- Optional aromatic layer (five-spice adding warmth and complexity)
Duck breast is inherently rich, so balance is critical. The honey adds sweetness, but without balsamic, the dish would feel heavy. The crisp skin provides texture, while the interior remains soft and tender.
Common Mistakes to Avoid
- Starting in a hot pan – Seals the skin and traps fat, preventing proper rendering.
- Not scoring deeply enough – Limits fat release and results in chewy skin.
- Cooking too hot too early – Burns the exterior before fat renders properly.
- Not pouring off excess fat – Causes the duck to fry instead of crisp.
- Overcooking – Turns the meat tough and dry instead of tender.
- Skipping resting – Leads to juice loss and reduced texture quality.
Variations
Orange Sauce Finish
Replace balsamic with orange juice and zest for a classic citrus pairing.
Five-Spice Forward Version
Increase five-spice for a more aromatic, Asian-inspired profile.
Pan-to-Oven Finish
After rendering, finish in the oven for more even internal cooking.
Cherry or Berry Reduction
Use fruit-based sauces to contrast richness with acidity and sweetness.
Herb-Finished Version
Add thyme or rosemary to the pan during finishing for additional aromatics.
Storage & Make-Ahead
Duck is best served fresh. Store leftovers for up to 2 days and reheat gently in a pan to preserve texture. Avoid microwaving — it softens the skin and ruins the structure.
Frequently Asked Questions
Why start duck in a cold pan?
It allows the fat to render slowly instead of sealing under high heat, which is critical for crispy skin.
How do I know when duck is done?
Medium-rare at around 54°C gives the best texture — tender and juicy.
Can I cook duck breasts fully well-done?
You can, but it loses its defining texture and becomes tough.
Why score the skin?
To allow fat to escape and prevent the skin from shrinking unevenly.
What should I serve with this?
For a natural pairing: Classic Mashed Potatoes, Garlic Butter Roasted Potatoes, or Mashed Sweet Potatoes complement crispy duck breast by soaking up its rich juices and balancing the fattiness with their comforting texture. For a more complete plate, Roasted Beet and Citrus Salad or a Light Carrot Lemon Salad add brightness and acidity, cutting through the richness and bringing freshness to the dish.
Nutrition Facts
( per serving )
Calories
~420 kcal
Protein
42 g
Fat
24 g
Carbs
5 g
Calories
~420 kcal
Protein
42 g
Fat
24 g
Carbs
5 g
Related Recipes
Related Recipes

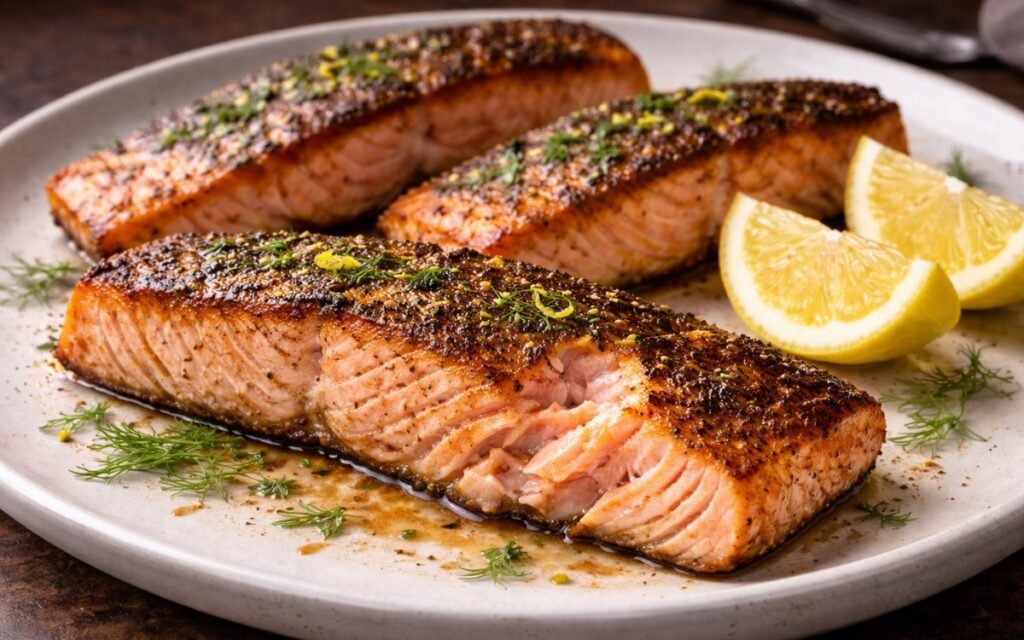
Grilled Salmon Fillets
Crispy-skinned grilled salmon with simple seasonings, perfectly cooked using a no-flip technique.
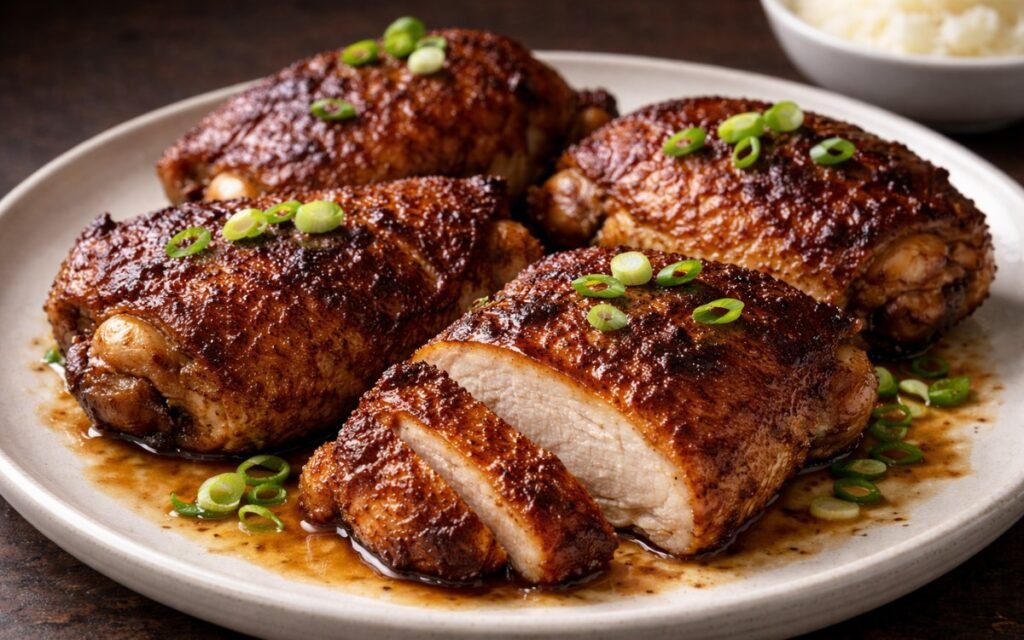
Chinese Five-Spice Chicken Thighs
Crispy-skinned chicken thighs marinated in aromatic five-spice, soy, ginger, and garlic blend.
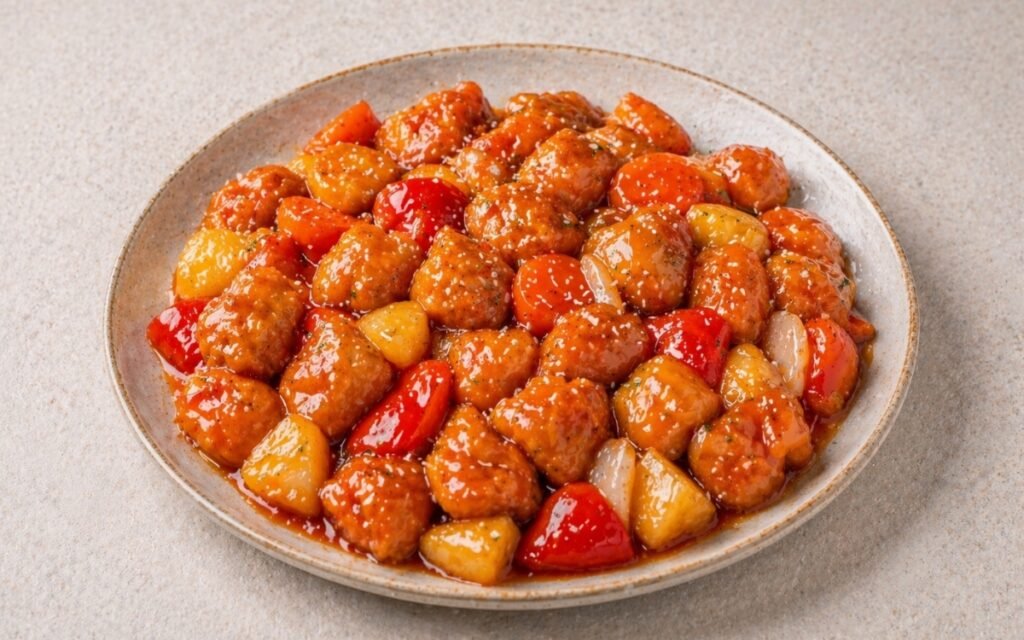
Sweet and Sour Chicken
Double-fried battered chicken thighs with pineapple and vegetables tossed in a glossy tangy-sweet sauce — the restaurant crispiness technique explained for home cooking in 50 minutes.
You might also like
You might also like
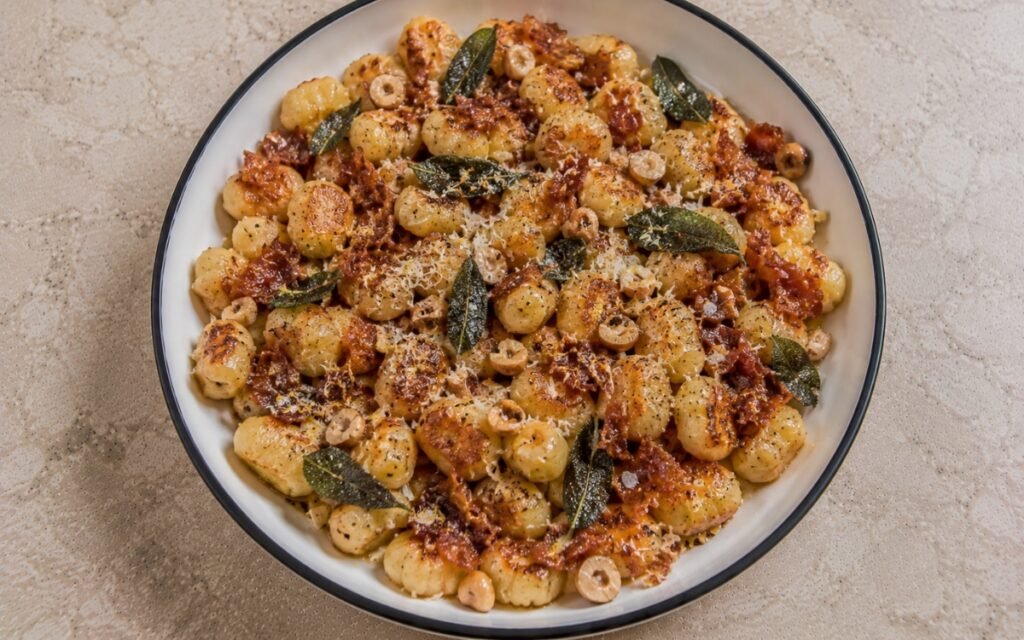
Brown Butter Sage Gnocchi with Crispy Prosciutto
Gnocchi tossed in brown butter with fried sage until golden-edged, emulsified with gnocchi water, finished with crispy prosciutto and Parmigiano — 25 minutes.
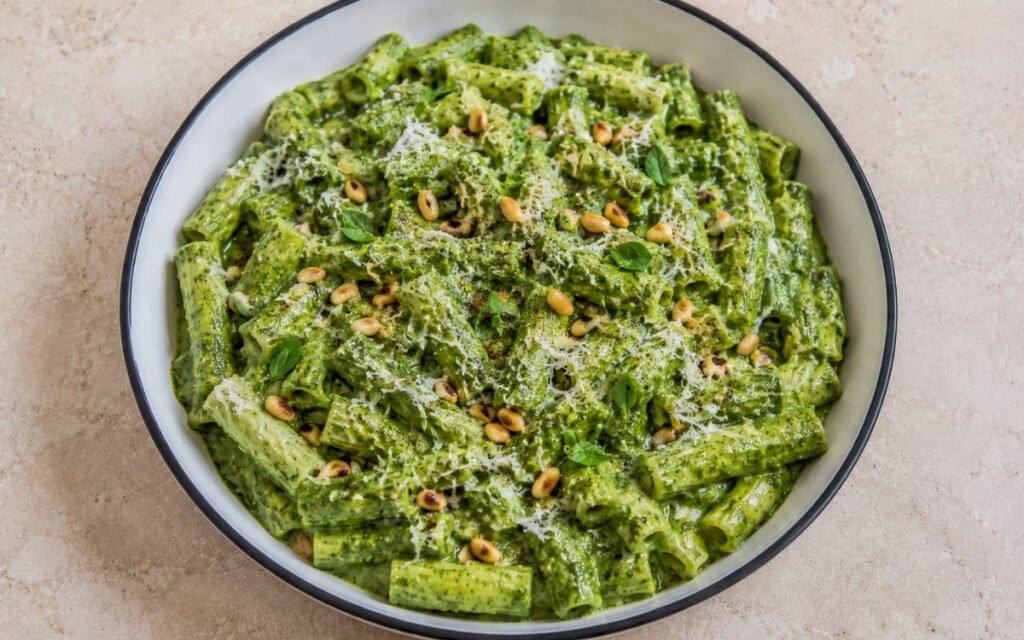
Creamy Spinach & Herb Green Sauce Pasta
Four herbs blended raw with cream cheese and Parmigiano — vivid green, rich, and ready in 35 minutes.
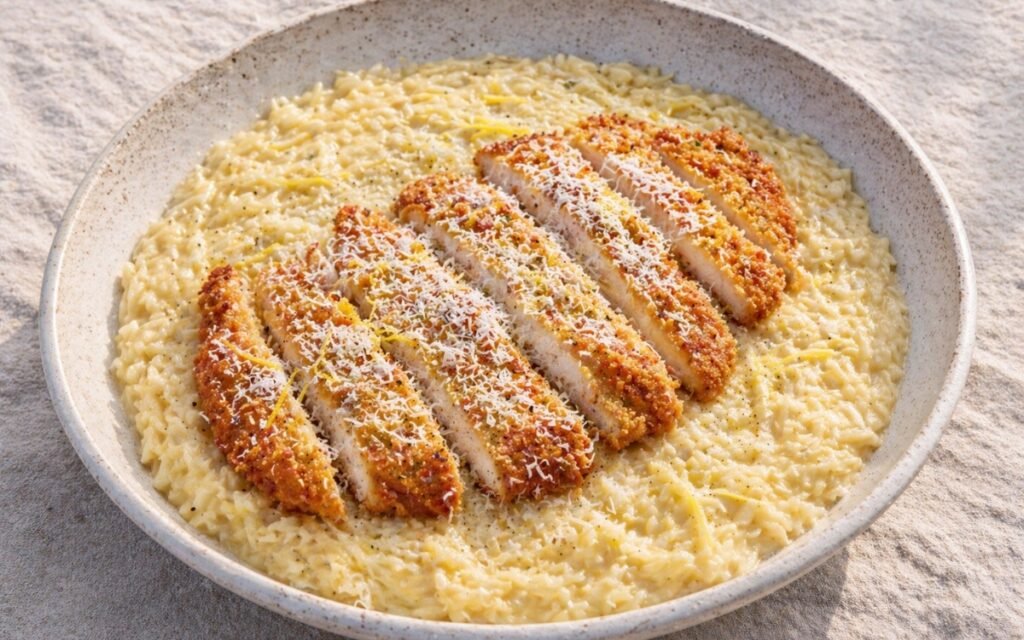
Lemon Chicken Cutlet Orzo
Crispy Parmesan-breaded cutlets sliced over creamy caramelised onion, double lemon, and ricotta orzo — 55 minutes.

Crispy Pan-Seared Duck Breast
Ingredients
Method
- Using a sharp knife, score the duck skin in a crosshatch pattern, cutting through the fat layer but not into the meat. The cuts should be evenly spaced about 1cm apart. This step is critical — it creates channels for fat to escape during cooking, preventing the skin from tightening and trapping fat underneath. Without proper scoring, the fat layer remains thick and rubbery instead of crisp.
- Season both sides with salt, pepper, and five-spice if using. Let the duck sit at room temperature for 30 minutes. This reduces the temperature gap between the surface and the center, allowing more even cooking and preventing the exterior from overcooking before the interior reaches target doneness.
- Place the duck breasts skin-side down in a completely cold, dry pan — no oil. Turn the heat to medium-low and allow the fat to begin rendering gradually. Starting in a cold pan is essential because it allows the fat beneath the skin to melt slowly instead of sealing shut under high heat.
- Cook the duck skin-side down for 12–14 minutes, adjusting heat as needed to maintain a steady, gentle sizzle. During this time, large amounts of fat will render out into the pan — periodically pour off excess fat to prevent shallow frying instead of crisping. Proper rendering transforms the thick fat layer into a thin, crisp structure while keeping the meat insulated and moist.
- Once most of the fat has rendered and the skin is golden, increase the heat slightly to finish crisping. This final stage develops a deep, evenly browned surface through the Maillard reaction, which creates complex flavor compounds and texture contrast.
- Flip the duck and cook the flesh side for 3–4 minutes over medium-high heat. This is a quick finishing step — the majority of cooking happens on the skin side. Remove the duck when it reaches approximately 54°C (130°F) for medium-rare, where the texture remains tender and juicy.
- Remove the duck and let it rest. In the same pan, add honey and balsamic vinegar, swirling to combine with the remaining drippings. The residual heat reduces the mixture quickly into a glossy, lightly thickened sauce that balances sweetness and acidity.
- Rest the duck for 5 minutes, then slice against the grain into thin pieces. Drizzle with the sauce just before serving. Resting stabilizes the internal juices and prevents them from spilling out when cut.