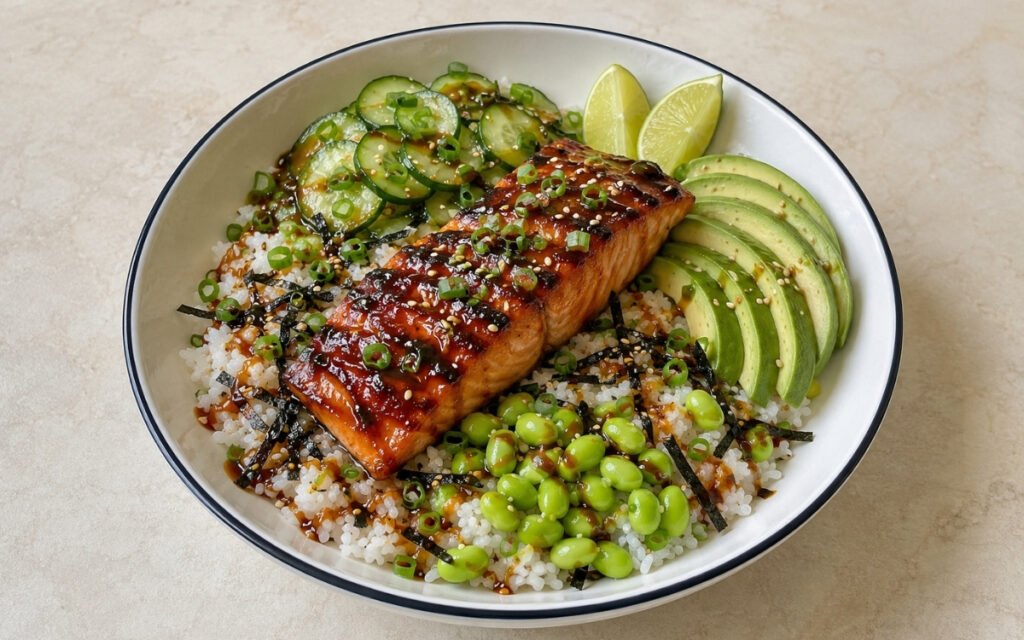
Miso Glazed Salmon Rice Bowl
A miso glaze built from white miso, mirin, sake, soy sauce, honey, ginger, and garlic — whisked before the pan is heated so it is ready to apply the moment the salmon is flipped. The salmon goes in flesh-side down first for a 4-minute sear that builds the initial golden crust, then flips skin-side down and receives the glaze in continuous applications every minute for 3–4 minutes — the honey and mirin’s sugars caramelising progressively against the heat until the glaze is sticky, dark, and aromatic. Pulled at 52°C for the moist, slightly translucent centre that the residual heat finishes to a tender medium. Quick-pickled cucumbers made while the salmon cooks. Sushi rice seasoned with rice vinegar and salt. Avocado, edamame, nori strips, sesame seeds, and scallions completing the bowl. The Japanese-inspired weeknight bowl that reliably impresses.
Prep Time : 15 min
Cook Time : 25 min
Servings : 4
15 min
25 min
4
Ingredients
For the Rice Base
• 300g sushi rice (uncooked)
• 480ml water
• 45ml rice vinegar
• 5g salt
For the Miso Glazed Salmon
• 4 salmon fillets (150g each, skin-on)
• 80g white miso paste — this one on Amazon
• 60ml mirin — this one on Amazon
• 45ml sake — this one on Amazon
• 30ml soy sauce
• 30g honey
• 15g fresh ginger, finely grated
• 3 garlic cloves, approximately 12g, minced
• 20ml toasted sesame oil — this one on Amazon
• Sea salt to taste
For the Bowl Toppings
• 200g frozen shelled edamame
• 200g Persian cucumbers, approximately 2 cucumbers, thinly sliced
• 2 ripe avocados, approximately 300g total, sliced
• 2 sheets nori seaweed, cut into thin strips — this one on Amazon
• 20g toasted sesame seeds
• 60g scallions, approximately 4 stalks, thinly sliced
• 2 limes, cut into wedges
• Pinch of sugar for pickles
This post may contain affiliate links. As an Amazon Associate I earn from qualifying purchases, at no additional cost to you.
Directions
- Cook and Season the Sushi Rice
Rinse the 300g of sushi rice under cold running water 4–6 times until the water is nearly clear — sushi rice’s high surface starch content requires more rinse cycles than regular rice and insufficient rinsing produces a gummy, over-sticky cooked result. Combine the rinsed rice with 480ml of cold water in a medium saucepan. Bring to a full boil, reduce immediately to the lowest possible setting, cover tightly, and simmer for 15 minutes without lifting the lid. Remove from heat and allow to stand covered for 10 minutes — the slightly extended rest compared to other jasmine or basmati preparations allows the sushi rice’s specific starch structure to fully set. Dissolve the 5g of salt into the 45ml of rice vinegar in a small bowl — stirring until completely dissolved before application ensures the seasoning distributes evenly rather than creating concentrated salty pockets. Transfer the cooked rice to a large non-metallic bowl and pour the vinegar mixture evenly over the surface. Fold gently using a rice paddle or flat wooden spoon with cutting-and-folding strokes rather than stirring — the folding motion distributes the vinegar without crushing the starch-swollen grains. Allow the rice to cool to room temperature before serving — properly seasoned sushi rice served at room temperature rather than hot or refrigerator-cold has the specific slightly-tacky, slightly-glossy surface that carries the other bowl components correctly. - Make the Miso Glaze
Before any heat is applied, prepare the glaze completely — it must be ready at the precise moment the salmon is flipped, as the glazing window is too short for concurrent preparation. In a small bowl, whisk together the 80g of white miso paste, 60ml of mirin, 45ml of sake, 30ml of soy sauce, 30g of honey, 15g of finely grated ginger, and 3 minced garlic cloves until completely smooth and uniform — no visible miso lumps remaining, the honey fully dissolved. White miso paste is specified specifically because its shorter fermentation period produces a milder, sweeter, less aggressively salty character than red or mixed miso — in a glaze where the miso’s sugars will caramelise under heat, white miso’s sweetness produces a more harmonious caramelised result than red miso’s stronger, saltier character. Mirin provides the sweet, sticky glaze quality that creates the characteristic lacquered surface. Sake’s fermented grain depth lightens the miso and soy’s potential heaviness. Reserve 60ml of the prepared glaze in a small separate bowl for drizzling at serving — this must be set aside before the glaze contacts the raw salmon to prevent cross-contamination. - Quick-Pickle the Cucumbers
While the rice cooks, prepare the pickled cucumbers. Thinly slice the 200g of Persian cucumbers — approximately 3mm rounds. In a small bowl, toss with a generous splash of rice vinegar and a pinch of sugar, turning to coat all surfaces. Allow to sit at room temperature while the salmon cooks — the 10–15 minute pickle softens the cucumber’s raw sharpness slightly and adds the clean, bright vinegar acidity that provides the specific fresh counterpoint the rich miso-glazed salmon requires. - Sear the Salmon Flesh-Side Down First
Pat each of the 4 salmon fillets completely dry on all surfaces with paper towels — thorough drying is the prerequisite for both the initial sear and the glaze caramelisation. Any surface moisture produces steam on contact with the hot oil, preventing the Maillard browning on the flesh side and causing the glaze to steam rather than caramelise during the skin-side cooking phase. Season each fillet lightly with sea salt on both sides. Heat the 20ml of toasted sesame oil in a large non-stick skillet over medium-high heat until shimmering. The sesame oil’s specific aromatic character — nutty, slightly toasted — infuses the salmon’s surface during searing and provides a background sesame note that complements the miso glaze. Add the salmon fillets flesh-side down — skin facing up. Cook completely undisturbed for 4 minutes. The flesh side requires this undisturbed contact time to develop the initial golden sear that holds the surface together for the flip — premature flipping produces a torn, uneven surface that receives the glaze unevenly. - Glaze and Finish the Salmon
After 4 minutes, carefully flip each fillet so the skin side is now facing down against the pan. Immediately reduce the heat to medium. Brush each fillet generously with the miso glaze — applying it across the entire flesh surface now facing up. Cook for 3–4 minutes total on the skin side, basting with additional glaze every minute throughout. Each successive basting application adds a layer of glaze that partially caramelises from the heat before the next application adds another layer — producing the specific sticky, lacquered, deep golden-brown exterior that defines miso-glazed fish. The honey and mirin’s sugars caramelise progressively with each basting, and the miso’s amino acids contribute to the Maillard-adjacent browning that produces the specific aroma of caramelised miso. The correct finishing temperature is 52°C internal temperature — measured in the thickest part of the fillet. At 52°C the salmon is just cooked through at the exterior while remaining slightly translucent and very moist at the centre. Residual heat after removing from the pan continues cooking the centre to a moist, tender medium result on the plate. Remove from heat immediately when 52°C is reached. - Cook the Edamame
While the salmon rests, bring a small pot of water to a boil. Add the 200g of frozen edamame and cook for 3–4 minutes until fully thawed and just tender throughout. Drain and toss with a pinch of sea salt. The edamame requires no additional flavouring beyond salt — its mild, slightly sweet, fresh soybean character provides a clean, neutral contrast against the intensely flavoured miso salmon. - Assemble and Serve
Divide the room-temperature sushi rice among four wide bowls. Place one glazed salmon fillet on each rice portion — positioning it so the caramelised, lacquered flesh surface is visible from above. Drain the quick-pickled cucumbers and arrange alongside the salmon. Fan the sliced avocado — cut immediately before assembly to prevent oxidation — in its own bowl section. Distribute the edamame. Scatter the nori strips across each bowl — their umami-rich, slightly oceanic character amplifies the miso’s savoury depth. Drizzle the reserved 60ml of miso glaze over the salmon and rice of each bowl — approximately 15ml per bowl. Scatter the 20g of toasted sesame seeds and 60g of sliced scallions. Place lime wedges alongside each bowl for squeezing at the table — the fresh lime’s citrus acidity cuts through the miso glaze’s sweetness and richness, providing the bright finish that makes the bowl feel complete.
*Notes :
- The successive glazing technique — brushing and basting every minute rather than applying all the glaze at once — produces significantly better results than a single-application glaze preparation. Each minute of basting adds a layer of glaze that begins caramelising before the next layer is applied — the result is a built-up, multi-layered lacquer with depth of colour and complexity of flavour rather than a thin, one-dimensional coating. Japanese restaurant-style miso-glazed fish (saikyo yaki) uses this same progressive application principle, and it is the specific technique that produces the characteristic dark, glossy, intensely flavoured surface.
- White miso — shiro miso — ferments for a shorter period (1 week to 3 months) than red or mixed miso, producing a milder, sweeter, less salty paste. In a glaze application where the miso’s natural sugars will undergo caramelisation under direct heat, white miso’s sweetness allows the honey and mirin’s flavours to remain balanced rather than being overwhelmed by fermented saltiness. The combination of white miso, honey, and mirin in this glaze produces a specifically sweet-savoury-umami-rich coating that is one of the most naturally harmonious flavour combinations in Japanese cooking.
Why This Recipe Works
This recipe works because it applies the glaze at the correct moment — after the flesh-side sear has built structural integrity, and progressively during the skin-side cooking phase rather than all at once — producing the multi-layered lacquered surface that a single application cannot achieve.
The flesh-side-first sear builds the initial crust before the delicate glaze is applied, preventing the miso from burning against the pan’s direct heat. The 52°C pull temperature preserves the moist, slightly translucent centre that makes the salmon worth eating rather than simply cooked through.
Ingredient Breakdown
White Miso Paste
The primary glaze ingredient — shorter fermentation produces a milder, sweeter paste that caramelises harmoniously without overwhelming saltiness.
Mirin
The lacquering agent — its natural sugars produce the characteristic sticky, glossy surface during the progressive basting.
Sake
The aromatic depth ingredient — fermented grain complexity that lightens the miso and soy without competing with them.
Progressive Basting (Every Minute)
The technique that builds the multi-layered lacquered surface — each application partially caramelises before the next layer is added.
52°C Internal Temperature
The precise pulling point — just-set exterior, slightly translucent and very moist centre; residual heat finishes it to the correct result.
Quick-Pickled Cucumbers
The acid contrast — rice vinegar’s clean brightness providing the essential counterpoint to the rich miso glaze.
Flavor Structure Explained
This Miso glazed salmon bowl follows a layered balance model:
- Sweet-savory umami core (miso glaze)
- Bright acidic contrast (pickled cucumber, lime)
- Cool creamy richness (avocado)
- Umami aromatic finish (nori, sesame, sesame oil)
- Neutral grounding base (rice)
The miso glaze defines the dominant flavor with caramelised sweetness, soy-driven umami, and aromatic ginger-garlic depth concentrated on the salmon’s surface. Pickled cucumber and lime cut through that richness with sharp acidity, keeping the bowl vivid and balanced. Avocado provides smooth, cooling richness that softens the stronger savory notes. Nori, sesame seeds, and sesame oil layer in toasted umami and aroma that reinforce the Japanese flavor profile. Rice grounds the structure with mild sweetness and neutrality, allowing all other registers to integrate cleanly in every bite.
Common Mistakes to Avoid
- Not Drying the Salmon Thoroughly – Surface moisture prevents the initial flesh-side sear and causes the glaze to steam rather than caramelise. Always pat completely dry.
- Applying the Glaze Before the Flip – Miso glaze applied to the flesh side during the initial sear will burn against the hot pan before the salmon is cooked through. Always apply after the flip.
- Applying All the Glaze at Once – A single thick application produces uneven caramelisation and can burn at the edges while the centre remains raw. Always baste every minute progressively.
- Overcooking Beyond 52°C – The salmon becomes dry and loses its moist, slightly translucent quality. Use a thermometer and pull at the first sign of 52°C.
- Refrigerating the Sushi Rice – Cold temperature hardens sushi rice irreversibly. Always serve at room temperature.
- Not Reserving Glaze Before Raw Salmon Contacts It – The serving glaze must be set aside before the raw fish touches the preparation bowl to prevent cross-contamination.
Variations
With Miso-Glazed Tofu
Replace the salmon with 600g of extra-firm tofu pressed dry and cut into thick slabs — apply the same glaze and basting technique in a non-stick skillet for 3–4 minutes per side. The white miso caramelises identically on tofu.
With Miso-Glazed Chicken Thighs
Replace the salmon with 600g of boneless chicken thighs — marinate in the glaze for 30 minutes before searing flesh-side down for 5–6 minutes per side, basting during the second side. The miso glaze’s flavour profile is specifically well-matched to chicken.
With Miso-Glazed Eggplant
Replace the salmon with 2 medium eggplants halved and scored — brush with miso glaze and roast at 200°C for 25–30 minutes, basting twice during cooking. The eggplant absorbs the glaze deeply into its scored surface.
Spicier Version
Add 5g of gochujang or 3g of togarashi to the miso glaze for a heat element alongside the sweetness — gochujang for a Korean-influenced warmth, togarashi for the specifically Japanese seven-spice character.
Storage & Make-Ahead
Miso glaze can be refrigerated in a sealed jar for up to 3 days and is one of the most versatile make-ahead components in this collection. It works especially well on chicken, tofu, eggplant, and cod throughout the week.
Glazed salmon is best served immediately. It can be refrigerated for up to 2 days and served cold over fresh rice, or reheated very gently in a 150°C oven for about 2 minutes.
Quick-pickled cucumbers can be refrigerated for up to 2 days. During storage, they will continue to pickle, becoming slightly softer and more intensely flavored.
Sushi rice can be kept at room temperature for up to 2 hours if covered with a damp cloth. It should not be refrigerated, since cold storage negatively affects its texture.
Frequently Asked Questions
Why white miso rather than red or mixed?
White miso’s shorter fermentation produces a sweeter, milder, less aggressively salty paste — its natural sugars caramelise harmoniously in a glaze application without producing an overwhelmingly salty result. Red miso would produce a stronger, more intensely fermented character that can overpower the salmon.
Why sear flesh-side down first rather than skin-side?
The flesh side builds the initial structural integrity through searing before the delicate miso glaze is applied — a seared flesh surface holds together cleanly when the glaze is brushed on. Skin-side first would require applying the glaze to unseared flesh that tears easily.
What is mirin and can I substitute it
Mirin is a sweet Japanese rice wine with a syrupy consistency — its natural sugars are concentrated during production, producing the characteristic sticky, lacquering quality in glazes. Substituting with honey and a splash of sake at a 2:1 ratio approximates the sweetness and alcohol content but lacks the specific mirin character.
Why lime at serving rather than in the glaze?
Lime juice added to the glaze during preparation loses its most volatile aromatic compounds under heat and integrates into the sweet-savoury sauce without standing out as citrus brightness. Squeezed at the table, it provides the sharp, vivid citrus counterpoint to the miso’s richness at maximum freshness.
Why sesame oil for searing rather than neutral oil?
The sesame oil’s aromatic compounds infuse the salmon’s surface during searing, contributing a background nutty, toasted note that complements the miso glaze specifically well in this Japanese-inspired preparation.
Nutrition Facts
( per serving )
Calories
~980 kcal
Protein
43 g
Fat
49 g
Carbs
90 g
Calories
~980 kcal
Protein
43 g
Fat
49 g
Carbs
90 g
Related Recipes
Related Recipes

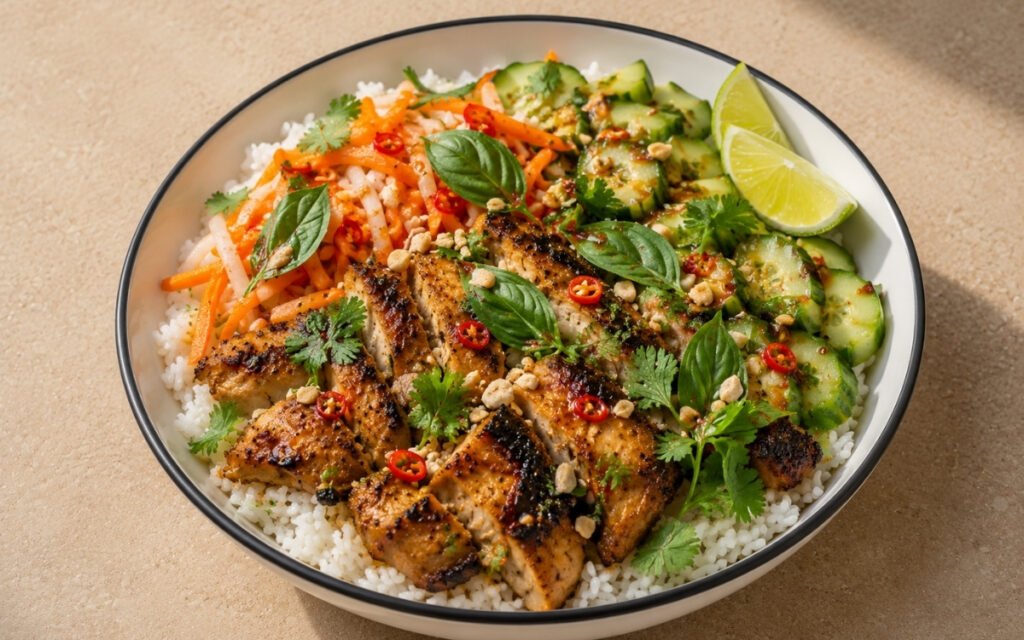
Vietnamese Lemongrass Chicken Rice Bowl
Chicken thighs marinated in finely minced lemongrass, fish sauce, and honey — caramelised golden over jasmine rice with pickled vegetables, three fresh herbs, and nuoc cham. 75 minutes.
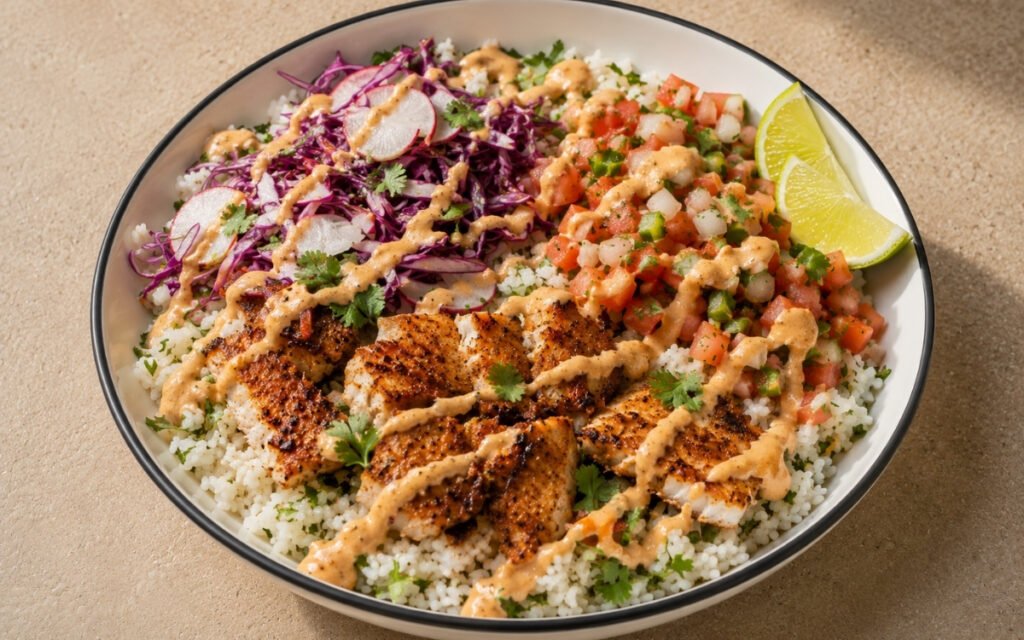
Fish Taco-Style Bowl
White fish seared golden with cumin and smoked paprika — over cilantro-lime rice with chipotle crema, purple cabbage slaw, pico de gallo, and guacamole. 40 minutes.
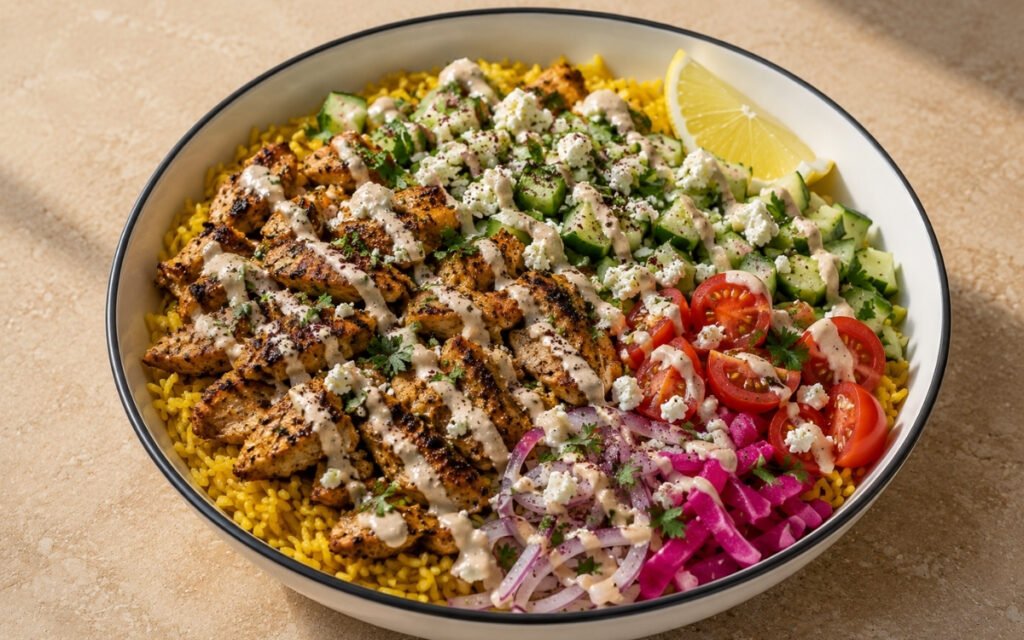
Lebanese Chicken Shawarma Rice Bowl
Chicken thighs marinated in yogurt and seven Lebanese spices, charred undisturbed in cast iron — over turmeric rice with cold-whisked tahini sauce and pickled turnips. 45 minutes.
You might also like
You might also like
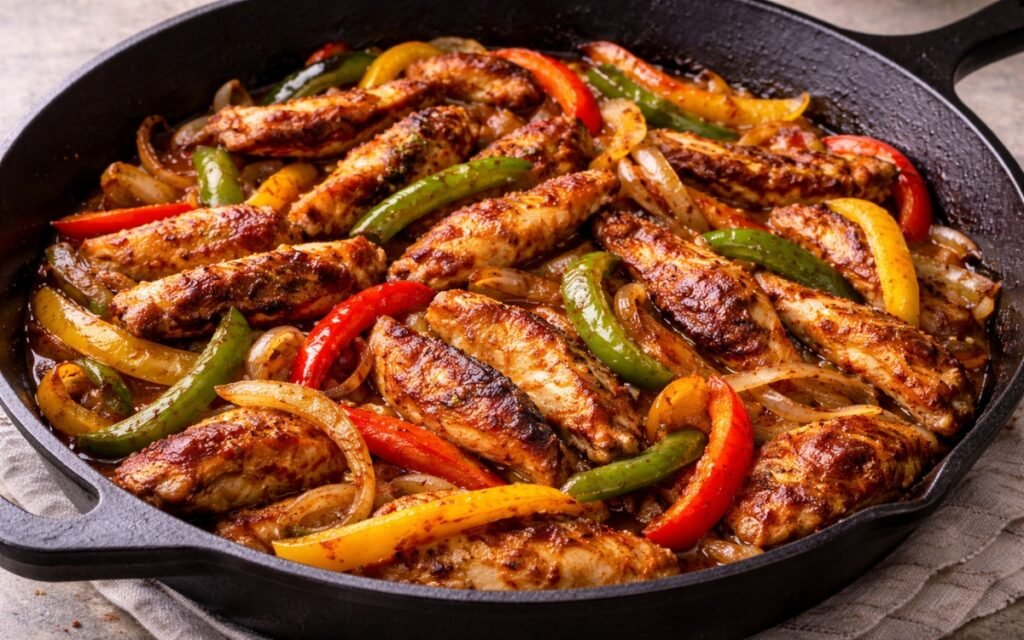
Chicken Fajita
Smoked paprika and cumin-marinated chicken thighs seared in cast iron with charred tri-colour peppers and caramelised onions — the complete Tex-Mex fajita in 35 minutes.
Pan-Seared Chicken Breast (Skin on)
Crispy-skinned, butter-basted chicken breast with golden exterior and perfectly juicy interior.
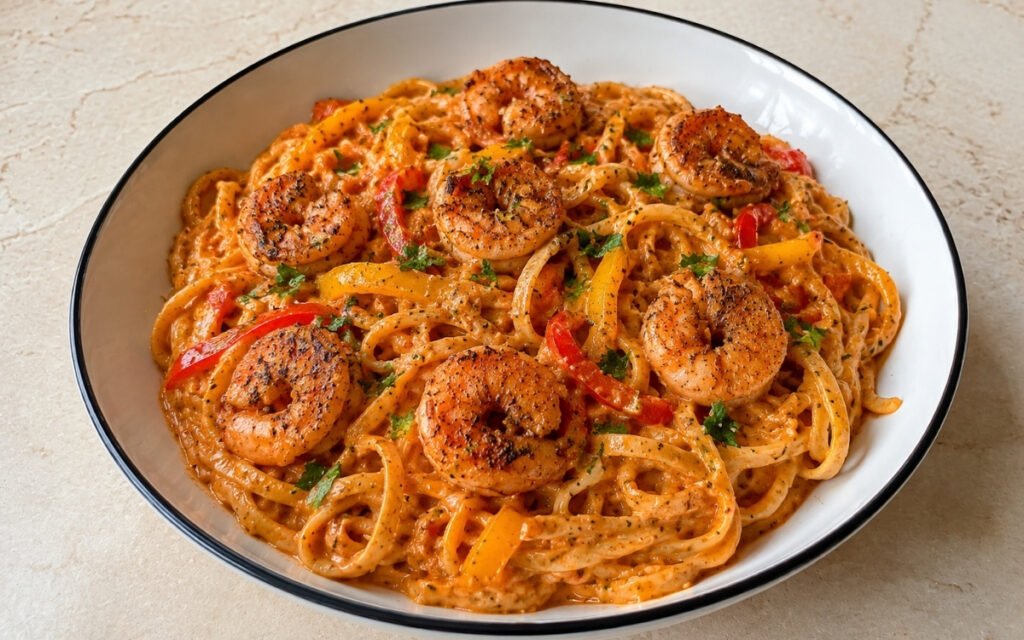
Creamy Cajun Shrimp Pasta
Cajun-seared shrimp and charred peppers in a cream cheese-stabilised Parmesan sauce — bold and spiced in 35 minutes.


Miso Glazed Salmon Rice Bowl
Ingredients
Method
- Rinse the 300g of sushi rice under cold running water 4–6 times until the water is nearly clear — sushi rice’s high surface starch content requires more rinse cycles than regular rice and insufficient rinsing produces a gummy, over-sticky cooked result. Combine the rinsed rice with 480ml of cold water in a medium saucepan. Bring to a full boil, reduce immediately to the lowest possible setting, cover tightly, and simmer for 15 minutes without lifting the lid. Remove from heat and allow to stand covered for 10 minutes — the slightly extended rest compared to other jasmine or basmati preparations allows the sushi rice’s specific starch structure to fully set. Dissolve the 5g of salt into the 45ml of rice vinegar in a small bowl — stirring until completely dissolved before application ensures the seasoning distributes evenly rather than creating concentrated salty pockets. Transfer the cooked rice to a large non-metallic bowl and pour the vinegar mixture evenly over the surface. Fold gently using a rice paddle or flat wooden spoon with cutting-and-folding strokes rather than stirring — the folding motion distributes the vinegar without crushing the starch-swollen grains. Allow the rice to cool to room temperature before serving — properly seasoned sushi rice served at room temperature rather than hot or refrigerator-cold has the specific slightly-tacky, slightly-glossy surface that carries the other bowl components correctly.
- Before any heat is applied, prepare the glaze completely — it must be ready at the precise moment the salmon is flipped, as the glazing window is too short for concurrent preparation. In a small bowl, whisk together the 80g of white miso paste, 60ml of mirin, 45ml of sake, 30ml of soy sauce, 30g of honey, 15g of finely grated ginger, and 3 minced garlic cloves until completely smooth and uniform — no visible miso lumps remaining, the honey fully dissolved. White miso paste is specified specifically because its shorter fermentation period produces a milder, sweeter, less aggressively salty character than red or mixed miso — in a glaze where the miso’s sugars will caramelise under heat, white miso’s sweetness produces a more harmonious caramelised result than red miso’s stronger, saltier character. Mirin provides the sweet, sticky glaze quality that creates the characteristic lacquered surface. Sake’s fermented grain depth lightens the miso and soy’s potential heaviness. Reserve 60ml of the prepared glaze in a small separate bowl for drizzling at serving — this must be set aside before the glaze contacts the raw salmon to prevent cross-contamination.
- While the rice cooks, prepare the pickled cucumbers. Thinly slice the 200g of Persian cucumbers — approximately 3mm rounds. In a small bowl, toss with a generous splash of rice vinegar and a pinch of sugar, turning to coat all surfaces. Allow to sit at room temperature while the salmon cooks — the 10–15 minute pickle softens the cucumber’s raw sharpness slightly and adds the clean, bright vinegar acidity that provides the specific fresh counterpoint the rich miso-glazed salmon requires.
- Pat each of the 4 salmon fillets completely dry on all surfaces with paper towels — thorough drying is the prerequisite for both the initial sear and the glaze caramelisation. Any surface moisture produces steam on contact with the hot oil, preventing the Maillard browning on the flesh side and causing the glaze to steam rather than caramelise during the skin-side cooking phase. Season each fillet lightly with sea salt on both sides. Heat the 20ml of toasted sesame oil in a large non-stick skillet over medium-high heat until shimmering. The sesame oil’s specific aromatic character — nutty, slightly toasted — infuses the salmon’s surface during searing and provides a background sesame note that complements the miso glaze. Add the salmon fillets flesh-side down — skin facing up. Cook completely undisturbed for 4 minutes. The flesh side requires this undisturbed contact time to develop the initial golden sear that holds the surface together for the flip — premature flipping produces a torn, uneven surface that receives the glaze unevenly.
- After 4 minutes, carefully flip each fillet so the skin side is now facing down against the pan. Immediately reduce the heat to medium. Brush each fillet generously with the miso glaze — applying it across the entire flesh surface now facing up. Cook for 3–4 minutes total on the skin side, basting with additional glaze every minute throughout. Each successive basting application adds a layer of glaze that partially caramelises from the heat before the next application adds another layer — producing the specific sticky, lacquered, deep golden-brown exterior that defines miso-glazed fish. The honey and mirin’s sugars caramelise progressively with each basting, and the miso’s amino acids contribute to the Maillard-adjacent browning that produces the specific aroma of caramelised miso. The correct finishing temperature is 52°C internal temperature — measured in the thickest part of the fillet. At 52°C the salmon is just cooked through at the exterior while remaining slightly translucent and very moist at the centre. Residual heat after removing from the pan continues cooking the centre to a moist, tender medium result on the plate. Remove from heat immediately when 52°C is reached.
- While the salmon rests, bring a small pot of water to a boil. Add the 200g of frozen edamame and cook for 3–4 minutes until fully thawed and just tender throughout. Drain and toss with a pinch of sea salt. The edamame requires no additional flavouring beyond salt — its mild, slightly sweet, fresh soybean character provides a clean, neutral contrast against the intensely flavoured miso salmon.
- Divide the room-temperature sushi rice among four wide bowls. Place one glazed salmon fillet on each rice portion — positioning it so the caramelised, lacquered flesh surface is visible from above. Drain the quick-pickled cucumbers and arrange alongside the salmon. Fan the sliced avocado — cut immediately before assembly to prevent oxidation — in its own bowl section. Distribute the edamame. Scatter the nori strips across each bowl — their umami-rich, slightly oceanic character amplifies the miso’s savoury depth. Drizzle the reserved 60ml of miso glaze over the salmon and rice of each bowl — approximately 15ml per bowl. Scatter the 20g of toasted sesame seeds and 60g of sliced scallions. Place lime wedges alongside each bowl for squeezing at the table — the fresh lime’s citrus acidity cuts through the miso glaze’s sweetness and richness, providing the bright finish that makes the bowl feel complete.