Ingredients
Method
Cook and Season the Sushi Rice
- Rinse the 300g of sushi rice under cold running water 4–6 times until the water is nearly clear — sushi rice's high surface starch content requires more rinse cycles than regular rice and insufficient rinsing produces a gummy, over-sticky cooked result. Combine the rinsed rice with 480ml of cold water in a medium saucepan. Bring to a full boil, reduce immediately to the lowest possible setting, cover tightly, and simmer for 15 minutes without lifting the lid. Remove from heat and allow to stand covered for 10 minutes — the slightly extended rest compared to other jasmine or basmati preparations allows the sushi rice's specific starch structure to fully set. Dissolve the 5g of salt into the 45ml of rice vinegar in a small bowl — stirring until completely dissolved before application ensures the seasoning distributes evenly rather than creating concentrated salty pockets. Transfer the cooked rice to a large non-metallic bowl and pour the vinegar mixture evenly over the surface. Fold gently using a rice paddle or flat wooden spoon with cutting-and-folding strokes rather than stirring — the folding motion distributes the vinegar without crushing the starch-swollen grains. Allow the rice to cool to room temperature before serving — properly seasoned sushi rice served at room temperature rather than hot or refrigerator-cold has the specific slightly-tacky, slightly-glossy surface that carries the other bowl components correctly.
Make the Miso Glaze
- Before any heat is applied, prepare the glaze completely — it must be ready at the precise moment the salmon is flipped, as the glazing window is too short for concurrent preparation. In a small bowl, whisk together the 80g of white miso paste, 60ml of mirin, 45ml of sake, 30ml of soy sauce, 30g of honey, 15g of finely grated ginger, and 3 minced garlic cloves until completely smooth and uniform — no visible miso lumps remaining, the honey fully dissolved. White miso paste is specified specifically because its shorter fermentation period produces a milder, sweeter, less aggressively salty character than red or mixed miso — in a glaze where the miso's sugars will caramelise under heat, white miso's sweetness produces a more harmonious caramelised result than red miso's stronger, saltier character. Mirin provides the sweet, sticky glaze quality that creates the characteristic lacquered surface. Sake's fermented grain depth lightens the miso and soy's potential heaviness. Reserve 60ml of the prepared glaze in a small separate bowl for drizzling at serving — this must be set aside before the glaze contacts the raw salmon to prevent cross-contamination.
Quick-Pickle the Cucumbers
- While the rice cooks, prepare the pickled cucumbers. Thinly slice the 200g of Persian cucumbers — approximately 3mm rounds. In a small bowl, toss with a generous splash of rice vinegar and a pinch of sugar, turning to coat all surfaces. Allow to sit at room temperature while the salmon cooks — the 10–15 minute pickle softens the cucumber's raw sharpness slightly and adds the clean, bright vinegar acidity that provides the specific fresh counterpoint the rich miso-glazed salmon requires.
Sear the Salmon Flesh-Side Down First
- Pat each of the 4 salmon fillets completely dry on all surfaces with paper towels — thorough drying is the prerequisite for both the initial sear and the glaze caramelisation. Any surface moisture produces steam on contact with the hot oil, preventing the Maillard browning on the flesh side and causing the glaze to steam rather than caramelise during the skin-side cooking phase. Season each fillet lightly with sea salt on both sides. Heat the 20ml of toasted sesame oil in a large non-stick skillet over medium-high heat until shimmering. The sesame oil's specific aromatic character — nutty, slightly toasted — infuses the salmon's surface during searing and provides a background sesame note that complements the miso glaze. Add the salmon fillets flesh-side down — skin facing up. Cook completely undisturbed for 4 minutes. The flesh side requires this undisturbed contact time to develop the initial golden sear that holds the surface together for the flip — premature flipping produces a torn, uneven surface that receives the glaze unevenly.
Glaze and Finish the Salmon
- After 4 minutes, carefully flip each fillet so the skin side is now facing down against the pan. Immediately reduce the heat to medium. Brush each fillet generously with the miso glaze — applying it across the entire flesh surface now facing up. Cook for 3–4 minutes total on the skin side, basting with additional glaze every minute throughout. Each successive basting application adds a layer of glaze that partially caramelises from the heat before the next application adds another layer — producing the specific sticky, lacquered, deep golden-brown exterior that defines miso-glazed fish. The honey and mirin's sugars caramelise progressively with each basting, and the miso's amino acids contribute to the Maillard-adjacent browning that produces the specific aroma of caramelised miso. The correct finishing temperature is 52°C internal temperature — measured in the thickest part of the fillet. At 52°C the salmon is just cooked through at the exterior while remaining slightly translucent and very moist at the centre. Residual heat after removing from the pan continues cooking the centre to a moist, tender medium result on the plate. Remove from heat immediately when 52°C is reached.
Cook the Edamame
- While the salmon rests, bring a small pot of water to a boil. Add the 200g of frozen edamame and cook for 3–4 minutes until fully thawed and just tender throughout. Drain and toss with a pinch of sea salt. The edamame requires no additional flavouring beyond salt — its mild, slightly sweet, fresh soybean character provides a clean, neutral contrast against the intensely flavoured miso salmon.
Assemble and Serve
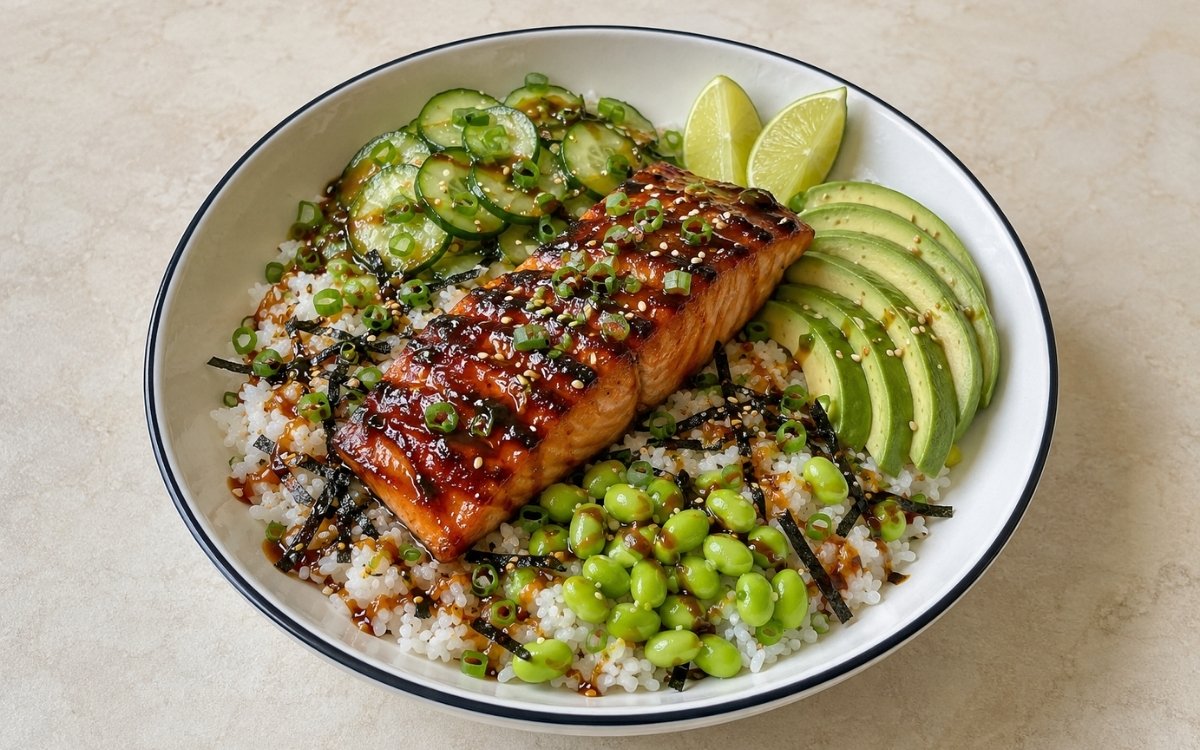
- Divide the room-temperature sushi rice among four wide bowls. Place one glazed salmon fillet on each rice portion — positioning it so the caramelised, lacquered flesh surface is visible from above. Drain the quick-pickled cucumbers and arrange alongside the salmon. Fan the sliced avocado — cut immediately before assembly to prevent oxidation — in its own bowl section. Distribute the edamame. Scatter the nori strips across each bowl — their umami-rich, slightly oceanic character amplifies the miso's savoury depth. Drizzle the reserved 60ml of miso glaze over the salmon and rice of each bowl — approximately 15ml per bowl. Scatter the 20g of toasted sesame seeds and 60g of sliced scallions. Place lime wedges alongside each bowl for squeezing at the table — the fresh lime's citrus acidity cuts through the miso glaze's sweetness and richness, providing the bright finish that makes the bowl feel complete.
Notes
The successive glazing technique — brushing and basting every minute rather than applying all the glaze at once — produces significantly better results than a single-application glaze preparation. Each minute of basting adds a layer of glaze that begins caramelising before the next layer is applied — the result is a built-up, multi-layered lacquer with depth of colour and complexity of flavour rather than a thin, one-dimensional coating. Japanese restaurant-style miso-glazed fish (saikyo yaki) uses this same progressive application principle, and it is the specific technique that produces the characteristic dark, glossy, intensely flavoured surface.
White miso — shiro miso — ferments for a shorter period (1 week to 3 months) than red or mixed miso, producing a milder, sweeter, less salty paste. In a glaze application where the miso's natural sugars will undergo caramelisation under direct heat, white miso's sweetness allows the honey and mirin's flavours to remain balanced rather than being overwhelmed by fermented saltiness. The combination of white miso, honey, and mirin in this glaze produces a specifically sweet-savoury-umami-rich coating that is one of the most naturally harmonious flavour combinations in Japanese cooking.