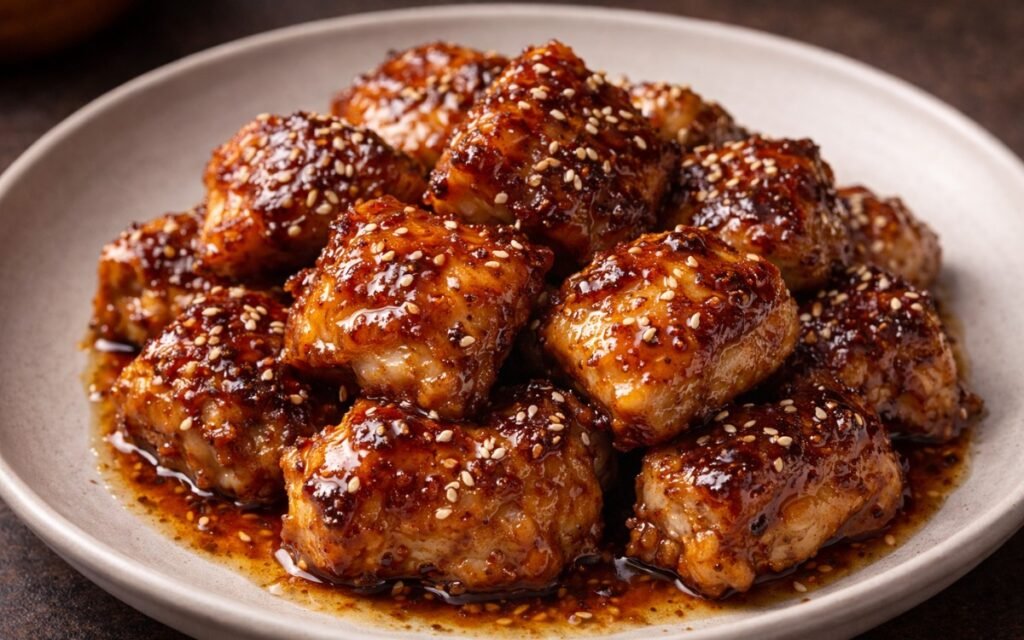
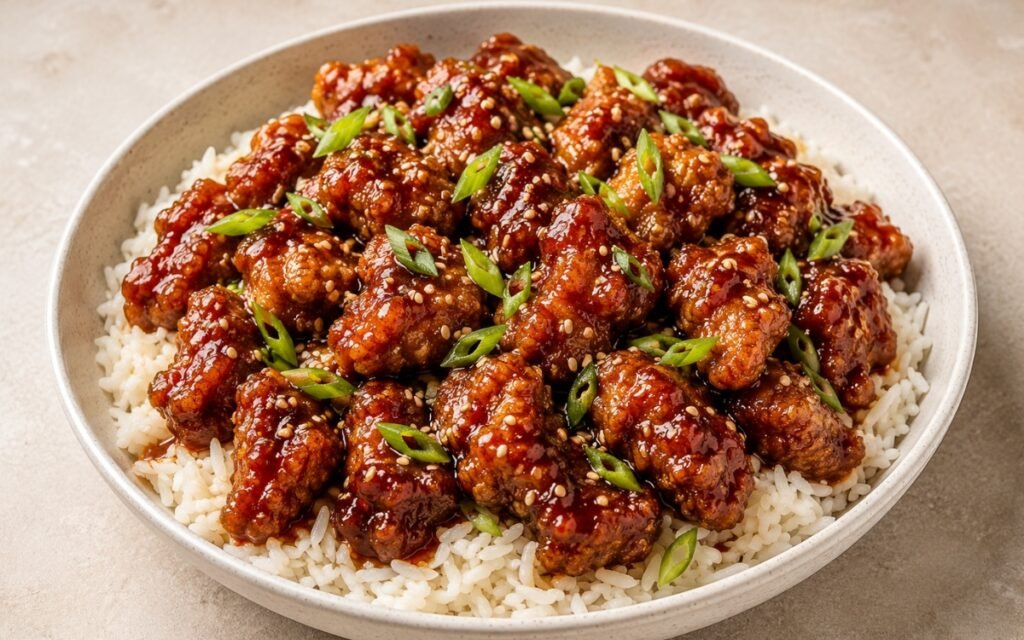
Crispy Honey Garlic Chicken
Crispy pan-fried chicken coated in a sticky honey garlic glaze that clings to every edge and caramelizes into a glossy, intensely flavored coating. This dish is built on texture contrast — a crisp exterior that holds up under sauce, and a juicy interior that stays tender. Done properly, this is not soggy takeout-style chicken — it’s structured, balanced, and repeatable.
Prep Time : 15 min
Cook Time : 25 min
Servings : 4
15 min
25 min
4
Ingredients
For the Chicken
• 800g boneless, skinless chicken thighs
• 30g cornstarch
• 5g fine sea salt
• 3g black pepper
• 30ml vegetable oil
For the Glaze
• 80g honey — this one on Amazon
• 45ml soy sauce — this one on Amazon
• 30ml rice vinegar — this one on Amazon
• 6 garlic cloves, minced
• 10g fresh ginger, minced
• 2g red pepper flakes
• 10g sesame seeds for garnish
This post may contain affiliate links. As an Amazon Associate I earn from qualifying purchases, at no additional cost to you.
Directions
- Prepare the Chicken
Cut the chicken thighs into large, even pieces around 4cm in size. Consistency matters here — uneven pieces cook at different rates and ruin texture control. Pat the chicken completely dry using paper towels. This is critical because moisture prevents the cornstarch from forming a proper coating and interferes with browning. - Coat the Chicken
Combine cornstarch, salt, and black pepper in a bowl, then add the chicken and toss until every piece is evenly coated. The coating should be light but complete — no wet patches, no thick clumps. Cornstarch forms a dry, starchy surface that crisps quickly and creates texture for the glaze to adhere to later. - Sear the Chicken
Heat vegetable oil in a large skillet over medium-high heat until shimmering. Place the chicken in a single layer without overcrowding. If necessary, cook in batches. Overcrowding drops the temperature and causes steaming instead of searing, which destroys the texture before you even get to the glaze stage. - Build the Crust
Cook the chicken undisturbed for about 3 minutes until the underside develops a golden crust, then flip and repeat on the other side. The goal here is not to fully cook the chicken, but to create a stable, crisp exterior. Remove the chicken once both sides are browned — this prevents overcooking while you build the sauce. - Build the Aromatic Base
In the same pan, reduce the heat slightly and add garlic and ginger. Cook for about 30 seconds, stirring constantly. This step releases aromatic compounds into the oil, forming the base of the glaze. Do not let them brown — burnt garlic will ruin the entire dish with bitterness. - Create the Glaze
Add honey, soy sauce, rice vinegar, and red pepper flakes to the pan and bring to a simmer. Cook for about 2 minutes until the sauce thickens slightly and becomes glossy. This is where the balance forms — sweetness from honey, salt from soy sauce, and acidity from vinegar preventing the glaze from becoming heavy. - Coat and Reduce
Return the chicken to the pan and toss continuously to coat every piece evenly. Continue cooking for 2–3 minutes as the sauce reduces further and tightens around the chicken. The glaze should cling, not pool — forming a sticky, lacquered coating that holds onto the crisp surface. - Finish and Serve
Transfer immediately to a serving plate and garnish with sesame seeds. Serve hot while the glaze is still fluid and the coating retains its structure. Waiting too long allows steam to soften the crust and dull the texture.
*Notes :
- This dish is entirely about surface control. The cornstarch coating creates a micro-textured exterior that crisps quickly and provides friction for the glaze to cling to. Without it, the sauce slides off and the chicken stays soft.
- Chicken thighs are used because they contain enough fat to stay juicy even under high heat. Chicken breast would dry out before achieving the same exterior texture.
- The glaze is built on reduction, not thickness from starch. As it simmers, water evaporates and sugar concentration increases, allowing it to coat the chicken naturally. This is what creates that sticky, lacquered finish rather than a heavy, artificial coating.
- Timing is critical. The chicken is partially cooked first, then finished in the glaze. If fully cooked too early, it will overcook during the final reduction stage.
- Heat control is the difference between caramelization and burning. Honey contains sugars that brown quickly — too much heat and it goes from glossy to burnt in seconds.
Why This Recipe Works
This method works because it separates structure from flavor. The chicken is first given a crisp, stable exterior before ever touching the sauce, ensuring the glaze enhances rather than destroys texture.
At the same time, the glaze is reduced independently to concentrate flavor and achieve proper viscosity before coating. This prevents dilution and allows it to cling evenly instead of pooling in the pan.
Ingredient Breakdown
Chicken Thighs
Provide fat and moisture, allowing high-heat cooking without drying out — essential for maintaining juiciness.
Cornstarch
Creates a dry, textured coating that crisps quickly and allows the glaze to adhere effectively.
Salt
Enhances flavor and improves surface seasoning of the chicken.
Black Pepper
Adds mild heat and depth without overpowering the glaze.
Vegetable Oil
Neutral, high-heat cooking medium that ensures even browning.
Honey
Primary sweetener that thickens and caramelizes to form the sticky glaze.
Soy Sauce
Provides salt and umami, balancing the sweetness of the honey.
Rice Vinegar
Adds acidity to cut through the sugar and prevent the glaze from becoming heavy.
Garlic
Builds the aromatic base and defines the savory character of the dish.
Ginger
Adds sharpness and freshness that lifts the glaze.
Red Pepper Flakes
Provide controlled heat that enhances overall flavor perception.
Sesame Seeds
Add texture and a subtle nutty finish to contrast the glaze.
Flavor Structure Explained
This dish follows a high-contrast, glaze-driven structure:
- Savory base (chicken providing neutral protein foundation)
- Crispy exterior (cornstarch coating forming texture and structure)
- Sweet glaze dominance (honey delivering primary flavor impact)
- Salt balance (soy sauce anchoring the sweetness)
- Aromatic layer (garlic and ginger adding depth and warmth)
- Acidic control (rice vinegar preventing the glaze from becoming heavy)
The glaze is the main driver, not the chicken. Sweetness hits first, followed immediately by salt and umami from soy sauce. Garlic and ginger sit underneath, adding complexity, while vinegar sharpens the finish so the dish doesn’t feel overly sticky or cloying. The crisp coating is what makes the entire system work — without it, the dish collapses into soft, overly sweet chicken.
Common Mistakes to Avoid
- Not drying the chicken – The coating won’t adhere properly and the surface won’t crisp.
- Overcrowding the pan – Drops temperature and causes steaming instead of browning.
- Skipping the initial crust step – Leads to soft chicken that can’t hold the glaze.
- Burning the garlic – Adds bitterness that overwhelms the sauce.
- Reducing the glaze too much – It becomes thick and sticky but stops coating evenly.
- Using too low heat for finishing – The glaze won’t tighten properly around the chicken.
Variations
Double-Fried Version
Fry the chicken once, rest, then fry again for a thicker, more aggressive crust before glazing.
Spicy Honey Garlic Chicken
Increase chili flakes or add chili paste for a more pronounced heat profile.
Soy-Less Version
Use tamari or coconut aminos for a slightly different but still balanced profile.
Lemon Honey Chicken
Add fresh lemon juice at the end for a brighter, sharper finish.
Sticky Sesame Version
Increase sesame oil slightly and finish with toasted sesame seeds for a more nutty profile.
Storage & Make-Ahead
Store leftovers in an airtight container for up to 3 days. Reheat in a pan, not a microwave, to restore some of the exterior texture. The glaze can be prepared in advance, but the chicken should always be cooked fresh for best results.
Frequently Asked Questions
Why isn’t my chicken crispy?
Most likely too much moisture or overcrowding — both prevent proper browning.
Can I use chicken breast?
Yes, but it is less forgiving and more likely to dry out during cooking.
Why is my glaze too thin?
It hasn’t reduced enough — simmer longer to concentrate sugars.
Why did my glaze burn?
Heat was too high or left unattended — honey caramelizes quickly and can turn bitter.
What should I serve with this?
For a natural pairing: Cilantro Lime Jasmine Rice absorbs the glaze and balances the intensity providing extra freshness. A Spicy Asian Cucumber Salad adds heat and crunch. Garlic Green Beans or Stir-Fried Vegetables bring contrast and prevent the dish from feeling too heavy.
Nutrition Facts
( per serving )
Calories
~410 kcal
Protein
42 g
Fat
16 g
Carbs
24 g
Calories
~410 kcal
Protein
42 g
Fat
16 g
Carbs
24 g
Related Recipes
Related Recipes

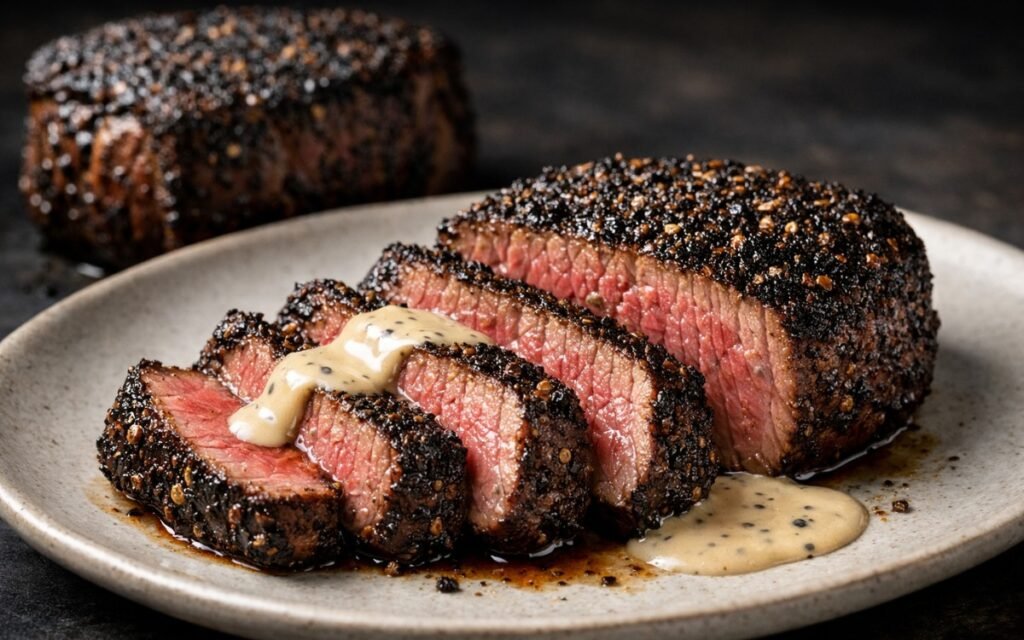
Peppercorn Crusted Steak
Tender steak coated in crushed black peppercorns, seared with butter, and finished with brandy sauce.
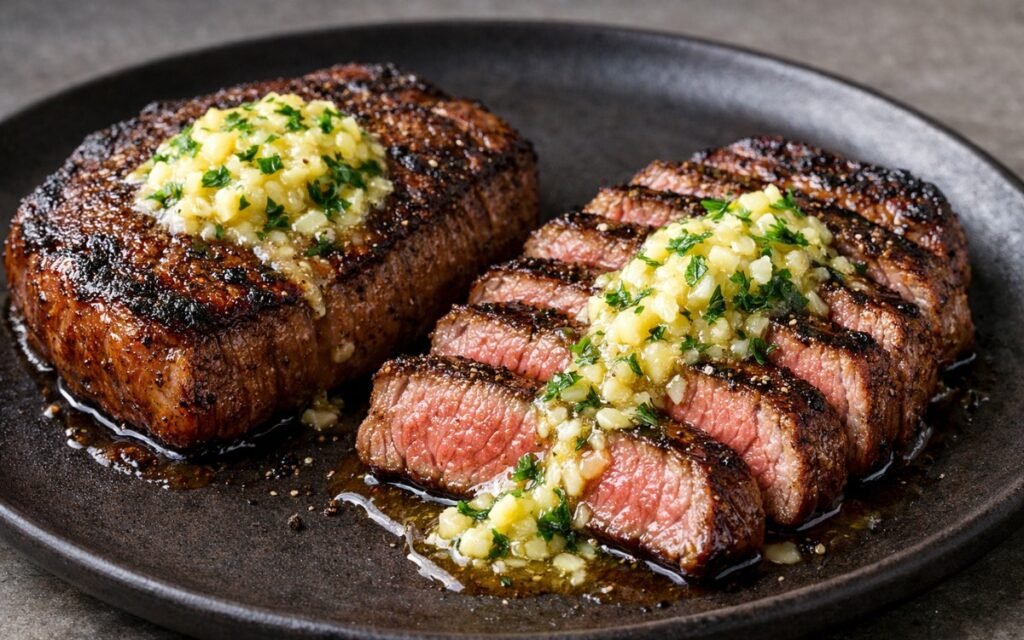
Garlic Butter Sirloin Steak
Pan-seared sirloin steak crowned with herb-infused garlic butter for restaurant-quality results.
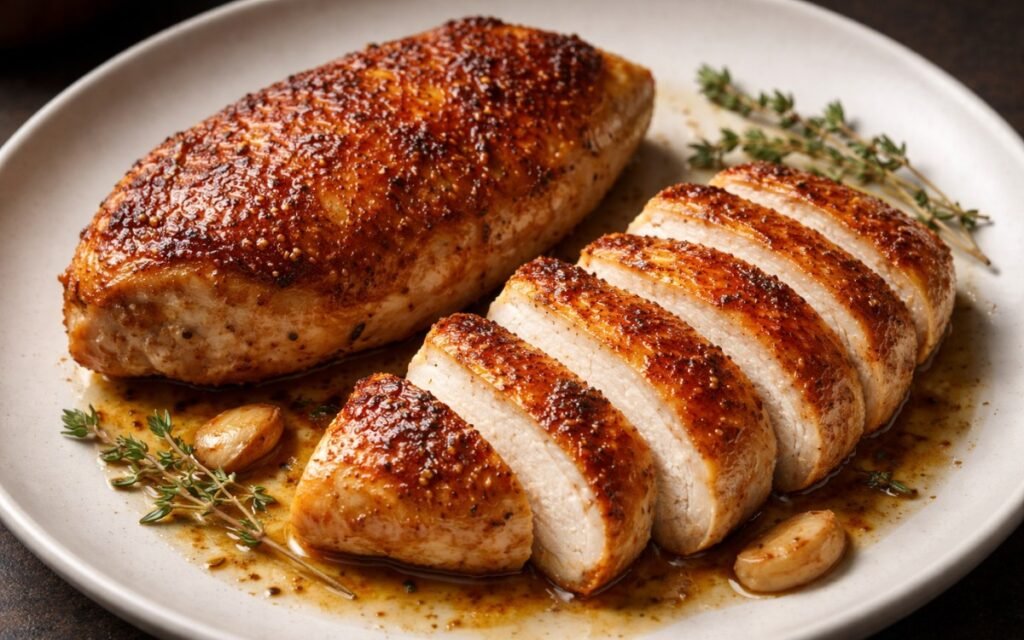
Pan-Seared Chicken Breast (Skin on)
Crispy-skinned, butter-basted chicken breast with golden exterior and perfectly juicy interior.
You might also like
You might also like
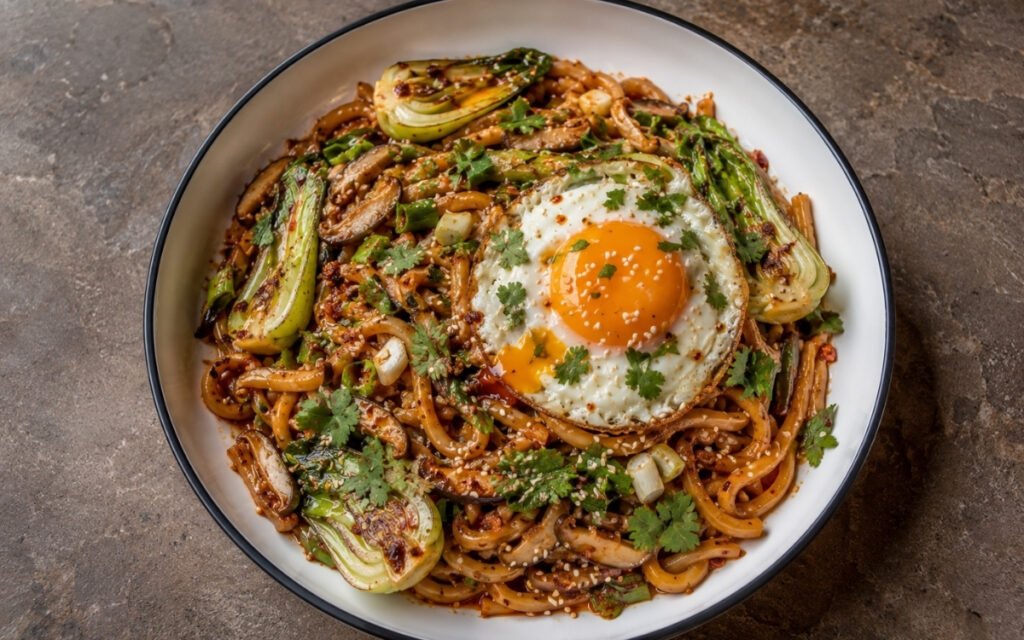
Spicy Chili Garlic Oil Noodles
Homemade gochugaru and Sichuan peppercorn oil over noodles with shiitake — crispy fried egg on top, 25 minutes.
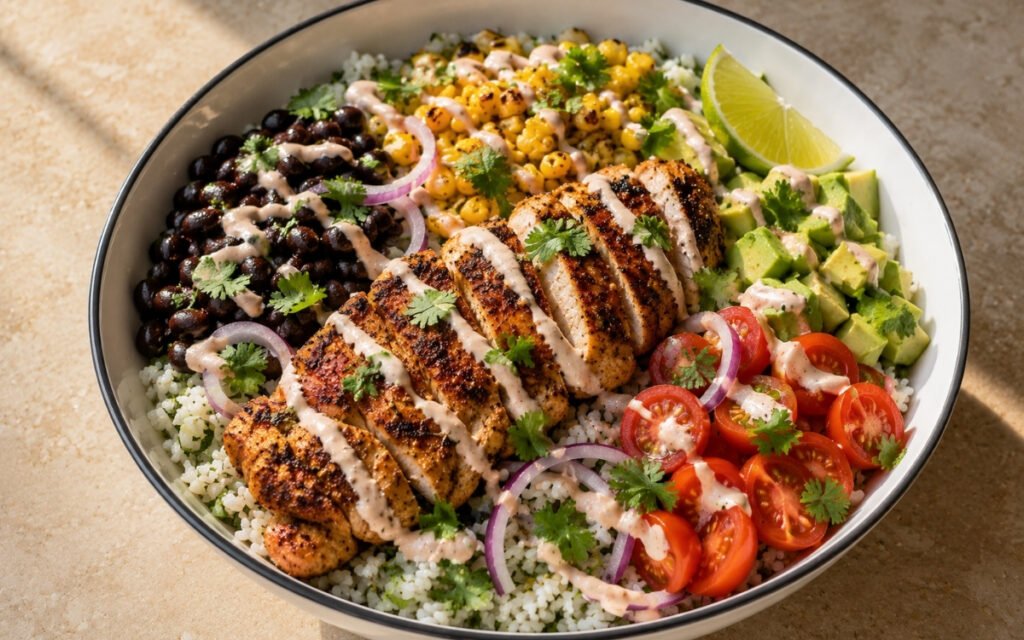
Chili Lime Chicken Rice Bowl
Chili-lime marinated chicken and charred corn over cilantro-lime rice with black beans, avocado, and Greek yogurt crema — vibrant, balanced, 45 minutes.
General Tso’s Chicken Rice Bowl
Chicken thighs marinated in Shaoxing wine and soy, dredged in 1:1 cornstarch and flour, fried golden, and tossed in a glossy brown sugar-soy-hoisin-dried chili sauce. Over jasmine rice with scallions and sesame seeds.

Crispy Honey Garlic Chicken
Ingredients
Method
- Cut the chicken thighs into large, even pieces around 4cm in size. Consistency matters here — uneven pieces cook at different rates and ruin texture control. Pat the chicken completely dry using paper towels. This is critical because moisture prevents the cornstarch from forming a proper coating and interferes with browning.
- Combine cornstarch, salt, and black pepper in a bowl, then add the chicken and toss until every piece is evenly coated. The coating should be light but complete — no wet patches, no thick clumps. Cornstarch forms a dry, starchy surface that crisps quickly and creates texture for the glaze to adhere to later.
- Heat vegetable oil in a large skillet over medium-high heat until shimmering. Place the chicken in a single layer without overcrowding. If necessary, cook in batches. Overcrowding drops the temperature and causes steaming instead of searing, which destroys the texture before you even get to the glaze stage.
- Cook the chicken undisturbed for about 3 minutes until the underside develops a golden crust, then flip and repeat on the other side. The goal here is not to fully cook the chicken, but to create a stable, crisp exterior. Remove the chicken once both sides are browned — this prevents overcooking while you build the sauce.
- In the same pan, reduce the heat slightly and add garlic and ginger. Cook for about 30 seconds, stirring constantly. This step releases aromatic compounds into the oil, forming the base of the glaze. Do not let them brown — burnt garlic will ruin the entire dish with bitterness.
- Add honey, soy sauce, rice vinegar, and red pepper flakes to the pan and bring to a simmer. Cook for about 2 minutes until the sauce thickens slightly and becomes glossy. This is where the balance forms — sweetness from honey, salt from soy sauce, and acidity from vinegar preventing the glaze from becoming heavy.
- Return the chicken to the pan and toss continuously to coat every piece evenly. Continue cooking for 2–3 minutes as the sauce reduces further and tightens around the chicken. The glaze should cling, not pool — forming a sticky, lacquered coating that holds onto the crisp surface.
- Transfer immediately to a serving plate and garnish with sesame seeds. Serve hot while the glaze is still fluid and the coating retains its structure. Waiting too long allows steam to soften the crust and dull the texture.