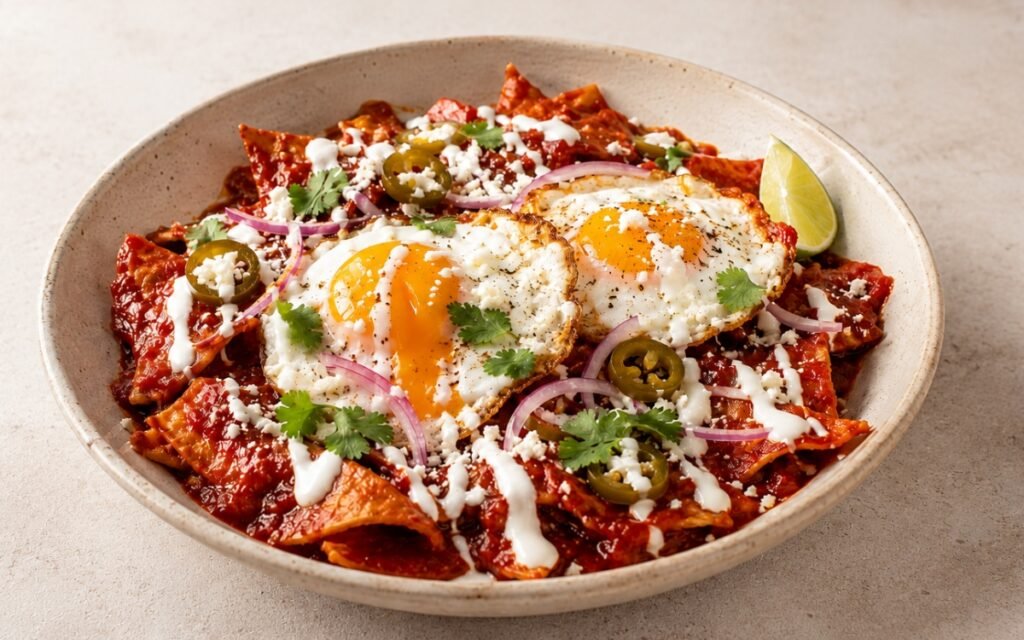
Chilaquiles Rojos with Fried Eggs & Crema
A salsa roja built from dried guajillo and ancho chilies — briefly toasted in a dry pan until fragrant, soaked in hot water until pliable, and blended with charred tomatoes, onion, garlic, toasted spices, and bloomed tomato paste into the specifically deep, slightly smoky, complex red sauce that dried-chili cooking produces and that fresh-tomato salsa cannot approximate. The thick, sturdy corn tortilla chips folded directly into the simmering salsa and left until they soften at their surfaces while retaining some structural bite — the specific texture that makes chilaquiles different from soggy nachos and different from firm tortilla chips, sitting exactly between the two in the way that only correct timing produces. Fried eggs in lard, whites crisped at the edges and yolks bright and runny, placed on top so the yolk breaks into the salsa at the table. Cotija, crema, pickled jalapeños, red onion, and cilantro finishing each bowl. The Mexican breakfast that is built to be eaten immediately — the contrast between the crisp-edged chips, the softened sauced interior, the running yolk, and the smoky salsa existing only in the window between assembly and the moment the chips absorb too much liquid.
Prep Time : 20 min
Cook Time : 35 min
Servings : 4
20 min
35 min
4
Ingredients
For the Guajillo Salsa Roja
• 5 dried guajillo chilies, stems and seeds removed — this one on Amazon
• 1 dried ancho chili, stem and seeds removed
• 1 dried árbol chili, optional — for additional heat
• 2 Roma tomatoes
• ½ white onion
• 3 garlic cloves
• 350–400ml chicken stock or water
• 1 tsp Mexican oregano
• ½ tsp ground cumin — this one on Amazon
• 1 tbsp tomato paste
• 1 tbsp neutral oil or lard
• Fine sea salt, to taste
• Freshly ground black pepper, to taste
For the Chilaquiles
• 220g thick corn tortilla chips — see Homemade Corn Tortillas for making your own chips with no added salt or commercial flavouring
• 4 large eggs
• 1 tbsp lard, for frying the eggs
For the Garnishes
• 60g cotija cheese, crumbled — this one on Amazon
• 80ml Mexican crema
• Pickled jalapeños
• Red onion, thinly sliced
• Fresh cilantro leaves
• Lime wedges, optional
This post may contain affiliate links. As an Amazon Associate I earn from qualifying purchases, at no additional cost to you.
Directions
- Toast the Dried Chilies
Heat a dry cast iron or heavy skillet over medium-low heat. Working one at a time, press each dried guajillo and ancho chili flat against the surface with a spatula and toast for 20–30 seconds per side. The correctly toasted chili becomes slightly more pliable, smells specifically fragrant and roasted, and may show a very light darkening at the edges. The line between correctly toasted and burnt is narrow and consequential — burnt chilies produce a bitter, acrid salsa that cannot be corrected by any subsequent adjustment. Watch constantly and remove immediately when fragrant. If adding the árbol chili for heat, toast it for only 10–15 seconds per side — árbol is thin-fleshed and burns faster than the larger dried chilies. Transfer all toasted chilies to a heatproof bowl. Cover completely with very hot — near-boiling — water and weigh down with a small plate or bowl if the chilies float. Allow to soak for 10 minutes until fully rehydrated, soft, and pliable throughout. Drain and discard the soaking water — it contains the majority of the chilies’ bitter compounds and tannic residue that would make the finished salsa aggressive rather than complex. The instruction to discard the soaking liquid is not standard across all Mexican cooking, but for a salsa where balance and depth are the goal rather than maximum intensity, the discarded water produces a noticeably smoother, more rounded result. - Char the Vegetables
While the chilies soak, char the tomatoes, onion half, and unpeeled garlic cloves in a dry cast iron pan over high heat — or under the broiler on a baking sheet. Turn the vegetables occasionally, allowing each surface to develop dark, slightly blackened patches. The tomatoes should show burst skin and collapse slightly; the onion half should show char marks on the cut face and soften; the garlic should be soft to the touch and show darkening of the paper skin. Transfer to a plate. When cool enough to handle, squeeze the roasted garlic from its skin if roasted with skin on, or simply peel if charred with the skin removed beforehand. The charred vegetables provide a specifically smoky, caramelised depth to the salsa that distinguishes a properly developed salsa roja from a blended sauce. - Bloom the Tomato Paste and Toast the Spices
In a medium saucepan over medium heat, add the 1 tbsp of neutral oil or lard. Add the 1 tbsp of tomato paste and cook, stirring constantly, for 1–2 minutes until the paste darkens slightly and smells sweeter and more concentrated — the Maillard reaction removing the raw, acidic edge and converting it to a rounded, savoury depth. Add the ½ tsp of cumin and 1 tsp of Mexican oregano directly into the hot tomato paste and fat. Stir continuously for 20–30 seconds — the spices bloom in the fat alongside the caramelised paste, releasing their essential oils in a way that does not occur when they are simply added to liquid. Mexican oregano is specifically different from Mediterranean oregano — it has a more citrusy, slightly more pungent character with less bitterness, and it is the correct herb for a Mexican red sauce. Mediterranean oregano is a functional substitute at ¾ the quantity but produces a slightly different result. - Blend the Salsa Roja
Transfer the drained, rehydrated chilies and the charred tomatoes, onion, and garlic to a blender. Add the tomato paste and spice mixture from the saucepan. Pour in 350ml of the chicken stock or water. Blend at high speed for a full 60–90 seconds until completely smooth — no visible chili skin pieces or vegetable chunks remaining. A fully smooth salsa is specifically important for chilaquiles because any incompletely blended chili skin produces a stringy, unpleasant texture when the chips are folded in. The salsa should be pourable but notably thicker than water — if it appears very thick, add additional stock to the 400ml maximum and blend again. Pour the blended salsa through a fine-mesh sieve back into the saucepan if a perfectly smooth result is the goal — sieving removes any remaining skin fragments the blender did not fully break down. - Simmer and Season the Salsa
Return the blended salsa to the saucepan over medium heat. Simmer uncovered for 8–10 minutes, stirring occasionally, until the salsa has darkened slightly in colour, become glossy, and reduced to a slightly thicker consistency that coats the back of a spoon clearly. Simmering cooks out any remaining raw flavour from the blended chili and concentrates the salsa’s depth — an unsimmered blended salsa has a specifically flat, slightly harsh flavour compared to the rounded, developed result of 8–10 minutes of active simmering. Season generously with fine sea salt and black pepper — taste at this stage and ensure the salsa is well-seasoned, as it will season the chips and it should taste assertive enough to stand against the cotija and crema at serving. - Add the Chips and Fold to the Correct Texture
Add the 220g of thick corn tortilla chips directly into the simmering salsa. Reduce the heat to medium-low. Using a spatula, fold the chips gently through the salsa — turning them over and under the sauce in slow, deliberate movements rather than stirring aggressively, which would break the chips completely. Fold for 2–3 minutes until every chip is coated in the salsa. The timing is the most technique-sensitive step in chilaquiles: too little time produces chips that are still dry and crunchy at their centres; too much time produces completely soggy, dissolved chips with no textural identity. The correct result is chips that are softened and sauce-coated on their surfaces but retain enough structure to hold their shape when scooped — slightly yielding when bitten, with a soft but not completely collapsed interior. The chips are ready when the majority show this slightly softened-but-structured texture. For best results, use thick, sturdily constructed corn tortilla chips that are specifically made for use in warm applications. Thin snack chips dissolve in the salsa within 30 seconds of contact. See Homemade Corn Tortillas for making your own chips from proper corn tortillas without the added salt, flavouring, and thinner texture of commercial tortilla chips — homemade chips cut from dried corn tortillas produce specifically the correct structural quality for chilaquiles. - Fry the Eggs in Lard
While the chips are being folded into the salsa, heat the 1 tbsp of lard in a separate skillet over medium-high heat until fully melted and shimmering. Crack each egg carefully into the hot lard. Cook undisturbed for 2–3 minutes until the whites are completely set and the edges are crisped, browned, and slightly lacy from the hot fat. The yolks should remain bright yellow and completely liquid. Lard is specified for the egg frying specifically — its high smoke point and specifically savoury, slightly porky depth adds a flavour dimension to the fried egg that butter or neutral oil cannot replicate in a Mexican cooking context. The crisped, browned white against the running yolk is the specific egg preparation for chilaquiles — not scrambled, not softly set, not fully cooked through. - Assemble and Serve Immediately
Divide the sauced chips among four shallow bowls. Place one fried egg on top of each portion with the yolk facing up and unbroken. The yolk is intentionally left unbroken at this stage so each person breaks it at the table, mixing the runny yolk into the salsa and chips at the moment of eating. Drizzle 20ml of crema per bowl in a loose zigzag across the chips and egg. Crumble 15g of cotija per bowl. Scatter pickled jalapeños, thinly sliced red onion, and fresh cilantro. Place lime wedges alongside if desired. Serve immediately and without delay — chilaquiles are a dish designed to be eaten at the moment they are ready. The contrast between the slightly crisped chip edges, the sauced soft interior, the running egg yolk, and the smoky salsa exists only in a brief window before the chips continue absorbing liquid and the yolk cools.
*Notes :
- The choice of dried chilies defines the flavour of this salsa roja more than any other variable. Guajillo — the most widely available Mexican dried chili outside Mexico — provides a moderate heat (2,500–5,000 SHU), a specific sweet, slightly tannic fruitiness, and a brilliant deep red colour. Ancho — dried poblano — adds earthiness, sweetness, and a mild chocolatey depth with minimal heat. Árbol — small, thin, very hot — provides the optional heat without additional flavour complexity. Together they produce a salsa with layered heat, fruit, earthiness, and colour that no single chili variety alone provides. The 5:1:1 guajillo-to-ancho-to-árbol ratio is calibrated for a moderately spiced result; adjusting the árbol quantity is the simplest heat control available.
- Mexican crema is specifically different from sour cream and significantly different from crème fraîche in the context of this dish. Mexican crema has a thinner, pourable consistency and a milder, less aggressively sour flavour — it drizzles across the chilaquiles and provides cool, creamy contrast without the thicker, heavier coating of sour cream. If Mexican crema is unavailable, crème fraîche thinned with a small amount of whole milk to drizzling consistency is the closest substitute.
Why This Recipe Works
This recipe works because the salsa roja is built through every available flavour-development technique simultaneously — toasted dried chilies, charred vegetables, bloomed tomato paste, toasted spices — before being simmered after blending to cook out the raw edge and develop gloss and depth.
The chips are folded at the moment that produces the specific softened-but-structured texture that defines chilaquiles rather than soggy nachos. And the dish is served immediately — chilaquiles that wait lose the specific textural contrast that makes the preparation specifically compelling.
Ingredient Breakdown
Dried Guajillo, Ancho, and Árbol Chilies
The salsa’s flavour foundation — toasted briefly for fragrance, soaked to rehydrate, and blended smooth; each variety contributing a distinct dimension.
Charred Tomatoes, Onion, and Garlic
The smoky vegetable base — direct char contact produces the specific smoky, caramelised depth that raw vegetables cannot provide.
Bloomed Tomato Paste and Toasted Spices
The compound seasoning base — tomato paste caramelised in fat before the liquid is added; spices toasted in the same fat for maximum aromatic release.
Thick Corn Tortilla Chips
The structural requirement — thick chips absorb the salsa at the correct rate; thin chips dissolve before the correct texture is achieved.
Lard-Fried Eggs
The specific technique and fat — lard’s high smoke point and savoury depth produces the crisped white and running yolk that is the correct egg for chilaquiles.
Cotija and Mexican Crema
The finishing balance — cotija’s sharp, salty, crumbly presence against the smoky salsa; crema’s cool, mild drizzle tempering the heat.
Flavor Structure Explained
This Chilaquiles rojos follows a layered balance model:
- Smoky chili core (guajillo, ancho, charred vegetables)
- Rich creamy layer (egg yolk, crema, fried egg white)
- Sharp salty-acid contrast (cotija, pickled jalapeños)
- Fresh herbal lift (cilantro, red onion, lime)
- Deep roasted sauce body (salsa roja)
Salsa roja defines the foundation with layered dried chili flavor — fruity sweetness, earthy warmth, and smoky charred depth fused into a concentrated red sauce. Egg yolk and crema soften that intensity with creamy richness, while crisp egg edges add savory fried contrast. Cotija and pickled jalapeños cut through the richness with salinity, acidity, and heat that sharpen every bite. Cilantro, raw onion, and lime finish the bowl with fresh herbal brightness and citrus lift. The dish works because every spoonful balances smoke, richness, acid, spice, and freshness simultaneously.
Common Mistakes to Avoid
- Burning the Dried Chilies During Toasting – Burnt chilies produce a bitter, irreparably acrid salsa. Toast only until fragrant — 20–30 seconds per side maximum, over medium-low heat.
- Using the Chili Soaking Water – Soaking water concentrates the chilies’ bitter tannins. Discard it and use fresh stock for the salsa.
- Not Simmering the Blended Salsa – Blended but unsimmered salsa has a raw, flat character. The 8–10 minute simmer develops the glossy, rounded depth that makes the salsa specifically good.
- Using Thin Snack Chips – Thin chips dissolve in the salsa before the correct texture is achieved. Always thick, sturdy corn chips — or homemade from proper corn tortillas.
- Leaving the Chips in the Sauce Too Long – Beyond 3–4 minutes the chips lose all structural identity. Fold to the specific softened-but-structured texture and serve immediately.
- Not Serving Immediately – Chilaquiles held for 10 minutes after assembly produce soggy, uniformly soft chips without the textural contrast that makes the dish specifically good.
Variations
With Cilantro-Lime Drizzle
Finish each bowl with a drizzle of Cilantro-Lime Drizzle alongside the crema — the fresh, vegetal citrus brightness cuts through the smoky salsa’s richness and makes the finished bowl taste specifically more vivid and more fresh without replacing the crema’s cooling dairy contrast.
Chilaquiles Verdes
Replace the guajillo salsa roja with a salsa verde — tomatillos, serranos, onion, garlic, and cilantro roasted and blended — for a brighter, more acidic, greener version. The chip-folding technique and garnishes are identical.
With Pulled Chicken
Fold 200g of warm shredded cooked chicken through the sauced chips before plating — the most common addition for a more substantial breakfast or brunch version.
With Scrambled Rather Than Fried Eggs
Softly scrambled eggs folded alongside the chips in the final assembly for a version where the egg integrates with the salsa throughout rather than breaking at the table.
Storage & Make-Ahead
Salsa roja can be made up to 5 days in advance and refrigerated in a sealed container. It also freezes well for up to 2 months. Before using it, reheat the salsa until it reaches a full simmer.
Assembled chilaquiles are not suitable for storage, since the chips continue absorbing the sauce after assembly and lose their textural contrast within about 20 minutes. For the best result, always assemble and serve them immediately.
Frequently Asked Questions
What are guajillo chilies and where do I find them?
Guajillo are the most widely used dried chili in Mexican cooking — long, smooth-skinned, dark brick-red, and moderately hot with a specific sweet, slightly tannic fruitiness. Available at Latin grocery stores, Mexican food stores, and increasingly at mainstream supermarkets in the international foods section or the spice aisle.
Why lard for frying the eggs?
Lard has a higher smoke point than butter and a specifically savoury, slightly porky depth that complements the salsa roja’s dried chili character in the way that neutral oil does not. The hot lard produces the specific lacy, browned, crisped egg white edge that is the correct texture for eggs in chilaquiles.
Why should I not use the chili soaking water?
The soaking water concentrates the dried chilies’ bitter tannic compounds — leached out during rehydration. Using it in the salsa produces a more bitter, more intensely harsh result. Discarding it and using fresh stock produces a cleaner, more complex, more balanced salsa.
Can I make the chips from scratch?
Yes — and homemade chips from proper corn tortillas produce a specifically superior result for chilaquiles. See Homemade Corn Tortillas for making your own tortillas, then cut into triangles, brush lightly with oil, and bake at 180°C for 12–15 minutes until crisp but not brittle. Homemade chips have no added commercial salt or flavouring that can conflict with the salsa’s seasoning.
Why does the dish need to be served immediately?
The textural contrast — crisped chip edges, softened sauce-coated interior, running egg yolk, smoky salsa — exists only in the brief window after assembly before the chips continue absorbing liquid. This is not a flaw of the recipe but a fundamental characteristic of the dish: chilaquiles are specifically a cook-to-order preparation, not a hold-and-serve one.
Nutrition Facts
( per serving )
Calories
~520 kcal
Protein
18 g
Fat
28 g
Carbs
52 g
Calories
~520 kcal
Protein
18 g
Fat
28 g
Carbs
52 g
Related Recipes
Related Recipes

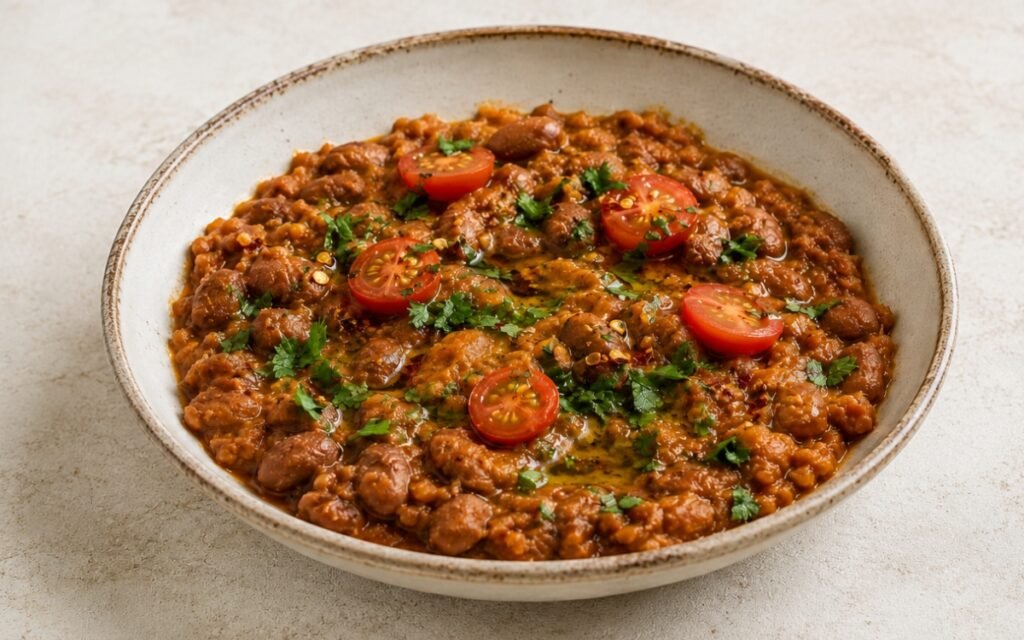
Ful Medames
Tomato paste bloomed in olive oil, garlic and cumin toasted in the same fat, fava beans half-mashed in the spiced base — lemon, tahini, olive oil, parsley, and cherry tomatoes. 30 minutes.
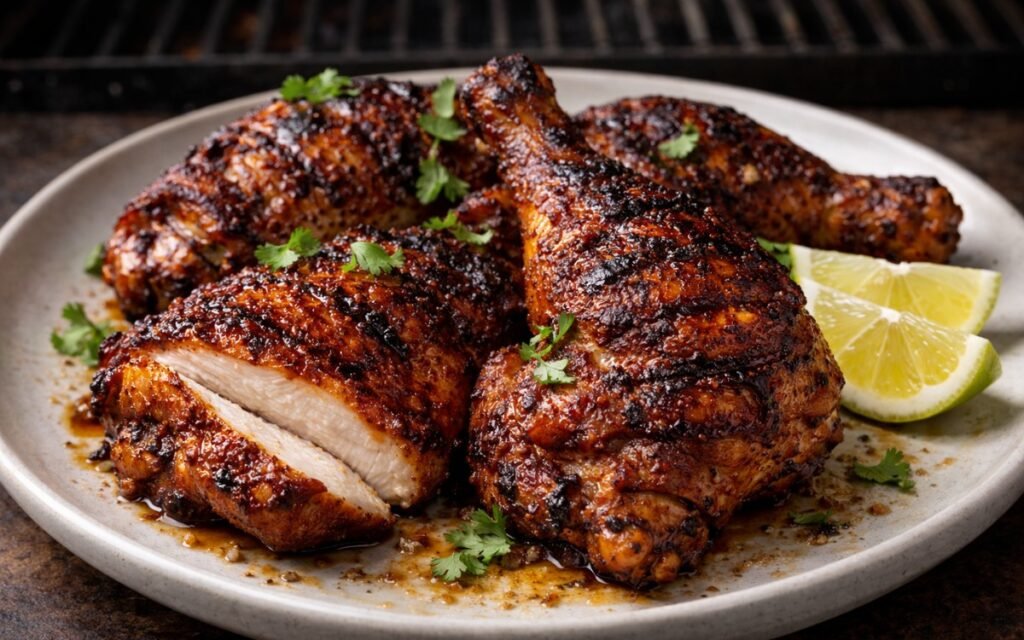
Chipotle Grilled Chicken Legs
Smoky chipotle-marinated chicken legs grilled until charred and crispy with bold, spicy flavors.
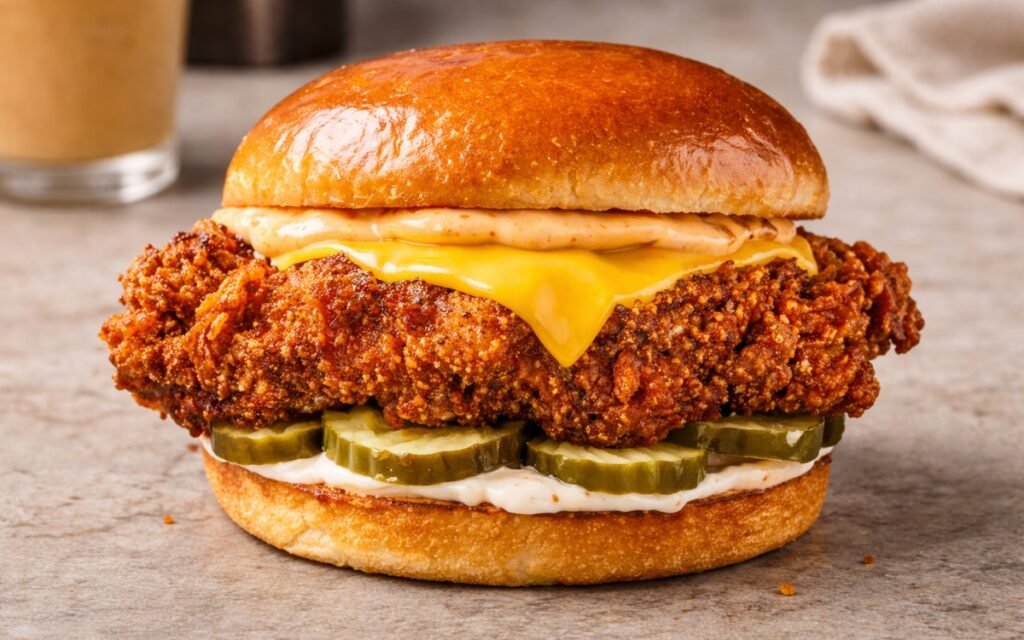
Spicy Fried Chicken Sandwich
Ultra-crispy gochujang-marinated chicken with pickles, melted cheese, and garlicky heat stacked on toasted brioche.
You might also like
You might also like
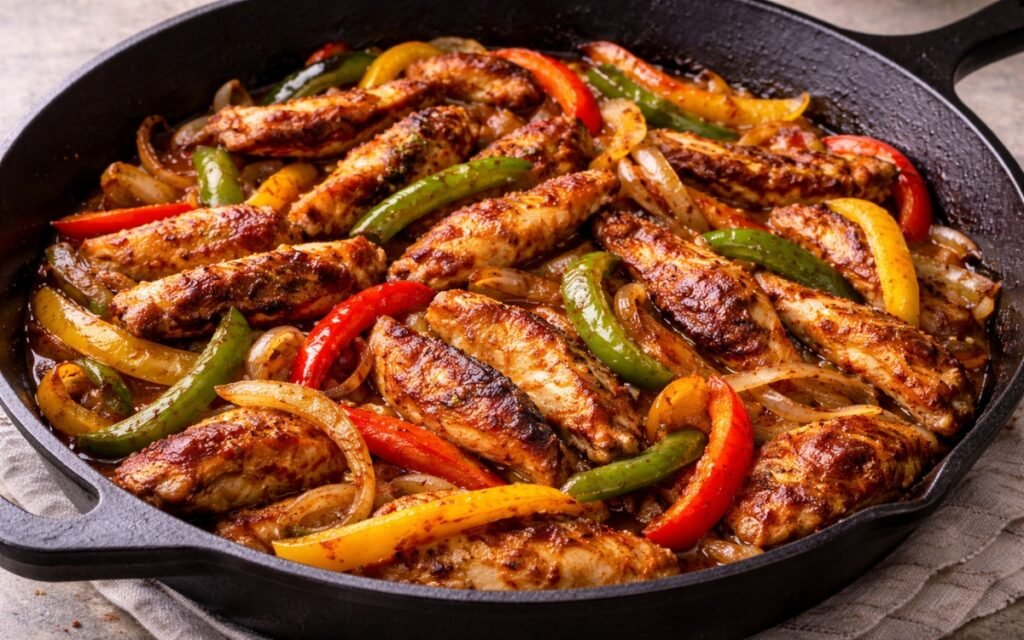
Chicken Fajita
Smoked paprika and cumin-marinated chicken thighs seared in cast iron with charred tri-colour peppers and caramelised onions — the complete Tex-Mex fajita in 35 minutes.
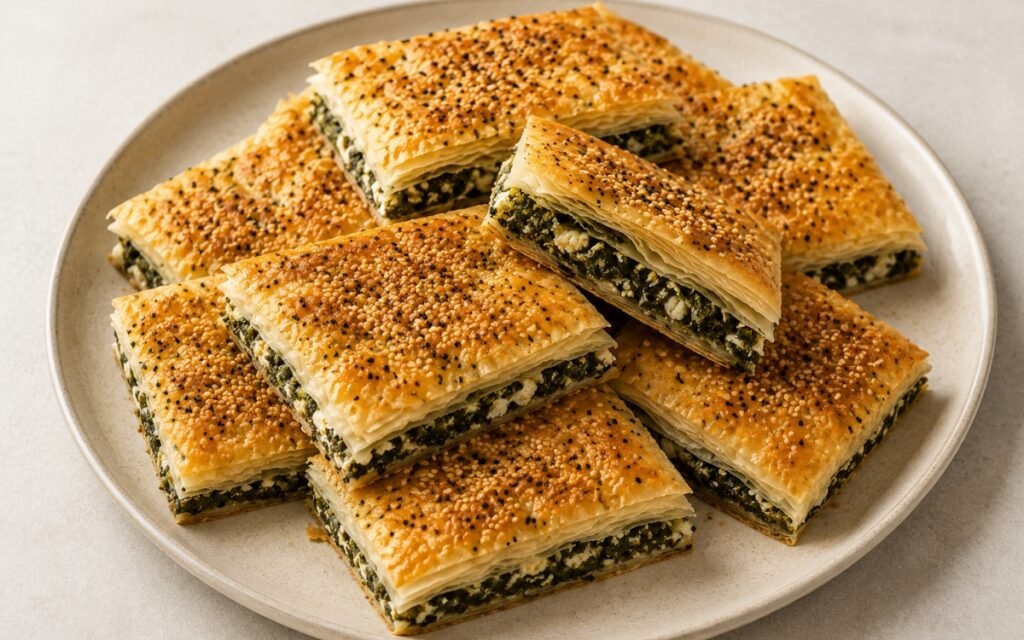
Turkish Börek — Spinach and Feta Borek
Pressed spinach and feta layered between phyllo sheets with a light milk-yogurt coating — pre-cut before baking, sesame and nigella seeds over egg wash, baked deeply golden. Crisp outside, soft custardy inside.
Beef Burrito Rice Bowl
Ground beef pressed flat in smoking cast iron, seared until deeply caramelised, then broken down and seasoned — over Mexican rice with spiced beans, pico, corn salad, guacamole, and cheese blend.


Chilaquiles Rojos with Fried Eggs & Crema
Ingredients
Method
- Heat a dry cast iron or heavy skillet over medium-low heat. Working one at a time, press each dried guajillo and ancho chili flat against the surface with a spatula and toast for 20–30 seconds per side. The correctly toasted chili becomes slightly more pliable, smells specifically fragrant and roasted, and may show a very light darkening at the edges. The line between correctly toasted and burnt is narrow and consequential — burnt chilies produce a bitter, acrid salsa that cannot be corrected by any subsequent adjustment. Watch constantly and remove immediately when fragrant. If adding the árbol chili for heat, toast it for only 10–15 seconds per side — árbol is thin-fleshed and burns faster than the larger dried chilies. Transfer all toasted chilies to a heatproof bowl. Cover completely with very hot — near-boiling — water and weigh down with a small plate or bowl if the chilies float. Allow to soak for 10 minutes until fully rehydrated, soft, and pliable throughout. Drain and discard the soaking water — it contains the majority of the chilies’ bitter compounds and tannic residue that would make the finished salsa aggressive rather than complex. The instruction to discard the soaking liquid is not standard across all Mexican cooking, but for a salsa where balance and depth are the goal rather than maximum intensity, the discarded water produces a noticeably smoother, more rounded result.
- While the chilies soak, char the tomatoes, onion half, and unpeeled garlic cloves in a dry cast iron pan over high heat — or under the broiler on a baking sheet. Turn the vegetables occasionally, allowing each surface to develop dark, slightly blackened patches. The tomatoes should show burst skin and collapse slightly; the onion half should show char marks on the cut face and soften; the garlic should be soft to the touch and show darkening of the paper skin. Transfer to a plate. When cool enough to handle, squeeze the roasted garlic from its skin if roasted with skin on, or simply peel if charred with the skin removed beforehand. The charred vegetables provide a specifically smoky, caramelised depth to the salsa that distinguishes a properly developed salsa roja from a blended sauce.
- In a medium saucepan over medium heat, add the 1 tbsp of neutral oil or lard. Add the 1 tbsp of tomato paste and cook, stirring constantly, for 1–2 minutes until the paste darkens slightly and smells sweeter and more concentrated — the Maillard reaction removing the raw, acidic edge and converting it to a rounded, savoury depth. Add the ½ tsp of cumin and 1 tsp of Mexican oregano directly into the hot tomato paste and fat. Stir continuously for 20–30 seconds — the spices bloom in the fat alongside the caramelised paste, releasing their essential oils in a way that does not occur when they are simply added to liquid. Mexican oregano is specifically different from Mediterranean oregano — it has a more citrusy, slightly more pungent character with less bitterness, and it is the correct herb for a Mexican red sauce. Mediterranean oregano is a functional substitute at ¾ the quantity but produces a slightly different result.
- Transfer the drained, rehydrated chilies and the charred tomatoes, onion, and garlic to a blender. Add the tomato paste and spice mixture from the saucepan. Pour in 350ml of the chicken stock or water. Blend at high speed for a full 60–90 seconds until completely smooth — no visible chili skin pieces or vegetable chunks remaining. A fully smooth salsa is specifically important for chilaquiles because any incompletely blended chili skin produces a stringy, unpleasant texture when the chips are folded in. The salsa should be pourable but notably thicker than water — if it appears very thick, add additional stock to the 400ml maximum and blend again. Pour the blended salsa through a fine-mesh sieve back into the saucepan if a perfectly smooth result is the goal — sieving removes any remaining skin fragments the blender did not fully break down.
- Return the blended salsa to the saucepan over medium heat. Simmer uncovered for 8–10 minutes, stirring occasionally, until the salsa has darkened slightly in colour, become glossy, and reduced to a slightly thicker consistency that coats the back of a spoon clearly. Simmering cooks out any remaining raw flavour from the blended chili and concentrates the salsa’s depth — an unsimmered blended salsa has a specifically flat, slightly harsh flavour compared to the rounded, developed result of 8–10 minutes of active simmering. Season generously with fine sea salt and black pepper — taste at this stage and ensure the salsa is well-seasoned, as it will season the chips and it should taste assertive enough to stand against the cotija and crema at serving.
- Add the 220g of thick corn tortilla chips directly into the simmering salsa. Reduce the heat to medium-low. Using a spatula, fold the chips gently through the salsa — turning them over and under the sauce in slow, deliberate movements rather than stirring aggressively, which would break the chips completely. Fold for 2–3 minutes until every chip is coated in the salsa. The timing is the most technique-sensitive step in chilaquiles: too little time produces chips that are still dry and crunchy at their centres; too much time produces completely soggy, dissolved chips with no textural identity. The correct result is chips that are softened and sauce-coated on their surfaces but retain enough structure to hold their shape when scooped — slightly yielding when bitten, with a soft but not completely collapsed interior. The chips are ready when the majority show this slightly softened-but-structured texture. For best results, use thick, sturdily constructed corn tortilla chips that are specifically made for use in warm applications. Thin snack chips dissolve in the salsa within 30 seconds of contact. See Homemade Corn Tortillas for making your own chips from proper corn tortillas without the added salt, flavouring, and thinner texture of commercial tortilla chips — homemade chips cut from dried corn tortillas produce specifically the correct structural quality for chilaquiles.
- While the chips are being folded into the salsa, heat the 1 tbsp of lard in a separate skillet over medium-high heat until fully melted and shimmering. Crack each egg carefully into the hot lard. Cook undisturbed for 2–3 minutes until the whites are completely set and the edges are crisped, browned, and slightly lacy from the hot fat. The yolks should remain bright yellow and completely liquid. Lard is specified for the egg frying specifically — its high smoke point and specifically savoury, slightly porky depth adds a flavour dimension to the fried egg that butter or neutral oil cannot replicate in a Mexican cooking context. The crisped, browned white against the running yolk is the specific egg preparation for chilaquiles — not scrambled, not softly set, not fully cooked through.
- Divide the sauced chips among four shallow bowls. Place one fried egg on top of each portion with the yolk facing up and unbroken. The yolk is intentionally left unbroken at this stage so each person breaks it at the table, mixing the runny yolk into the salsa and chips at the moment of eating. Drizzle 20ml of crema per bowl in a loose zigzag across the chips and egg. Crumble 15g of cotija per bowl. Scatter pickled jalapeños, thinly sliced red onion, and fresh cilantro. Place lime wedges alongside if desired. Serve immediately and without delay — chilaquiles are a dish designed to be eaten at the moment they are ready. The contrast between the slightly crisped chip edges, the sauced soft interior, the running egg yolk, and the smoky salsa exists only in a brief window before the chips continue absorbing liquid and the yolk cools.