
Iced Oat Milk Cappuccino
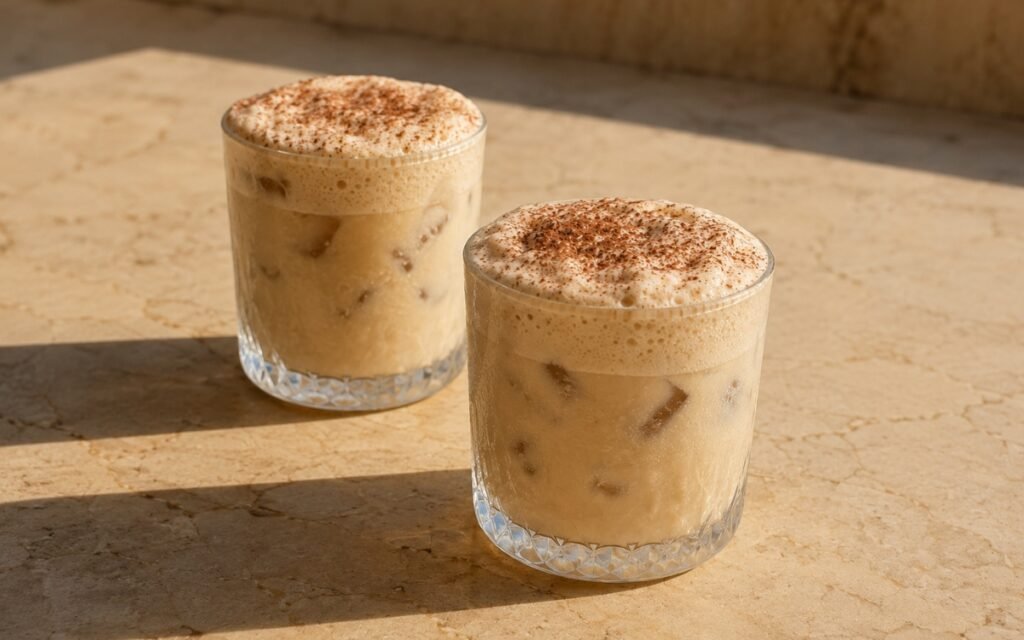
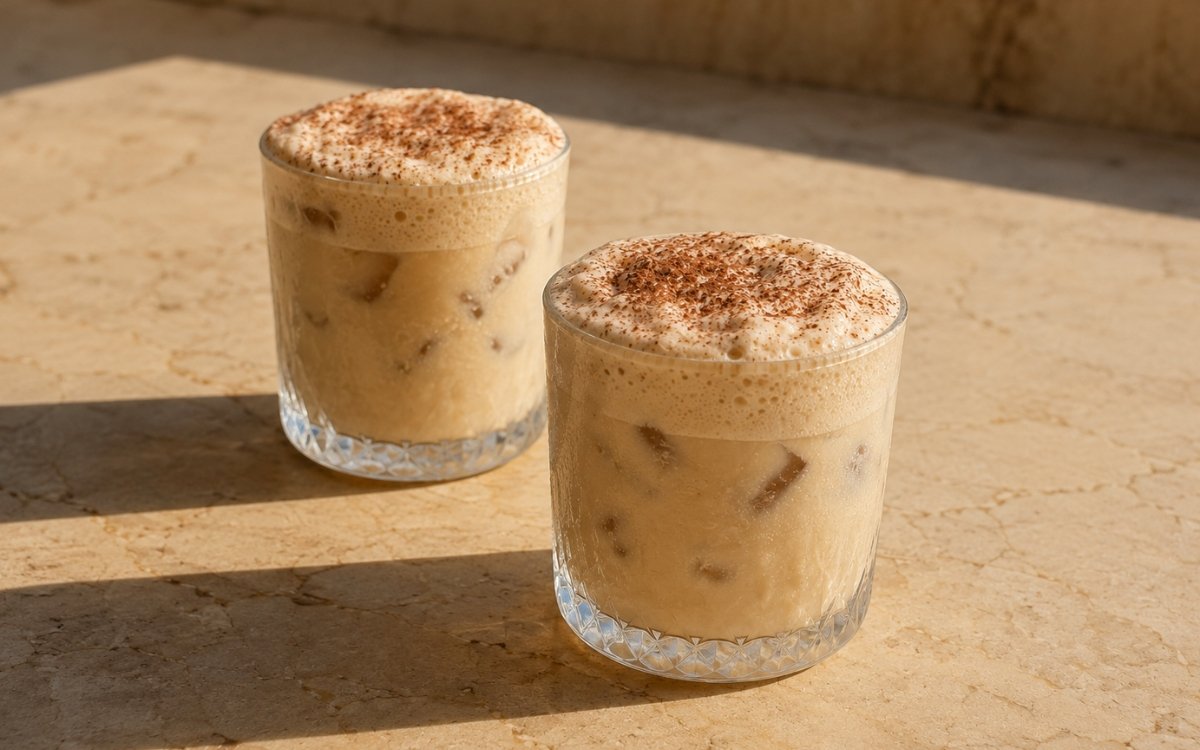
A classic iced oat milk cappuccino made with espresso, ice, chilled oat milk, and a generous cap of thick, airy oat milk foam, finished with a light dusting of cocoa powder. It should drink stronger than a latte, look pale caramel-beige, and carry the defining cappuccino contrast between the colder liquid base and the thick dry foam on top. Frothing the reserved oat milk into genuinely thick, dry-leaning foam, rather than a thin silky sheen, is the technique this whole drink depends on for reading as a true cappuccino — a minimal froth simply makes it look and drink like an iced latte, the same foam-volume principle used elsewhere in this collection whenever a drink’s format depends on a substantial, visible foam cap rather than a light finish. Using barista-style oat milk specifically, rather than standard oat milk, matters just as much, since barista blends are formulated to hold a stable, voluminous foam that standard oat milk simply can’t sustain. Building the espresso-and-milk base first, then topping it separately with that thick foam, is what preserves the drink’s defining visual contrast between the two layers. The payoff is a drink with three clear visual cues in one glass — a pale caramel-beige coffee base, visible ice beneath it, and a thick, cream-coloured foam cap dusted with cocoa.
Prep Time : 8 min
Cook Time : 2 min
Servings : 2
8 min
2 min
2
Ingredients
For the Iced Oat Milk Cappuccino
• 120ml espresso, freshly brewed (4 standard shots total, counting 1 shot = 30ml)
• 260ml chilled barista-style oat milk — this one on Amazon
• 8–10 ice cubes
For Finishing
• Unsweetened cocoa powder, for a light dusting
This post may contain affiliate links. As an Amazon Associate I earn from qualifying purchases, at no additional cost to you.
Directions
- Brew the Espresso
Brew 120ml espresso total, equal to 4 standard 30ml shots. Let it stand for 1–2 minutes so it is still fresh and aromatic, but not aggressively hot when poured over the ice. The espresso should taste clean and concentrated. Because oat milk is naturally a little sweeter and softer than dairy milk, weak espresso gets lost fast. Oat milk’s own natural sweetness and softer character mean a weak or thin espresso has considerably less presence against it than the same shot would have against dairy milk — genuinely concentrated espresso is what keeps the coffee flavour clearly present rather than fading into the background. - Build the Iced Base
Divide the ice between 2 glasses. Pour about 60ml espresso into each glass. Add about 60–70ml chilled oat milk to each glass. Stir briefly so the espresso and oat milk combine into a pale caramel-beige base. The drink base should already look lighter and warmer in tone than a standard iced coffee, but still clearly darker and more concentrated than a latte base. Building and combining this base fully before any foam is added establishes the drink’s core colour and strength as its own distinct layer — the foam that follows is meant to sit visibly on top of this base rather than being stirred through it from the start. - Foam the Remaining Oat Milk
Use the remaining chilled oat milk to make the cappuccino foam. Froth it until it becomes thick, airy, and dry-leaning, with a substantial cap rather than a thin silky surface. This can be done with a milk frother, a steam wand used carefully on cold milk if your setup allows it, or a handheld frother. The goal is a generous cappuccino-style foam, not a flat white sheen and not a latte-style minimal froth. The oat milk foam should be noticeably voluminous and stable, slightly beige-cream rather than pure white, and airy enough to sit high above the drink rather than disappearing into it immediately. Barista-style oat milk works best here. Standard oat milk often foams poorly and collapses faster. Barista-style oat milk is specifically formulated with additional stabilisers and fat content to hold air and structure under frothing — standard oat milk lacks that formulation and tends to produce a foam that’s both less voluminous and considerably less stable once poured. - Top the Drinks
Spoon or pour the thick oat milk foam over each glass, dividing it evenly and creating a generous cappuccino cap. The ice should still be visible through the lower sides of the glass, while the upper portion is crowned with thick foam. This is what makes it a cappuccino. If the top layer is only a thin froth, it reads more like an iced latte. The foam should feel substantial and sit visibly above the liquid. The visible contrast between clear ice below and thick, opaque foam above is the drink’s defining visual signature — a thin, sparse foam layer collapses that contrast and pushes the presentation toward a latte’s more uniform look instead. - Finish and Serve
Dust the top of each drink lightly with unsweetened cocoa powder. Serve immediately. The final drink should have three clear visual cues: a pale caramel oat-milk coffee base, visible ice below, and a thick cream-coloured foam cap with a light cocoa finish. A light dusting rather than a heavy cocoa layer is what finishes the drink without masking the foam’s own colour and texture — too much cocoa would turn the visual focus toward the chocolate dusting rather than the foam itself.
*Notes :
- The distinction between this drink’s thick, dry-leaning foam and the thin microfoam sheen used in other iced espresso drinks throughout this collection is worth understanding clearly, since it’s the entire reason this reads as a cappuccino rather than a latte or flat white. A cappuccino’s identity depends specifically on a substantial, visible foam cap sitting above the liquid — frothing the oat milk only lightly, the way a flat white’s finish calls for, would produce a genuinely different drink despite using the same base ingredients.
- Choosing barista-style oat milk specifically over a standard version is worth treating as a real ingredient decision rather than a minor brand preference. Barista blends are formulated with additional fat and stabilisers precisely to hold air and structure under frothing in a way standard oat milk, designed primarily for drinking rather than foaming, simply doesn’t sustain. Using standard oat milk here risks a foam that both lacks the volume this drink needs and collapses considerably faster once poured.
- Building the espresso-and-oat-milk base fully, stirring it into a cohesive, pale caramel-beige liquid before any foam is added, protects the drink’s two-layer structure. That base is meant to exist as its own distinct component beneath the foam, not blended through it from the start — keeping those two stages separate is what preserves the visible contrast between the colder liquid base and the thick foam cap that defines a proper cappuccino’s presentation.
- The instruction to serve immediately after foaming reflects a genuine, time-sensitive characteristic of oat milk foam specifically. While oat milk can produce a genuinely good foam, especially in a barista formulation, that foam still settles and softens meaningfully faster than dairy milk foam would under the same conditions — the window between foaming and serving matters more here than it might for a dairy-based cappuccino.
Why This Recipe Works
This recipe works because the espresso-and-oat-milk base is built and combined fully as its own distinct layer before any foam is added, and that foam itself is frothed specifically thick and dry-leaning — using barista-style oat milk, which is formulated to actually hold that structure — rather than a thin sheen better suited to a different drink entirely.
Topping the base with a generous, separately built foam cap, rather than stirring it through, preserves the visible contrast between clear ice, pale coffee base, and thick foam that defines a proper cappuccino. Serving immediately protects that foam’s texture before it has time to settle and soften.
Ingredient Breakdown
Freshly Brewed, Concentrated Espresso
The coffee foundation — needs genuine strength to stay present against oat milk’s naturally softer, sweeter character.
Barista-Style Oat Milk
The specified milk — formulated specifically to hold thick, stable foam in a way standard oat milk can’t sustain.
Thick, Dry-Leaning Foam (Separately Built)
The defining structural component — this substantial cap, rather than a thin sheen, is what makes the drink read as a genuine cappuccino.
Layered Build (Base, Then Foam on Top)
The critical technique — keeps the two components visually and texturally distinct rather than blending together.
Light Cocoa Dusting
The finishing touch — a restrained amount that completes the presentation without masking the foam’s own texture and colour.
Flavor Structure Explained
This iced oat milk cappuccino follows a layered balance model:
- Bold coffee foundation (concentrated espresso)
- Soft sweet body (chilled oat milk base)
- Thick airy cap (dense oat milk foam)
- Warm aromatic finish (cocoa dusting)
Concentrated espresso provides a bold, clean coffee foundation strong enough to stand out against oat milk’s naturally soft sweetness. The chilled oat milk base adds gentle body and mellow flavour beneath the foam. A thick, airy cap of separately frothed oat milk foam sits visibly above that base, contributing genuine textural contrast rather than simply more liquid milk. A light dusting of unsweetened cocoa powder finishes the drink with a warm, faintly bitter aromatic note that echoes the espresso beneath.
Common Mistakes to Avoid
- Frothing the Foam Too Lightly – A thin, sheer froth reads more like an iced latte or flat white than a proper cappuccino. Always froth thick and dry-leaning for a substantial cap.
- Using Standard Instead of Barista-Style Oat Milk – Standard oat milk foams poorly and collapses faster. Always use a barista-formulated version for stable, voluminous foam.
- Stirring the Foam Through the Base Instead of Topping It Separately – This loses the drink’s defining visual and textural layering. Always keep the foam as its own distinct top layer.
- Using Weak Espresso – Oat milk’s natural sweetness can overwhelm a thin shot. Always brew genuinely concentrated, clean espresso.
- Letting the Drink Sit Before Serving – Oat milk foam settles and softens faster than dairy foam. Always serve immediately after topping with foam.
Variations
Sweeter Version
Add a small amount of simple syrup to the espresso before building the base for a more classic, lightly sweetened café-style drink.
Extra Cocoa Version
Increase the cocoa dusting slightly, or substitute a light dusting of cinnamon for a different warm, aromatic finish.
Almond Milk Version
Substitute a barista-style almond milk for the oat milk, accepting a slightly different, lighter foam texture.
Stronger Version
Increase to 3 shots of espresso per serving for a bolder, more coffee-forward drink while keeping the same foam-topped structure.
Storage & Make-Ahead
This drink is meant to be built, foamed, and served fresh; it does not hold or store well once assembled, since both the ice and the oat milk foam degrade quickly.
Espresso can be brewed just before building the glasses, but should not be brewed far in advance, since its flavour and aroma fade noticeably as it sits.
Chilled barista-style oat milk should be kept refrigerated until the moment of frothing for the best foam stability.
Frequently Asked Questions
Why does the foam need to be thick and dry rather than a thin sheen?
A cappuccino’s identity depends specifically on a substantial, visible foam cap sitting above the liquid. A thin, light froth — the kind used for a flat white or latte — produces a genuinely different drink, since that thick foam layer is the actual defining feature separating a cappuccino from other espresso-and-milk formats.
Why does this recipe specifically call for barista-style oat milk rather than standard oat milk?
Barista blends are formulated with additional fat and stabilisers specifically to hold air and structure under frothing. Standard oat milk, designed mainly for drinking rather than foaming, tends to produce a thinner, less voluminous foam that also collapses considerably faster once poured.
Why does the espresso need to be genuinely concentrated rather than a standard strength?
Oat milk’s naturally softer, sweeter character means a weak or thin espresso has less presence against it than the same shot would have against dairy milk. Concentrated espresso is what keeps the coffee flavour clearly noticeable rather than fading into the background.
Why does the foam need to be built and added separately rather than stirred through the whole drink?
Building the espresso-and-oat-milk base fully first, then topping it with a separately made foam cap, preserves the visible contrast between clear ice, the pale coffee base, and the thick foam above it. Stirring the foam through from the start would lose that defining layered presentation.
Are there other iced espresso and plant-milk drinks worth trying?
Iced Flat White, Classic Iced Latte, Honey Almondmilk Cold Brew, and Coconut Iced Latte all build on a related espresso-and-milk foundation, each taking a different direction with milk type, foam texture, or sweetness worth exploring.
Nutrition Facts
( per serving )
Calories
~130 kcal
Protein
3 g
Fat
5 g
Carbs
16 g
Calories
~130 kcal
Protein
3 g
Fat
5 g
Carbs
16 g
Related Recipes
Related Recipes

Iced Americano with Lemon
Cold filtered water and ice topped with freshly brewed espresso, finished with a briefly warmed lemon peel twist for elegant citrus lift.
Chocolate Cream Cold Brew
Strong, chilled cold brew coffee topped with a thick, cleanly dissolved chocolate cream cold foam that slowly marbles into the coffee.
Coconut Iced Latte
Chilled barista coconut milk and freshly brewed espresso over ice, finished with a soft coconut cream top layer and toasted coconut flakes.

You might also like
You might also like
Avocado Toast with Jammy Eggs
Deeply toasted sourdough with chunky lemon-brightened smashed avocado and precisely timed jammy eggs, finished with chili flakes and herbs.
Basil Lemonade — Blended
Lemon zest syrup off heat, basil added last starting at ⅓ cup — blended 15–25 seconds, served immediately for slushy texture. Warm-herbal and unexpectedly elegant.
Cinnamon Dolce Iced Latte
Warm cinnamon-brown sugar syrup, cold milk, and ice topped with freshly brewed espresso, for a milk-forward, gently spiced latte.


Iced Oat Milk Cappuccino
Ingredients
Method
- Brew 120ml espresso total, equal to 4 standard 30ml shots. Let it stand for 1–2 minutes so it is still fresh and aromatic, but not aggressively hot when poured over the ice. The espresso should taste clean and concentrated. Because oat milk is naturally a little sweeter and softer than dairy milk, weak espresso gets lost fast. Oat milk’s own natural sweetness and softer character mean a weak or thin espresso has considerably less presence against it than the same shot would have against dairy milk — genuinely concentrated espresso is what keeps the coffee flavour clearly present rather than fading into the background.
- Divide the ice between 2 glasses. Pour about 60ml espresso into each glass. Add about 60–70ml chilled oat milk to each glass. Stir briefly so the espresso and oat milk combine into a pale caramel-beige base. The drink base should already look lighter and warmer in tone than a standard iced coffee, but still clearly darker and more concentrated than a latte base. Building and combining this base fully before any foam is added establishes the drink’s core colour and strength as its own distinct layer — the foam that follows is meant to sit visibly on top of this base rather than being stirred through it from the start.
- Use the remaining chilled oat milk to make the cappuccino foam. Froth it until it becomes thick, airy, and dry-leaning, with a substantial cap rather than a thin silky surface. This can be done with a milk frother, a steam wand used carefully on cold milk if your setup allows it, or a handheld frother. The goal is a generous cappuccino-style foam, not a flat white sheen and not a latte-style minimal froth. The oat milk foam should be noticeably voluminous and stable, slightly beige-cream rather than pure white, and airy enough to sit high above the drink rather than disappearing into it immediately. Barista-style oat milk works best here. Standard oat milk often foams poorly and collapses faster. Barista-style oat milk is specifically formulated with additional stabilisers and fat content to hold air and structure under frothing — standard oat milk lacks that formulation and tends to produce a foam that’s both less voluminous and considerably less stable once poured.
- Spoon or pour the thick oat milk foam over each glass, dividing it evenly and creating a generous cappuccino cap. The ice should still be visible through the lower sides of the glass, while the upper portion is crowned with thick foam. This is what makes it a cappuccino. If the top layer is only a thin froth, it reads more like an iced latte. The foam should feel substantial and sit visibly above the liquid. The visible contrast between clear ice below and thick, opaque foam above is the drink’s defining visual signature — a thin, sparse foam layer collapses that contrast and pushes the presentation toward a latte’s more uniform look instead.
- Dust the top of each drink lightly with unsweetened cocoa powder. Serve immediately. The final drink should have three clear visual cues: a pale caramel oat-milk coffee base, visible ice below, and a thick cream-coloured foam cap with a light cocoa finish. A light dusting rather than a heavy cocoa layer is what finishes the drink without masking the foam’s own colour and texture — too much cocoa would turn the visual focus toward the chocolate dusting rather than the foam itself.