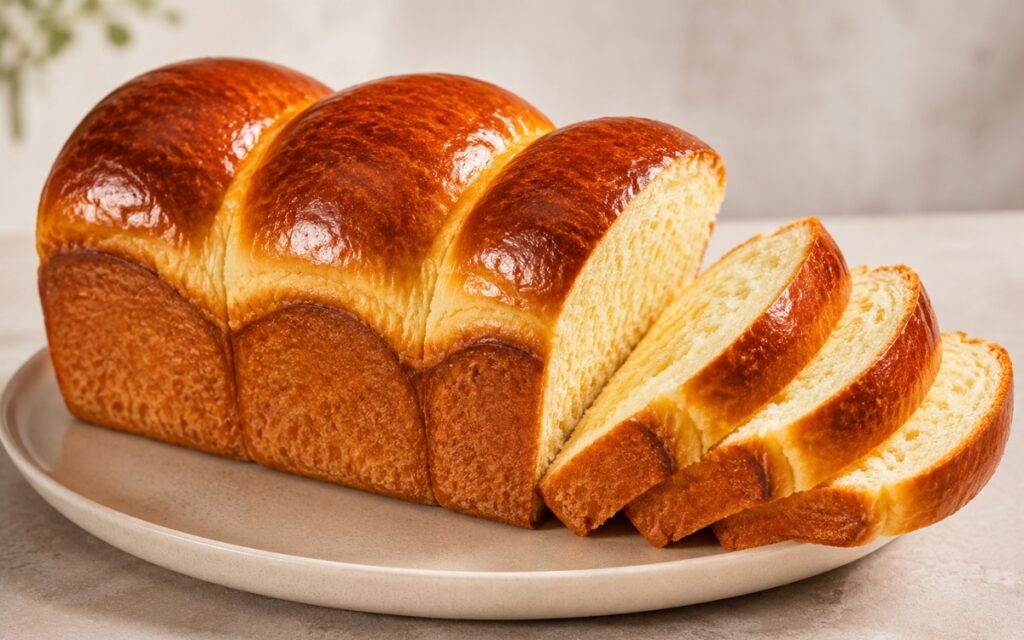
Brioche Toast Bread
An enriched dough built on the French brioche principle: a high butter and egg ratio that produces the specific tender, slightly sweet, golden-crumbed loaf that no lean bread can approximate — with the structure, height, and even sliceable crumb of a pullman-style toast bread rather than the free-form rolls and braids that brioche usually produces. Butter added gradually, one piece at a time, after the initial dough structure is established — the technique that develops a gluten network first and then enriches it, rather than smothering the flour in fat from the start and preventing development entirely. Overnight cold fermentation in the refrigerator — the slow, low-temperature rise that builds flavour complexity and makes the dough firmer, easier to shape, and more extensible than a rushed room-temperature rise. The finished loaf: deeply golden, glossy from the egg wash, soft and slightly springy when squeezed, with a crumb that toasts to a golden, caramelised surface and tears into pillowy, buttery layers. The bread that makes French toast, breakfast sandwiches, and grilled cheese specifically better.
Prep Time : 30 min
Cook Time : 32–38 min
Servings : 12 slices
30 min
32–38 min
12 slices
Ingredients
For the Brioche Dough
• 500g all-purpose flour
• 8g fine sea salt
• 30g granulated sugar
• 7g instant dry yeast
• 10g honey — this one on Amazon
• 220g warm whole milk — 24–27°C
• 2 whole eggs
• 2 egg yolks
• 110g unsalted butter, very soft but not melted — cut into small pieces, at room temperature — this one on Amazon
For the Egg Wash
• 1 egg
• 1 tbsp whole milk
This post may contain affiliate links. As an Amazon Associate I earn from qualifying purchases, at no additional cost to you.
Directions
- Activate the Yeast and Combine the Wet Ingredients
In a large mixing bowl, combine the 220g of warm milk — measured at 24–27°C specifically, as temperatures above 30°C begin inhibiting yeast activity and temperatures above 43°C kill it — with the 10g of honey and 7g of instant dry yeast. Stir briefly and allow to sit for 5 minutes. After 5 minutes the mixture should show visible foam and small bubbles across the surface — the sign that the yeast is active and viable. If no foam appears after 5 minutes, the yeast is likely dead or the milk temperature was incorrect; discard and begin again with fresh yeast and correctly tempered milk. Add the 2 whole eggs and 2 egg yolks to the foamy milk mixture. Whisk until completely combined and uniform — no visible yolk streaks remaining. The four-egg combination (two whole, two yolks) is the specific enrichment ratio that produces the characteristic golden crumb colour and the rich, slightly custard-adjacent flavour of brioche. The yolks’ carotenoid pigments are what produce the golden colour; the whites provide structure and moisture. More yolks than whites produces a richer result; this ratio balances colour and richness against structural integrity. - Combine with the Dry Ingredients and Develop Initial Structure
In a separate bowl, whisk together the 500g of flour, 30g of sugar, and 8g of salt. Add the dry mixture to the wet mixture. Begin kneading — either by hand on a lightly floured surface or with a stand mixer fitted with the dough hook on medium-low speed. Knead for 5–7 minutes until the initial rough, shaggy mass smooths into a cohesive dough that is noticeably more elastic and extensible than at the start. At this stage the dough should be somewhat sticky and smooth but not yet fully developed — it will tear rather than stretch when pulled. This initial kneading establishes the primary gluten network that will subsequently be enriched by the butter. - Add the Butter Gradually
This is the most technique-critical and most patience-requiring step in the recipe, and it is non-negotiable in its execution. The butter must be added gradually, one small piece at a time, with thorough kneading after each addition until the piece is fully absorbed and no visible butter streaks remain before the next piece enters the dough. The reason for gradual addition is structural: fat inhibits gluten formation by coating the flour’s protein strands and preventing them from bonding into the extended gluten network. If all the butter is added simultaneously at the beginning, the fat overwhelms the flour and prevents any meaningful gluten development — producing a greasy, structureless mass that cannot hold the carbon dioxide from fermentation and will not rise. Added gradually after initial gluten development, each piece of butter is absorbed into an existing gluten network and lubricates rather than prevents the structure, producing the specific smooth, glossy, slightly elastic final dough. Add the 110g of soft butter in approximately 10–12 pieces over the course of 10–12 minutes of continuous kneading. The butter must be genuinely soft — cold butter breaks the gluten strands during incorporation and creates grey, greasy streaks; melted butter produces a different emulsification and a different crumb texture. Soft, room-temperature butter that smears easily between fingers is the correct starting point. Continue kneading for the full 10–12 minutes until the dough is completely smooth, glossy, slightly tacky but not wet or sticky, and passes the windowpane test: stretch a small piece slowly between your fingers — a well-developed brioche dough stretches into a thin, translucent membrane before tearing. - First Rise and Overnight Refrigeration
Transfer the dough to a lightly greased bowl and cover tightly with plastic wrap. Allow to rest at room temperature for 45–60 minutes — not until doubled, but until slightly puffed and relaxed from the kneading. This brief room-temperature rest begins the fermentation and allows the gluten to relax before the cold slow-down. Transfer the covered bowl to the refrigerator and allow to ferment overnight — a minimum of 8 hours and up to 16 hours. During the cold fermentation the yeast remains active but at a greatly reduced metabolic rate, producing carbon dioxide slowly while also producing the flavour compounds — organic acids, esters, and alcohols — that develop over time and make the overnight brioche taste noticeably more complex and more flavourful than a same-day rushed version. The cold temperature also firms the butter within the dough, making the dough significantly easier to shape in the morning — cold, firm brioche dough shapes cleanly and holds its form; room-temperature brioche dough is soft and difficult to manipulate. Same-Day Alternative: Skip the refrigeration and allow the dough to rise at room temperature for 1½–2 hours, or until doubled in volume. Watch the dough rather than the clock — ambient temperature, yeast vigour, and dough hydration all affect timing. An over-proofed dough that has risen beyond doubled will have weakened gluten structure and may collapse during baking; a correctly doubled dough will spring back slowly when poked with a floured finger. - Shape the Loaf
Remove the refrigerated dough from the refrigerator. Allow to sit at room temperature for 15–20 minutes to relax slightly. The dough will be cold, firm, and significantly easier to handle than room-temperature brioche. Gently deflate the dough by pressing it down. Divide into 3 equal portions — a kitchen scale produces the most consistent equal portions; three equal portions in a standard 23×13cm loaf pan produce the characteristic three-crowned top that is the visual hallmark of a classic toast bread. Shape each portion into a tight log or ball — pulling the surface toward the base and pinching the seam closed — to build surface tension. Surface tension in shaped dough is what produces the smooth, evenly rounded rise during proofing; loosely shaped dough with no surface tension produces irregular, flat-topped results. Place the three shaped portions side by side, seam-side down, in a buttered 23×13cm (9×5 inch) loaf pan. The pieces should touch each other and fill the pan’s length evenly. Cover loosely with lightly greased plastic wrap or a clean damp cloth. - Final Proof
Allow to proof at room temperature for 45–75 minutes — until the dough is noticeably puffed, slightly domed above the pan’s rim, and springs back slowly (but does return) when poked. The final proof window varies significantly with ambient temperature: a warm kitchen at 24°C may proof the shaped loaf in 45 minutes; a cool kitchen at 18°C may require 75–90 minutes. The dough is correctly proofed when it looks pillowy and soft and has visibly expanded from its shaped size. Under-proofed dough produces a dense, tight crumb and may burst at the sides during baking; over-proofed dough loses structural integrity and collapses or sinks after baking. Preheat the oven to 175°C during the final proof period. - Egg Wash and Bake
Whisk together 1 egg and 1 tbsp of whole milk until uniform. Using a pastry brush, apply a thin, even coat of egg wash across the entire top surface of the proofed loaf — reaching all three domed crowns but not dripping into the sides of the pan where it would adhere and prevent the loaf from releasing cleanly. The egg wash’s protein and fat produce the specific deep amber, glossy, lacquered surface during baking that distinguishes a brioche from an unfinished loaf. Place in the preheated 175°C oven. Bake for 32–38 minutes until the top is a deep, even golden-brown across all three crowns and the internal temperature reads 90–92°C at the centre of the loaf — insert the thermometer from the side through the centre mass, not from the top. At 90–92°C the crumb is fully set and cooked through; below this the centre remains gummy. If the top surface begins browning significantly before 32 minutes — check at 20–22 minutes — loosely tent with a sheet of aluminium foil for the remainder of the baking time. - Cool Before Slicing
Remove from the oven and allow the loaf to cool in the pan on a wire rack for 10 minutes. After 10 minutes, use the pan’s sides to gently loosen the loaf and transfer it to the wire rack. Allow to cool completely to room temperature before slicing — a minimum of 1 hour. Hot brioche cut immediately produces a gummy, compressed crumb that tears rather than slicing cleanly; fully cooled brioche produces clean, even 2cm slices with visible, open crumb structure.
*Notes :
- The overnight cold fermentation is the specific quality decision that most distinguishes bakery-quality brioche from a same-day rushed version. Cold fermentation produces flavour through a slow accumulation of organic acids, esters, and alcohols as the yeast and beneficial bacteria process the dough’s sugars over 8–16 hours. The same-day version is good; the overnight version has a specific depth and complexity — a barely perceptible background tang and a more aromatic, more developed butter-and-egg flavour — that makes it noticeably more satisfying as a toast bread.
- The windowpane test is the most reliable indicator of sufficient gluten development in an enriched dough, and it is worth performing before accepting the dough as ready for its first rise. Take a small piece — roughly golf ball size — and stretch it slowly and steadily between your fingers. A fully developed dough stretches into a thin, translucent membrane, similar to a soap bubble, before tearing. An underdeveloped dough tears immediately without thinning. Underdeveloped brioche dough produces a dense, heavy loaf without the open, tender crumb that the recipe produces when properly kneaded.
- This bread is specifically well-suited to French toast — its high egg and butter content produces a crumb that absorbs custard at the correct rate without over-saturating, and its inherent richness makes the finished French toast taste specifically indulgent. See the Classic French Toast recipe for the technique.
Why This Recipe Works
This recipe works because it applies the two most important principles of enriched dough development: gradual butter addition after initial gluten development rather than concurrent, and overnight cold fermentation for flavour complexity and workability.
The three-piece shaping produces the even, crowned top and the consistent, uniform crumb that toast bread specifically requires. The internal temperature target — rather than time alone — ensures the centre is correctly baked regardless of oven variation.
Ingredient Breakdown
Four-Egg Enrichment (Two Whole, Two Yolks)
The richness and colour system — yolks for the golden crumb pigment and custard-adjacent flavour, whites for structure and moisture.
Gradual Butter Addition (One Piece at a Time)
The gluten-preservation technique — fat added to existing gluten lubricates rather than prevents development; all-at-once addition prevents gluten formation entirely.
Honey in the Dough
The fermentation food and flavour note — the yeast feeds on the honey’s simple sugars for vigorous initial activity, and the honey’s floral character remains subtly present in the finished crumb.
Overnight Cold Fermentation
The flavour development stage — slow, low-temperature fermentation produces the organic acids, esters, and aromatic alcohols that make overnight brioche noticeably more complex than same-day.
Three-Piece Shaping
The loaf structure technique — equal portions placed side by side produce even, consistent crowns and the uniform slice-to-slice crumb that toast bread requires.
90–92°C Internal Temperature Target
The doneness indicator — more reliable than time or colour for ensuring a fully baked, non-gummy centre.
Flavor Structure Explained
This Brioche toast bread follows a layered balance model:
- Buttery dairy core (high butter content)
- Rich egg depth (egg yolks and proteins)
- Fermented complexity (overnight cold proof)
- Floral sweetness (honey)
- Soft enriched crumb (brioche structure)
Butter defines the dominant character with smooth, slightly sweet dairy richness running through every slice. Eggs create the secondary layer, adding custard-like depth and richness that separate brioche from simpler enriched breads. Overnight fermentation contributes subtle organic acids and aromatic esters that make the loaf taste mature and developed rather than merely sweet. Honey adds delicate floral sweetness that rounds the profile in a way plain sugar cannot. Together these layers create a bread that feels rich, soft, and luxurious while still carrying underlying complexity from time and fermentation.
Common Mistakes to Avoid
- Adding All the Butter at Once – The most consequential technique error. Fat added before gluten development prevents the gluten network from forming — producing a greasy, structureless mass. Always one piece at a time with full incorporation between each addition.
- Using Cold Butter – Cold butter breaks the gluten strands and creates grey streaks. Always genuinely soft, room-temperature butter that smears easily.
- Not Performing the Windowpane Test – Underdeveloped dough produces a dense, heavy loaf. Always check gluten development before the first rise.
- Not Cooling Before Slicing – Hot brioche crumb is in a softened, partially molten state. Slicing hot produces gummy, compressed results. Always cool fully.
- Over-Proofing the Shaped Loaf – Over-proofed brioche has weakened gluten that collapses during baking, producing a sunken centre or burst sides. Always check with the poke test rather than relying on timing alone.
- Skipping the Egg Wash – The glossy, amber surface is the specific visual characteristic of a correctly finished brioche — and it requires the egg wash. It also contributes a thin, set protein layer at the surface that slightly crisps the crust.
Variations
Same-Day Version
Skip the overnight refrigeration and allow the dough to rise at room temperature for 1½–2 hours until doubled. The same shaping and baking technique applies; the flavour will be less complex but still excellent.
With Vanilla
Add 1 tsp of pure vanilla extract to the wet ingredients before combining with the dry — its aromatic sweetness amplifies the butter and honey character and produces a specifically more dessert-adjacent brioche.
Pullman Style Brioche Toast Bread
Use a lidded Pullman loaf pan (pain de mie tin) for a perfectly rectangular loaf with no crowns — the lid constrains the rise and produces even slices with square cross-sections. Reduce baking time slightly and check internal temperature at 28 minutes.
With Seeds
After applying the egg wash, scatter sesame seeds, poppy seeds, or a combination over the three crowns before baking — the seeds toast against the surface and add a nutty aromatic character to the finished crust.
Storage & Make-Ahead
At room temperature, brioche can be stored wrapped or in a sealed bag for up to 3 days. Its high butter and egg content helps keep the crumb moist much longer than lean breads.
For longer storage, slice the brioche once it has cooled completely, wrap each slice individually in plastic wrap, and freeze for up to 1 month. The slices can be toasted directly from frozen or thawed at room temperature for about 20 minutes.
The dough can also be refrigerated before baking. After shaping the loaf, cover it tightly and let it proof slowly overnight in the refrigerator. The next day, allow it to rest at room temperature for about 20 minutes before baking. This method is especially convenient when you want freshly baked brioche in the morning.
Frequently Asked Questions
Why is the butter added gradually rather than all at once?
Adding all the butter at once coats every flour particle in fat before gluten can develop — fat inhibits gluten formation by preventing the proteins from bonding. Adding gradually to already-developed gluten allows the fat to lubricate and enrich the existing network rather than preventing it from forming. The result is the smooth, elastic, well-structured dough that rises and holds its shape.
Why overnight in the refrigerator?
Cold fermentation slows the yeast’s metabolism, extending the fermentation period to 8–16 hours rather than 1–2 hours. This extended time allows the accumulation of flavour compounds — organic acids, esters, aromatic alcohols — that short fermentation cannot produce. The cold also firms the butter in the dough, making it firmer and significantly easier to shape cleanly than room-temperature brioche dough.
What is the windowpane test?
A test for gluten development: take a small piece of dough and stretch it slowly between your fingers. Fully developed dough stretches into a thin, translucent membrane without tearing — the gluten network is cohesive and extensible enough to stretch without breaking. Dough that tears immediately without thinning is underdeveloped and needs more kneading.
Why 90–92°C internal temperature?
Quick breads and enriched breads’ doneness cannot be reliably assessed by colour alone — the egg wash and sugar content produce deep browning at the surface well before the dense, enriched crumb has finished cooking through. At 90–92°C the starch has fully gelatinised, the proteins have set, and the crumb is no longer gummy at the centre. Below this temperature the crumb is underdone regardless of surface colour.
Why three pieces rather than one?
Three shaped portions placed side by side in the loaf pan produce three distinct crowns during proofing and baking — the visual characteristic of a classic brioche toast bread. The three crowns also ensure the dough fills the pan laterally, producing even slices of consistent size from end to end. A single shaped piece can produce uneven rise and inconsistent slice widths.
Nutrition Facts
( Per Serving — 1 slice )
Calories
~265 kcal
Protein
7 g
Fat
11 g
Carbs
35 g
Calories
~265 kcal
Protein
7 g
Fat
11 g
Carbs
35 g
Related Recipes
Related Recipes

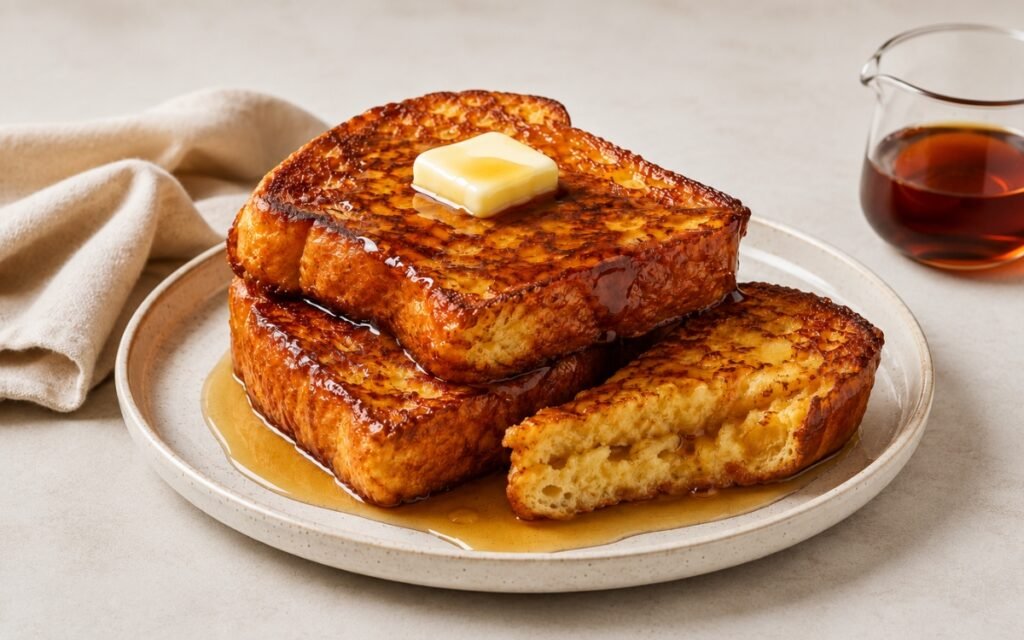
Classic French Toast
Three eggs and three yolks whisked with cream, cinnamon, and nutmeg — briefly soaking thick brioche and cooking 3 minutes per side in foaming butter until deeply golden. 30 minutes.
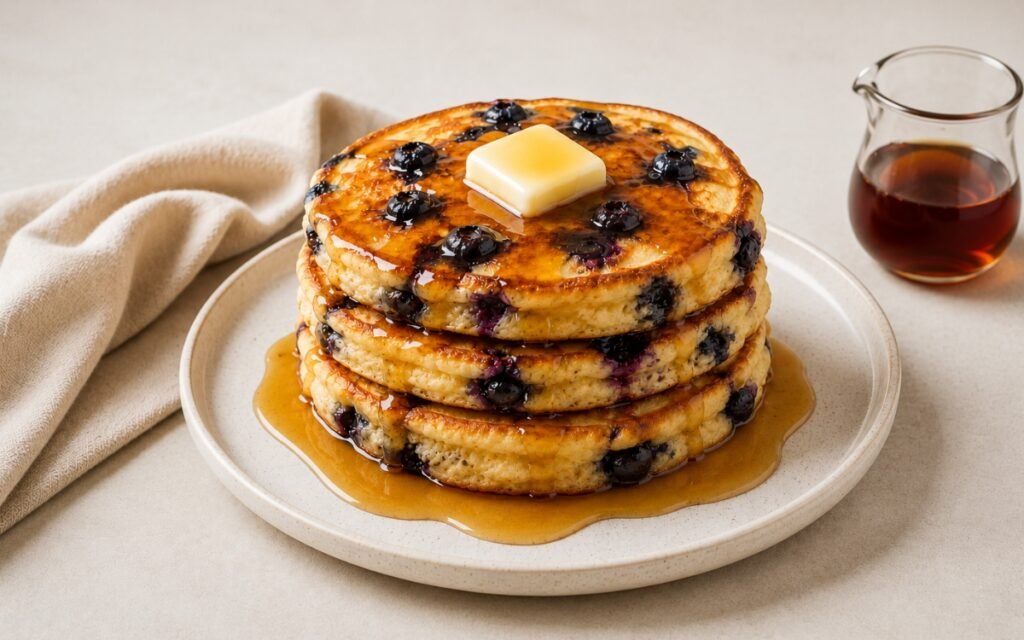
Blueberry Buttermilk Pancakes
Dual-leavened buttermilk batter mixed to 8 strokes with visible lumps — blueberries folded in and added again in the pan, maple syrup inside the batter. Tall, tender, and golden in 25 minutes.
Chilaquiles Rojos with Fried Eggs & Crema
Guajillo-ancho salsa roja from toasted dried chilies and charred vegetables — thick corn chips folded until softened but structured, topped with lard-fried eggs, crema, cotija, and pickled jalapeños. Serve immediately.

You might also like
You might also like
Garlic Butter Roasted Potatoes
Crispy golden potatoes tossed in garlic herb butter – incredibly flavorful and absolutely irresistible.
Ful Medames
Tomato paste bloomed in olive oil, garlic and cumin toasted in the same fat, fava beans half-mashed in the spiced base — lemon, tahini, olive oil, parsley, and cherry tomatoes. 30 minutes.
Brioche Burger Buns
Butter, egg, and milk enriched brioche buns with a deep golden egg-washed finish — soft, tender, and the bun that makes every burger and fried chicken sandwich worth making from scratch.


Brioche Toast Bread
Ingredients
Method
- In a large mixing bowl, combine the 220g of warm milk — measured at 24–27°C specifically, as temperatures above 30°C begin inhibiting yeast activity and temperatures above 43°C kill it — with the 10g of honey and 7g of instant dry yeast. Stir briefly and allow to sit for 5 minutes. After 5 minutes the mixture should show visible foam and small bubbles across the surface — the sign that the yeast is active and viable. If no foam appears after 5 minutes, the yeast is likely dead or the milk temperature was incorrect; discard and begin again with fresh yeast and correctly tempered milk. Add the 2 whole eggs and 2 egg yolks to the foamy milk mixture. Whisk until completely combined and uniform — no visible yolk streaks remaining. The four-egg combination (two whole, two yolks) is the specific enrichment ratio that produces the characteristic golden crumb colour and the rich, slightly custard-adjacent flavour of brioche. The yolks’ carotenoid pigments are what produce the golden colour; the whites provide structure and moisture. More yolks than whites produces a richer result; this ratio balances colour and richness against structural integrity.
- In a separate bowl, whisk together the 500g of flour, 30g of sugar, and 8g of salt. Add the dry mixture to the wet mixture. Begin kneading — either by hand on a lightly floured surface or with a stand mixer fitted with the dough hook on medium-low speed. Knead for 5–7 minutes until the initial rough, shaggy mass smooths into a cohesive dough that is noticeably more elastic and extensible than at the start. At this stage the dough should be somewhat sticky and smooth but not yet fully developed — it will tear rather than stretch when pulled. This initial kneading establishes the primary gluten network that will subsequently be enriched by the butter.
- This is the most technique-critical and most patience-requiring step in the recipe, and it is non-negotiable in its execution. The butter must be added gradually, one small piece at a time, with thorough kneading after each addition until the piece is fully absorbed and no visible butter streaks remain before the next piece enters the dough. The reason for gradual addition is structural: fat inhibits gluten formation by coating the flour’s protein strands and preventing them from bonding into the extended gluten network. If all the butter is added simultaneously at the beginning, the fat overwhelms the flour and prevents any meaningful gluten development — producing a greasy, structureless mass that cannot hold the carbon dioxide from fermentation and will not rise. Added gradually after initial gluten development, each piece of butter is absorbed into an existing gluten network and lubricates rather than prevents the structure, producing the specific smooth, glossy, slightly elastic final dough. Add the 110g of soft butter in approximately 10–12 pieces over the course of 10–12 minutes of continuous kneading. The butter must be genuinely soft — cold butter breaks the gluten strands during incorporation and creates grey, greasy streaks; melted butter produces a different emulsification and a different crumb texture. Soft, room-temperature butter that smears easily between fingers is the correct starting point. Continue kneading for the full 10–12 minutes until the dough is completely smooth, glossy, slightly tacky but not wet or sticky, and passes the windowpane test: stretch a small piece slowly between your fingers — a well-developed brioche dough stretches into a thin, translucent membrane before tearing.
- Transfer the dough to a lightly greased bowl and cover tightly with plastic wrap. Allow to rest at room temperature for 45–60 minutes — not until doubled, but until slightly puffed and relaxed from the kneading. This brief room-temperature rest begins the fermentation and allows the gluten to relax before the cold slow-down. Transfer the covered bowl to the refrigerator and allow to ferment overnight — a minimum of 8 hours and up to 16 hours. During the cold fermentation the yeast remains active but at a greatly reduced metabolic rate, producing carbon dioxide slowly while also producing the flavour compounds — organic acids, esters, and alcohols — that develop over time and make the overnight brioche taste noticeably more complex and more flavourful than a same-day rushed version. The cold temperature also firms the butter within the dough, making the dough significantly easier to shape in the morning — cold, firm brioche dough shapes cleanly and holds its form; room-temperature brioche dough is soft and difficult to manipulate.
- Same-Day Alternative: Skip the refrigeration and allow the dough to rise at room temperature for 1½–2 hours, or until doubled in volume. Watch the dough rather than the clock — ambient temperature, yeast vigour, and dough hydration all affect timing. An over-proofed dough that has risen beyond doubled will have weakened gluten structure and may collapse during baking; a correctly doubled dough will spring back slowly when poked with a floured finger.
- Remove the refrigerated dough from the refrigerator. Allow to sit at room temperature for 15–20 minutes to relax slightly. The dough will be cold, firm, and significantly easier to handle than room-temperature brioche. Gently deflate the dough by pressing it down. Divide into 3 equal portions — a kitchen scale produces the most consistent equal portions; three equal portions in a standard 23×13cm loaf pan produce the characteristic three-crowned top that is the visual hallmark of a classic toast bread. Shape each portion into a tight log or ball — pulling the surface toward the base and pinching the seam closed — to build surface tension. Surface tension in shaped dough is what produces the smooth, evenly rounded rise during proofing; loosely shaped dough with no surface tension produces irregular, flat-topped results. Place the three shaped portions side by side, seam-side down, in a buttered 23×13cm (9×5 inch) loaf pan. The pieces should touch each other and fill the pan’s length evenly. Cover loosely with lightly greased plastic wrap or a clean damp cloth.
- Allow to proof at room temperature for 45–75 minutes — until the dough is noticeably puffed, slightly domed above the pan’s rim, and springs back slowly (but does return) when poked. The final proof window varies significantly with ambient temperature: a warm kitchen at 24°C may proof the shaped loaf in 45 minutes; a cool kitchen at 18°C may require 75–90 minutes. The dough is correctly proofed when it looks pillowy and soft and has visibly expanded from its shaped size. Under-proofed dough produces a dense, tight crumb and may burst at the sides during baking; over-proofed dough loses structural integrity and collapses or sinks after baking. Preheat the oven to 175°C during the final proof period.
- Whisk together 1 egg and 1 tbsp of whole milk until uniform. Using a pastry brush, apply a thin, even coat of egg wash across the entire top surface of the proofed loaf — reaching all three domed crowns but not dripping into the sides of the pan where it would adhere and prevent the loaf from releasing cleanly. The egg wash’s protein and fat produce the specific deep amber, glossy, lacquered surface during baking that distinguishes a brioche from an unfinished loaf. Place in the preheated 175°C oven. Bake for 32–38 minutes until the top is a deep, even golden-brown across all three crowns and the internal temperature reads 90–92°C at the centre of the loaf — insert the thermometer from the side through the centre mass, not from the top. At 90–92°C the crumb is fully set and cooked through; below this the centre remains gummy. If the top surface begins browning significantly before 32 minutes — check at 20–22 minutes — loosely tent with a sheet of aluminium foil for the remainder of the baking time.
- Remove from the oven and allow the loaf to cool in the pan on a wire rack for 10 minutes. After 10 minutes, use the pan’s sides to gently loosen the loaf and transfer it to the wire rack. Allow to cool completely to room temperature before slicing — a minimum of 1 hour. Hot brioche cut immediately produces a gummy, compressed crumb that tears rather than slicing cleanly; fully cooled brioche produces clean, even 2cm slices with visible, open crumb structure.