
Brazilian Pão de Queijo
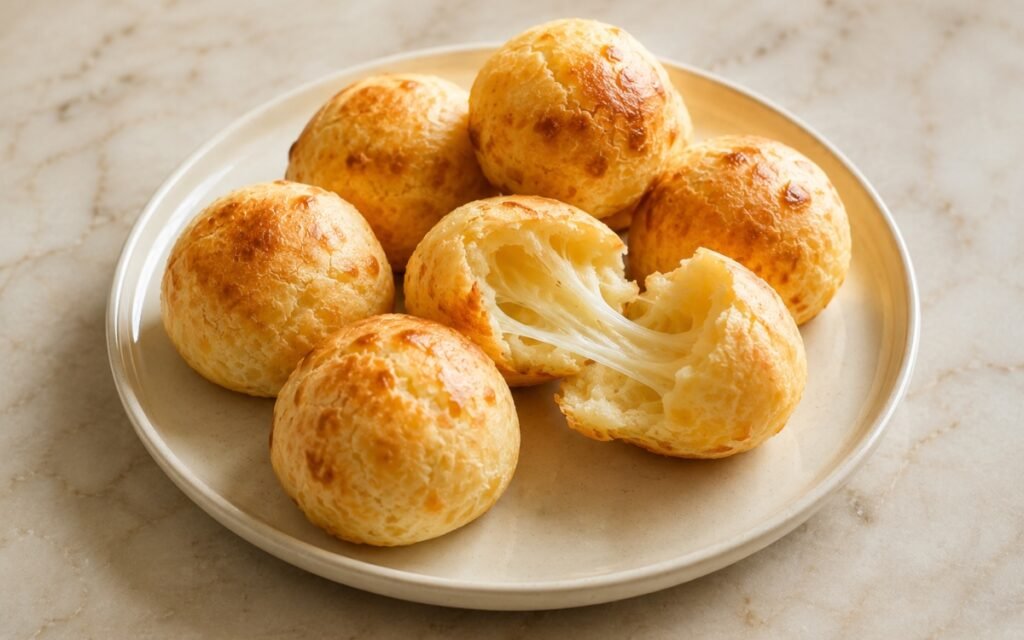
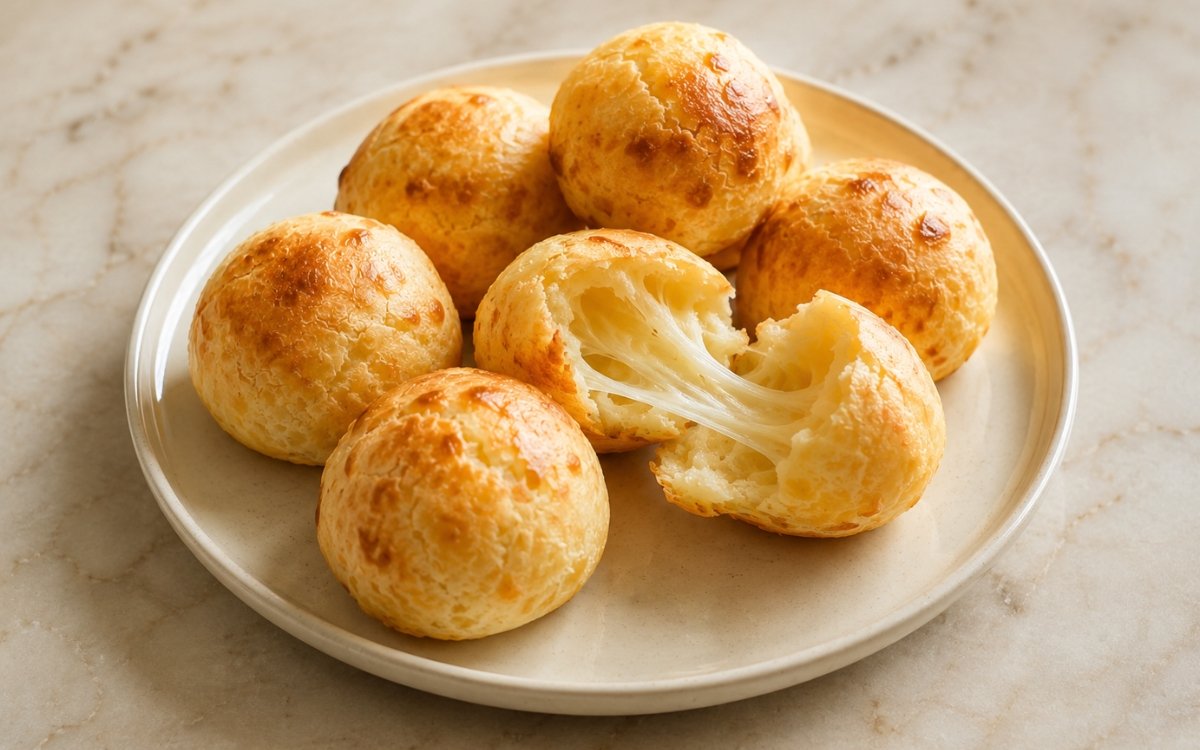
Classic Brazilian cheese breads made with tapioca starch, milk, oil, eggs, and cheese, baked into small golden puffed balls with cracked tops and chewy stretchy centres, served warm with one broken open to show the soft white interior and light cheese pull. Scalding the tapioca starch with hot liquid before anything else is added is the technique this entire recipe depends on — properly hydrated starch is what gives the finished bread its chewy, stretchy texture, while under-hydrated starch bakes dry and gritty, the same hot-liquid-into-starch principle used elsewhere in this collection whenever a dough needs real elasticity rather than a crumbly, bread-like crumb. Resisting the urge to add extra flour when the dough looks sticky and slippery matters just as much, since pão de queijo dough is supposed to stay tacky and elastic rather than firming up like a kneadable bread dough. Keeping the oven door closed for the first 15 minutes of baking protects the puff itself, since a sudden loss of heat at the wrong moment can collapse the structure before it has a chance to set. The payoff is a small golden ball with a cracked, puffed exterior giving way to a chewy, stretchy, cheese-pulling interior, best eaten within minutes of coming out of the oven.
Prep Time : 25 min
Cook Time : 25 min
Servings : 4
25 min
25 min
4
Ingredients
For the Pão de Queijo
• 300g tapioca starch, preferably polvilho doce or a mix of 200g polvilho doce and 100g polvilho azedo — this one on Amazon
• 240ml whole milk
• 80ml neutral oil
• 8g fine sea salt
• 2 large eggs
• 220g finely grated queijo Minas meia cura, or 160g low-moisture mozzarella plus 60g Parmesan if needed
• 20g unsalted butter, optional, for a richer dough — this one on Amazon
This post may contain affiliate links. As an Amazon Associate I earn from qualifying purchases, at no additional cost to you.
Directions
- Preheat the Oven
Preheat the oven to 200°C. Line a baking tray with parchment paper. The oven needs to be fully hot before baking. Pão de queijo relies on strong initial heat to puff properly. Preheating well ahead, rather than starting the oven partway through mixing the dough, ensures the balls hit consistent, fully developed heat the moment they go in — the initial burst of high heat is what drives the dramatic early puff this bread is known for. - Scald the Tapioca Starch
Place the tapioca starch in a large mixing bowl. In a small saucepan, combine the milk, neutral oil, salt, and butter if using. Bring just to a simmer over medium heat, until steaming hot and bubbling lightly at the edges. Pour the hot liquid over the tapioca starch and mix immediately with a wooden spoon or sturdy spatula. The mixture will look lumpy, sticky, and uneven at first. This scalding step is the main turning point. If the starch is not properly hydrated with hot liquid, the cheese breads bake dry, gritty, and flat. Tapioca starch behaves very differently from wheat flour — it needs genuine heat to properly hydrate and develop the elastic, gel-like structure that gives pão de queijo its signature chew, which is why cold or lukewarm liquid simply won’t produce the same result no matter how thoroughly it’s mixed. - Cool the Dough Slightly
Let the dough cool for 10 minutes, stirring once or twice to release steam. It should be warm but not hot enough to scramble the eggs. This brief window matters for the same reason it does in any egg-enriched dough built on a hot base — dough that’s still too hot will partially cook the eggs on contact, leaving visible curds rather than a smooth, incorporated mixture. - Add the Eggs
Add the eggs one at a time, mixing thoroughly after each addition. The dough may look broken and slippery before it comes back together. Keep mixing until sticky, stretchy, and cohesive. The dough should be tacky and elastic, not dry like bread dough. Do not add extra flour unless it is completely unworkable. Adding the eggs one at a time rather than together gives each one a chance to fully incorporate before the next goes in — dumping both eggs in at once risks a dough that stays visibly broken and never comes back together as smoothly. - Add the Cheese
Mix in the grated cheese until evenly distributed. The dough should now be thick, sticky, and scoopable. If it feels too loose to shape, rest it for 20 minutes or chill for 10–15 minutes. Tapioca starch firms as it hydrates. This rest, if needed, isn’t idle waiting — tapioca starch continues absorbing moisture and firming up for a period after mixing, so a dough that seems too loose to shape at first often becomes perfectly workable with just a short amount of additional time. - Shape the Cheese Balls
Lightly oil your hands or use a small scoop. Divide the dough into 20 balls, about 35–38g each. Place them on the prepared tray with space between them. Do not flatten them. They should stay round so they puff into small golden balls. Lightly oiling your hands rather than working with dry hands is what keeps this genuinely sticky dough from clinging and tearing as it’s portioned and rolled — a small detail that makes shaping considerably easier without needing to add extra starch. - Bake
Bake at 200°C for 20–25 minutes, until puffed, golden-brown, and cracked on the surface. Do not open the oven during the first 15 minutes. Sudden heat loss can make the puffs collapse before the structure sets. The early minutes of baking are when the dramatic rise happens, driven by steam building rapidly inside each ball — opening the oven during this window lets heat escape suddenly, and the resulting temperature drop can cause the still-unset structure to deflate before it’s had a chance to hold its shape. - Serve
Let the pão de queijo cool for 3–5 minutes, then serve warm. Break one open while still hot to show the chewy interior and melted cheese pull. This brief rest is enough to make the balls safe to handle without losing much heat — pão de queijo is genuinely at its best in this narrow window, while the interior is still warm, soft, and stretchy.
*Notes :
- The scalding step deserves to be understood as the technical foundation of this entire recipe rather than a routine mixing instruction. Tapioca starch doesn’t behave like wheat flour when it meets liquid — it needs real, sustained heat to properly hydrate and develop the gel-like, elastic structure that becomes the bread’s signature chew. Pouring cold or merely warm liquid over the starch, even if mixed thoroughly, simply won’t trigger that same transformation, which is why this step is singled out as the main turning point between a properly textured pão de queijo and one that bakes dry, gritty, and flat.
- The dough’s stickiness is a genuine feature of this recipe rather than a sign something’s gone wrong, and it’s worth resisting the instinct to correct it by adding extra flour or starch. Pão de queijo dough is meant to stay tacky and somewhat loose, closer to a thick batter than a kneadable bread dough — trying to firm it up into something that handles like standard dough actually works against the chewy, stretchy texture this bread is known for.
- Using a blend of polvilho doce (sweet tapioca starch) and polvilho azedo (sour, fermented tapioca starch) rather than polvilho doce alone produces a noticeably different result worth understanding if both are available. Polvilho doce alone gives good chew and softness, but polvilho azedo contributes extra puff and a subtle tanginess that’s characteristic of many traditional versions of this bread — a blend of the two, rather than either alone, is generally considered closer to the ideal.
- Keeping the oven door closed through the first 15 minutes of baking is one of the more consequential small rules in this recipe, given how dramatically pão de queijo puffs in its early baking minutes. That rapid rise is driven by steam building quickly inside each ball while the structure is still soft and unset — any sudden drop in oven temperature during that window, even briefly, risks the puffs collapsing before they’ve had time to hold their shape.
Why This Recipe Works
This recipe works because the tapioca starch is properly scalded with genuinely hot liquid before anything else touches it, developing the elastic, gel-like structure this bread depends on for its chew.
The dough is deliberately left sticky rather than corrected toward a drier, more bread-like consistency, and the eggs are added gradually into dough that’s been cooled to the right window so they incorporate smoothly rather than scrambling.
Keeping the oven closed through the critical early baking period protects the dramatic initial puff, and serving within minutes of baking is what preserves the warm, stretchy interior this bread is best known for.
Ingredient Breakdown
Properly Scalded Tapioca Starch
The structural foundation — hydrated with genuinely hot liquid to develop the elastic, chewy texture this bread depends on.
Polvilho Doce and Polvilho Azedo Blend
The specified starch types — sweet tapioca for chew and softness, sour tapioca for extra puff and subtle tang.
Sequentially Added Eggs
The binding technique — mixed in one at a time into properly cooled dough, ensuring full incorporation without scrambling.
Finely Grated Cheese
The flavour and pull component — distributed evenly through the sticky dough for a consistent interior rather than pockets of unmelted cheese.
Undisturbed Early Baking
The critical technique — the oven stays closed for the first 15 minutes, protecting the dramatic initial puff from collapsing.
Flavor Structure Explained
This pão de queijo follows a layered balance model:
- Crisp golden foundation (baked, cracked exterior)
- Chewy stretchy centre (scalded tapioca dough)
- Rich savoury body (melted cheese throughout)
- Warm milky undertone (milk, oil, butter)
The golden, cracked exterior provides a light, crisp contrast against everything inside. The chewy, stretchy interior, built on properly scalded tapioca starch, defines the bread’s signature texture. Melted cheese runs throughout the dough rather than sitting as a separate filling, giving every bite rich, savoury depth and a light pull. A warm, milky undertone from the milk, oil, and optional butter rounds out the flavour, keeping the whole bread simple and comforting rather than heavily seasoned.
Common Mistakes to Avoid
- Using Cold or Lukewarm Liquid Instead of Scalding Hot – This fails to properly hydrate the tapioca starch, producing dry, gritty, flat cheese breads. Always bring the milk mixture to a full simmer before pouring it over the starch.
- Adding Extra Flour to “Fix” a Sticky Dough – This dough is supposed to be tacky and loose, not dry and kneadable. Always let it rest or chill briefly instead if it seems too loose to shape.
- Opening the Oven During the First 15 Minutes – Sudden heat loss can collapse the puffs before their structure sets. Always wait until at least 15 minutes have passed before checking.
- Using Coarsely Chopped Cheese Instead of Finely Grated – Large cheese pieces distribute unevenly and can leak out and burn during baking. Always use finely grated cheese for an even interior.
- Serving After the Cheese Breads Have Fully Cooled – Pão de queijo firms up and loses its signature stretch as it cools. Always serve warm, ideally within minutes of coming out of the oven.
Variations
Herb-Flecked Version
Fold 10g of finely chopped fresh chives or parsley into the dough alongside the cheese for a herbaceous variation.
Extra-Cheesy Version
Increase the grated cheese to 260g for a richer, more pronounced cheese flavour throughout.
Mini Bites
Divide the dough into 30–35 smaller balls of about 20g each, reducing the bake time to 15–18 minutes, for bite-sized appetizer portions.
Filled Pão de Queijo
Press a small cube of a firmer cheese, such as a mild cheddar, into the centre of each ball before baking for a molten pocket at the middle.
Storage & Make-Ahead
Raw, shaped dough balls can be frozen on a tray until solid, then transferred to a bag or container and frozen for up to 2 months — bake directly from frozen, adding a few extra minutes to the bake time.
Baked pão de queijo can be stored at room temperature in an airtight container for up to 2 days, though the texture is noticeably better fresh.
To refresh cooled or day-old pão de queijo, warm in a 180°C oven for 5–7 minutes until heated through and slightly puffed again.
Pão de queijo is not well suited to microwave reheating, which tends to make the texture rubbery rather than restoring its chew.
Frequently Asked Questions
Why does the tapioca starch need to be scalded with hot liquid rather than mixed with cold?
Tapioca starch requires real heat to properly hydrate and develop its elastic, gel-like structure. Cold or lukewarm liquid won’t trigger that same transformation no matter how thoroughly it’s mixed, which is why scalding is treated as the main turning point in the whole recipe.
Why is the dough supposed to stay sticky rather than being kneaded firmer like bread dough?
Pão de queijo dough is fundamentally different from wheat-based bread dough — its stretchy, chewy texture comes specifically from a loose, tacky consistency. Adding extra starch to make it easier to handle actually works against the texture this bread is meant to have.
Why is it important not to open the oven during the first 15 minutes of baking?
The dramatic early puff is driven by steam building rapidly inside each ball while the structure is still soft. A sudden drop in oven temperature from opening the door during this window can cause that unset structure to collapse before it has time to hold its shape.
What’s the difference between polvilho doce and polvilho azedo, and does it matter which one is used?
Polvilho doce (sweet tapioca starch) gives good chew and softness, while polvilho azedo (sour, fermented tapioca starch) contributes extra puff and a subtle tang. A blend of both, rather than either alone, generally produces a result closer to the traditional texture and flavour.
Are there other crispy, cheesy snacks worth trying alongside this one?
Homemade Mozzarella Sticks make a good pairing if you’re after another crispy, cheesy snack — a genuinely different technique built around a breaded, fried cheese core rather than a baked, cheese-laced dough, but sharing the same appeal of a warm, pulling cheese centre.
Nutrition Facts
( per serving )
Calories
~420 kcal
Protein
14 g
Fat
24 g
Carbs
38 g
Calories
~420 kcal
Protein
14 g
Fat
24 g
Carbs
38 g
Related Recipes
Related Recipes

American Corn Dogs
Smoked frankfurters dusted in flour, dipped in thick cornmeal batter, and deep-fried until deeply golden, crisp, and slightly bumpy.
Classic Sparkling Lemonade
Lemon base chilled separately, sparkling water side-poured and gently stirred right before serving — less sugar for carbonation’s sweetness enhancement. Crisp, bright, and fully fizzy.
Grapefruit Orange Pitcher Drink
Brown sugar syrup with grapefruit and orange zest steeped 5–8 minutes maximum — 500ml each juice, salt, cold water, chilled. Bright, lightly bitter, and grown-up.



You might also like
You might also like
Mint Green Iced Tea
Green tea at 75–80°C for 2–3 minutes, mint clapped and infused cold 8–15 minutes, tasted from 8 — honey, chilled. Bold, cooling, and clean.
Patatas Bravas with Mayonnaise-Style Aioli
Potatoes parboiled, shaken rough, roasted on a preheated tray — smoky bravas sauce with sherry vinegar, creamy garlic aioli.
Iced Caramel Macchiato
Vanilla-sweetened cold milk, ice, and espresso poured over the top to create a dramatic dark swirl, finished with caramel sauce drizzle.


Brazilian Pão de Queijo
Ingredients
Method
- Preheat the oven to 200°C. Line a baking tray with parchment paper. The oven needs to be fully hot before baking. Pão de queijo relies on strong initial heat to puff properly. Preheating well ahead, rather than starting the oven partway through mixing the dough, ensures the balls hit consistent, fully developed heat the moment they go in — the initial burst of high heat is what drives the dramatic early puff this bread is known for.
- Place the tapioca starch in a large mixing bowl. In a small saucepan, combine the milk, neutral oil, salt, and butter if using. Bring just to a simmer over medium heat, until steaming hot and bubbling lightly at the edges. Pour the hot liquid over the tapioca starch and mix immediately with a wooden spoon or sturdy spatula. The mixture will look lumpy, sticky, and uneven at first. This scalding step is the main turning point. If the starch is not properly hydrated with hot liquid, the cheese breads bake dry, gritty, and flat. Tapioca starch behaves very differently from wheat flour — it needs genuine heat to properly hydrate and develop the elastic, gel-like structure that gives pão de queijo its signature chew, which is why cold or lukewarm liquid simply won’t produce the same result no matter how thoroughly it’s mixed.
- Let the dough cool for 10 minutes, stirring once or twice to release steam. It should be warm but not hot enough to scramble the eggs. This brief window matters for the same reason it does in any egg-enriched dough built on a hot base — dough that’s still too hot will partially cook the eggs on contact, leaving visible curds rather than a smooth, incorporated mixture.
- Add the eggs one at a time, mixing thoroughly after each addition. The dough may look broken and slippery before it comes back together. Keep mixing until sticky, stretchy, and cohesive. The dough should be tacky and elastic, not dry like bread dough. Do not add extra flour unless it is completely unworkable. Adding the eggs one at a time rather than together gives each one a chance to fully incorporate before the next goes in — dumping both eggs in at once risks a dough that stays visibly broken and never comes back together as smoothly.
- Mix in the grated cheese until evenly distributed. The dough should now be thick, sticky, and scoopable. If it feels too loose to shape, rest it for 20 minutes or chill for 10–15 minutes. Tapioca starch firms as it hydrates. This rest, if needed, isn’t idle waiting — tapioca starch continues absorbing moisture and firming up for a period after mixing, so a dough that seems too loose to shape at first often becomes perfectly workable with just a short amount of additional time.
- Lightly oil your hands or use a small scoop. Divide the dough into 20 balls, about 35–38g each. Place them on the prepared tray with space between them. Do not flatten them. They should stay round so they puff into small golden balls. Lightly oiling your hands rather than working with dry hands is what keeps this genuinely sticky dough from clinging and tearing as it’s portioned and rolled — a small detail that makes shaping considerably easier without needing to add extra starch.
- Bake at 200°C for 20–25 minutes, until puffed, golden-brown, and cracked on the surface. Do not open the oven during the first 15 minutes. Sudden heat loss can make the puffs collapse before the structure sets. The early minutes of baking are when the dramatic rise happens, driven by steam building rapidly inside each ball — opening the oven during this window lets heat escape suddenly, and the resulting temperature drop can cause the still-unset structure to deflate before it’s had a chance to hold its shape.
- Let the pão de queijo cool for 3–5 minutes, then serve warm. Break one open while still hot to show the chewy interior and melted cheese pull. This brief rest is enough to make the balls safe to handle without losing much heat — pão de queijo is genuinely at its best in this narrow window, while the interior is still warm, soft, and stretchy.