Ingredients
Method
Preheat the Oven
- Preheat the oven to 200°C. Line a baking tray with parchment paper. The oven needs to be fully hot before baking. Pão de queijo relies on strong initial heat to puff properly. Preheating well ahead, rather than starting the oven partway through mixing the dough, ensures the balls hit consistent, fully developed heat the moment they go in — the initial burst of high heat is what drives the dramatic early puff this bread is known for.
Scald the Tapioca Starch
- Place the tapioca starch in a large mixing bowl. In a small saucepan, combine the milk, neutral oil, salt, and butter if using. Bring just to a simmer over medium heat, until steaming hot and bubbling lightly at the edges. Pour the hot liquid over the tapioca starch and mix immediately with a wooden spoon or sturdy spatula. The mixture will look lumpy, sticky, and uneven at first. This scalding step is the main turning point. If the starch is not properly hydrated with hot liquid, the cheese breads bake dry, gritty, and flat. Tapioca starch behaves very differently from wheat flour — it needs genuine heat to properly hydrate and develop the elastic, gel-like structure that gives pão de queijo its signature chew, which is why cold or lukewarm liquid simply won't produce the same result no matter how thoroughly it's mixed.
Cool the Dough Slightly
- Let the dough cool for 10 minutes, stirring once or twice to release steam. It should be warm but not hot enough to scramble the eggs. This brief window matters for the same reason it does in any egg-enriched dough built on a hot base — dough that's still too hot will partially cook the eggs on contact, leaving visible curds rather than a smooth, incorporated mixture.
Add the Eggs
- Add the eggs one at a time, mixing thoroughly after each addition. The dough may look broken and slippery before it comes back together. Keep mixing until sticky, stretchy, and cohesive. The dough should be tacky and elastic, not dry like bread dough. Do not add extra flour unless it is completely unworkable. Adding the eggs one at a time rather than together gives each one a chance to fully incorporate before the next goes in — dumping both eggs in at once risks a dough that stays visibly broken and never comes back together as smoothly.
Add the Cheese
- Mix in the grated cheese until evenly distributed. The dough should now be thick, sticky, and scoopable. If it feels too loose to shape, rest it for 20 minutes or chill for 10–15 minutes. Tapioca starch firms as it hydrates. This rest, if needed, isn't idle waiting — tapioca starch continues absorbing moisture and firming up for a period after mixing, so a dough that seems too loose to shape at first often becomes perfectly workable with just a short amount of additional time.
Shape the Cheese Balls
- Lightly oil your hands or use a small scoop. Divide the dough into 20 balls, about 35–38g each. Place them on the prepared tray with space between them. Do not flatten them. They should stay round so they puff into small golden balls. Lightly oiling your hands rather than working with dry hands is what keeps this genuinely sticky dough from clinging and tearing as it's portioned and rolled — a small detail that makes shaping considerably easier without needing to add extra starch.
Bake
- Bake at 200°C for 20–25 minutes, until puffed, golden-brown, and cracked on the surface. Do not open the oven during the first 15 minutes. Sudden heat loss can make the puffs collapse before the structure sets. The early minutes of baking are when the dramatic rise happens, driven by steam building rapidly inside each ball — opening the oven during this window lets heat escape suddenly, and the resulting temperature drop can cause the still-unset structure to deflate before it's had a chance to hold its shape.
Serve
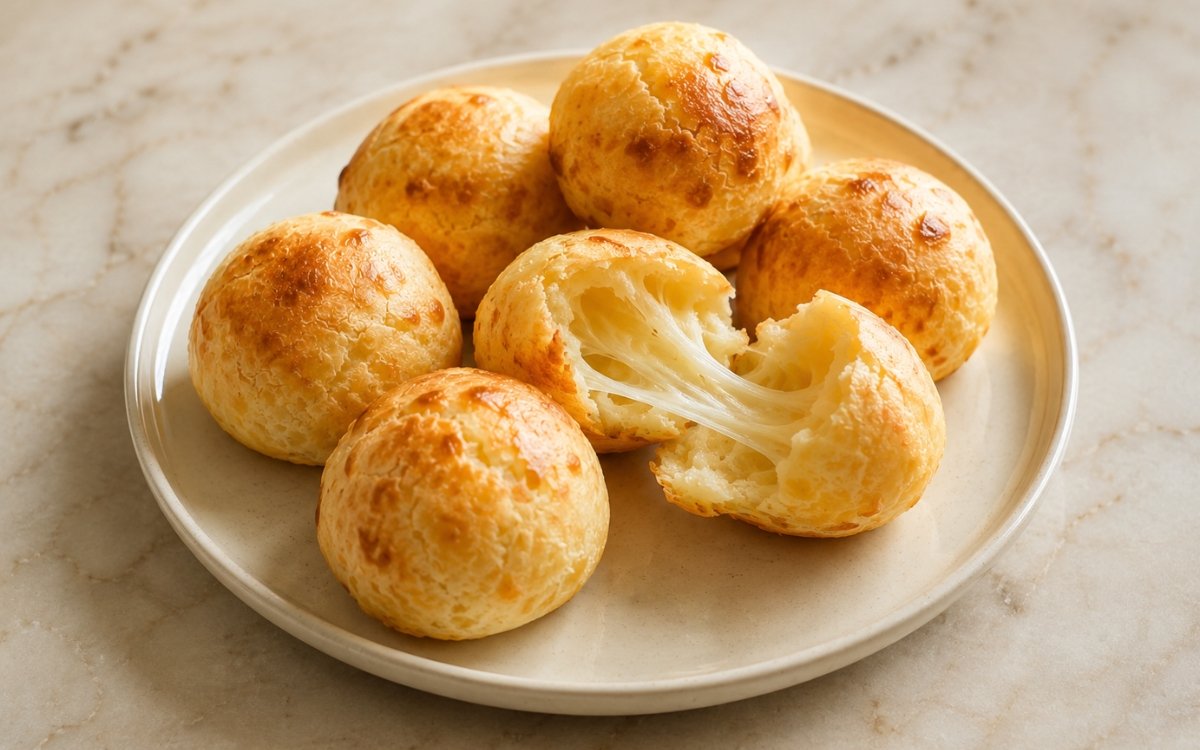
- Let the pão de queijo cool for 3–5 minutes, then serve warm. Break one open while still hot to show the chewy interior and melted cheese pull. This brief rest is enough to make the balls safe to handle without losing much heat — pão de queijo is genuinely at its best in this narrow window, while the interior is still warm, soft, and stretchy.
Notes
The scalding step deserves to be understood as the technical foundation of this entire recipe rather than a routine mixing instruction. Tapioca starch doesn't behave like wheat flour when it meets liquid — it needs real, sustained heat to properly hydrate and develop the gel-like, elastic structure that becomes the bread's signature chew. Pouring cold or merely warm liquid over the starch, even if mixed thoroughly, simply won't trigger that same transformation, which is why this step is singled out as the main turning point between a properly textured pão de queijo and one that bakes dry, gritty, and flat.
The dough's stickiness is a genuine feature of this recipe rather than a sign something's gone wrong, and it's worth resisting the instinct to correct it by adding extra flour or starch. Pão de queijo dough is meant to stay tacky and somewhat loose, closer to a thick batter than a kneadable bread dough — trying to firm it up into something that handles like standard dough actually works against the chewy, stretchy texture this bread is known for.
Using a blend of polvilho doce (sweet tapioca starch) and polvilho azedo (sour, fermented tapioca starch) rather than polvilho doce alone produces a noticeably different result worth understanding if both are available. Polvilho doce alone gives good chew and softness, but polvilho azedo contributes extra puff and a subtle tanginess that's characteristic of many traditional versions of this bread — a blend of the two, rather than either alone, is generally considered closer to the ideal.
Keeping the oven door closed through the first 15 minutes of baking is one of the more consequential small rules in this recipe, given how dramatically pão de queijo puffs in its early baking minutes. That rapid rise is driven by steam building quickly inside each ball while the structure is still soft and unset — any sudden drop in oven temperature during that window, even briefly, risks the puffs collapsing before they've had time to hold their shape.