
Brazilian Coxinha
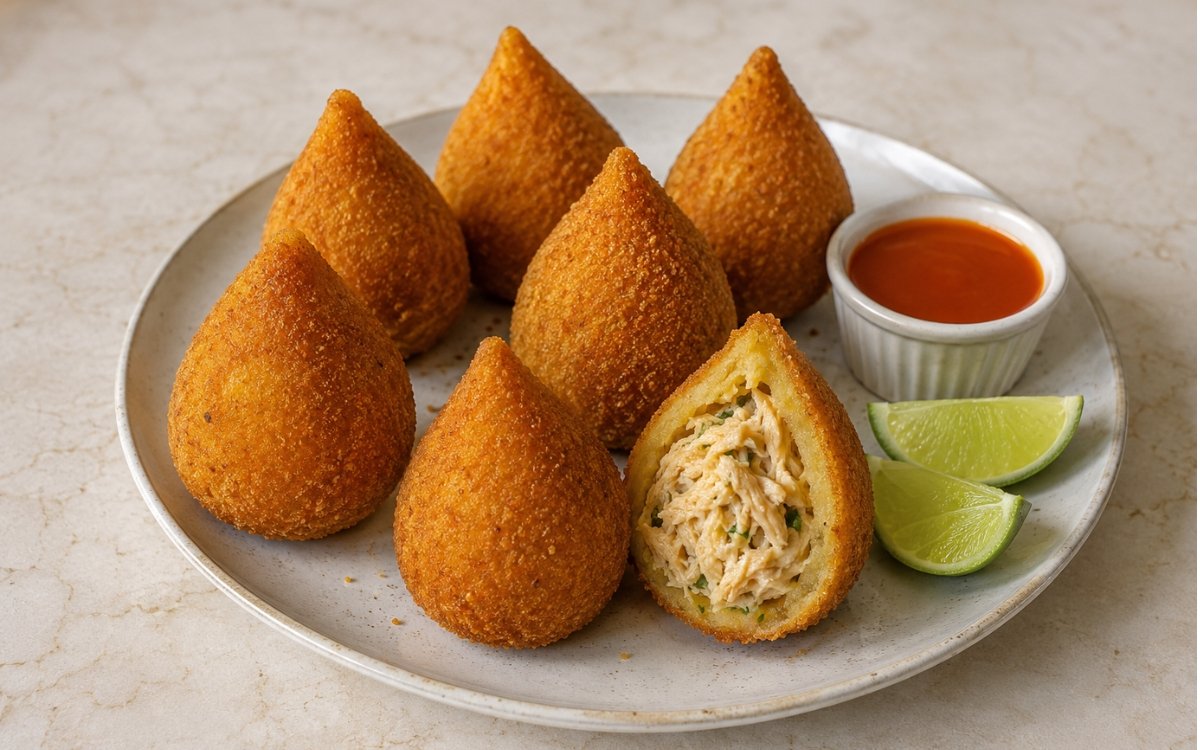
Classic Brazilian coxinhas shaped into golden teardrops, filled with creamy shredded chicken, coated in fine breadcrumbs, and fried until deeply golden-brown and crisp, served with hot sauce and lime wedges. Cooling the chicken filling completely before shaping is the technique that keeps assembly clean and controlled — warm filling melts the surrounding dough on contact, turning what should be a precise wrap into a mess, the same cool-filling-first principle used elsewhere in this collection whenever a warm filling meets a dough that needs to hold its shape around it. Cooking the dough on the stovetop until it pulls cleanly away from the pan matters just as much, since undercooked dough tastes floury and tears rather than stretching cleanly around the filling. Resting the breaded coxinhas before frying protects the coating’s grip on the dough, reducing the risk of splitting once they hit the hot oil. The payoff is a golden teardrop with a crisp, evenly breaded shell giving way to a soft dough layer and a creamy, juicy shredded chicken centre.

Prep Time : 1 hr
Cook Time : 1 hr
Servings : 4
1 hr
1 hr
4
Ingredients
For the Poached Chicken
• 750g boneless, skinless chicken breast
• 1.2 litres chicken stock or water
• ½ white onion, peeled
• 3 garlic cloves, peeled and lightly smashed
• 2 bay leaves
• 8g fine sea salt
• 2g freshly cracked black pepper
For the Creamy Chicken Filling
• Shredded chicken, from above
• 25ml neutral oil or olive oil
• 120g white onion, finely diced
• 3 garlic cloves, minced
• 20g tomato paste
• 3g smoked paprika or Brazilian colorau — this one on Amazon
• 2g ground cumin, optional — this one on Amazon
• 5g fine sea salt, plus more to taste
• 2g freshly cracked black pepper
• 120g requeijão, cream cheese, or very thick creamy cheese spread
• 20g fresh parsley, finely chopped
• 60–90ml reserved chicken cooking broth, only if needed
For the Coxinha Dough
• 600ml reserved chicken cooking broth
• 200ml whole milk
• 70g unsalted butter — this one on Amazon
• 8g fine sea salt
• 500g all-purpose flour — this one on Amazon
For Breading
• 120g all-purpose flour, for light dusting
• 3 large eggs
• 120ml whole milk
• 300g fine dry breadcrumbs
For Frying
• 1.5–2 litres neutral oil, for deep frying
For Serving
• Hot sauce
• 2 limes, cut into wedges
This post may contain affiliate links. As an Amazon Associate I earn from qualifying purchases, at no additional cost to you.
Directions
- Poach the Chicken
Place the chicken breast, stock or water, onion, garlic, bay leaves, salt, and black pepper in a pot. Bring to a gentle simmer, then reduce the heat to medium-low. Cook for 18–22 minutes, until the chicken reaches 74°C internally and shreds easily. Do not hard-boil it. Boiled chicken breast turns dry and stringy fast. Remove the chicken and rest for 10 minutes. Strain and reserve the cooking broth for the dough. Shred the chicken into fine strands. A gentle simmer rather than a hard boil protects this leaner cut from toughening, and straining the broth here means it’s ready to reuse directly in the dough later, carrying the chicken’s own flavour into the shell that surrounds it. - Make the Chicken Filling
Heat the oil in a skillet over medium heat. Add the diced onion and cook for 4–5 minutes until soft. Add the garlic and cook for 30 seconds. Add the tomato paste, smoked paprika or colorau, cumin if using, salt, and black pepper. Cook for 1 minute until the paste darkens slightly and the spices smell warm. Add the shredded chicken and stir until coated. Add 60ml reserved broth if needed, then cook for 2–3 minutes until juicy but not wet. Turn off the heat and fold in the requeijão or cream cheese and parsley. The filling should be creamy and cohesive, not loose or saucy. If it is wet, the coxinhas will split during frying. Folding in the requeijão or cream cheese only once the heat is off, rather than cooking it further, is what keeps the filling creamy and cohesive without breaking or thinning it — this cheese is the binding agent that holds the shredded chicken together into a scoopable, shapeable mass. - Cool the Filling
Spread the filling on a tray and let it cool completely. Warm filling melts the dough and makes shaping messy. Spreading the filling out into a thin layer on a tray, rather than leaving it mounded in a bowl, speeds up this cooling considerably by exposing far more surface area to the air — a meaningful time-saver given how much else this recipe requires. - Make the Coxinha Dough
Add the reserved chicken broth, milk, butter, and salt to a large saucepan. Bring to a simmer. Add the flour all at once and stir aggressively with a sturdy spoon over medium-low heat. Cook for 3–5 minutes, stirring constantly, until the dough forms a smooth heavy ball and pulls away from the sides of the pan. This step matters. Undercooked dough tastes floury and tears when shaped. This is the same choux-adjacent technique used for other cooked-dough preparations in this collection — cooking the flour directly into the hot liquid gelatinises its starches, which is what gives the finished dough enough elasticity to stretch cleanly around a ball of filling without tearing. - Cool and Knead the Dough
Transfer the hot dough to a clean work surface or bowl. Let it cool for 10 minutes, until warm enough to handle. Knead for 2–3 minutes until smooth. The dough should be soft, elastic, and not sticky. Cover so it does not dry out. Kneading briefly once the dough has cooled enough to handle helps distribute any remaining heat and moisture evenly throughout, producing a more uniformly smooth, pliable dough than simply letting it sit and cool without any working. - Shape the Coxinhas
Divide the dough into 20 equal pieces, about 55–60g each. Flatten one piece in your palm into a thick disc. Add about 30–35g chicken filling to the centre. Wrap the dough around the filling, seal it fully, then shape into the classic teardrop with a rounded base and tapered point. Seal carefully. Any cracks or thin spots can burst open in the oil. The teardrop shape isn’t purely decorative — that tapered point is traditionally where the dough is thinnest and most likely to be a weak spot, so extra attention to sealing that area specifically is what prevents the filling from breaking through during frying. - Bread the Coxinhas
Lightly dust each shaped coxinha with flour, shaking off the excess. Whisk the eggs with milk in a bowl. Place the breadcrumbs in a separate bowl. Dip each coxinha into the egg mixture, let excess drip off, then coat fully in breadcrumbs. Press gently so the breadcrumbs stick evenly, but do not crush the teardrop shape. The light flour dusting before the egg wash gives the wet egg something dry and textured to grip onto first, which in turn is what the breadcrumbs adhere to — skipping this first layer produces a patchier, less even final coating. - Rest Before Frying
Place the breaded coxinhas on a tray and rest for 20–30 minutes. This helps the coating set and reduces the chance of splitting in the oil. This rest allows the egg wash to fully bind the breadcrumbs to the dough’s surface before the shock of hot oil — coxinhas fried immediately after breading are considerably more prone to shedding crumbs or splitting along a poorly sealed edge. - Fry the Coxinhas
Heat the oil to 170–175°C. Fry the coxinhas in batches for 4–5 minutes, turning gently, until evenly deep golden-brown and crisp. Do not overcrowd the pot. Crowding drops the oil temperature and gives greasy, pale coxinhas. Transfer to a rack and let drain briefly. Turning the coxinhas gently rather than aggressively throughout the fry ensures even colour development on all sides of the teardrop shape, since its irregular form doesn’t naturally rest evenly in the oil the way a round shape would. - Serve
Serve 5 coxinhas per serving with hot sauce and lime wedges. Cut one open if presenting immediately so the creamy shredded chicken filling is visible. Serve hot while the crust is crisp and the filling is still warm. The crisp shell begins softening as it cools and as residual steam from the hot filling works against it from the inside, so serving without much delay preserves the contrast between crunchy exterior and creamy centre.
*Notes :
- The filling’s texture — creamy and cohesive, never loose or wet — is the single detail with the most direct impact on whether the finished coxinhas hold together through frying or split apart. Any excess moisture in the filling has nowhere to go once it’s sealed inside the dough, and as that trapped moisture heats up in the fryer, it creates internal pressure that finds the weakest point in the dough’s seal and pushes through. Cooking the chicken mixture down until genuinely dry, and folding in the requeijão or cream cheese for binding rather than added liquid, is what keeps that pressure from building in the first place.
- Cooling the filling completely before shaping is a step that’s tempting to rush given how long this recipe already runs, but doing so compromises the entire shaping stage that follows. Warm filling softens and partially melts the surrounding dough on contact, making it difficult to form a clean, even wrap and increasing the odds of thin spots or tears where the filling shows through. Spreading the filling thin on a tray, rather than leaving it in a mounded bowl, is a practical way to speed this cooling along.
- The dough’s cooked-starch structure, built the same way as several other doughs in this collection, is what gives it the specific combination of elasticity and strength needed to stretch around a substantial ball of filling without tearing. Undercooked dough that hasn’t fully pulled away from the pan’s sides lacks that same structural integrity — it tends to feel pasty rather than smooth, and it’s considerably more prone to cracking once shaped around the filling.
- The teardrop shape’s tapered point deserves particular attention during sealing, since it’s traditionally the thinnest, most vulnerable part of the whole shape. A coxinha that’s carefully and evenly formed everywhere else but rushed at the point is still at meaningful risk of splitting there specifically once it hits hot oil — the extra care this step calls for at that one spot is worth the small amount of additional time it takes.
Why This Recipe Works
This recipe works because both the filling and the dough are built with real attention to moisture control and structure: the chicken filling is cooked down and bound with cheese until creamy but genuinely dry, and it’s cooled completely before it ever meets the dough.
The dough itself is cooked on the stovetop until its starches are fully developed, giving it the elasticity to stretch and seal cleanly around the filling, with particular care given to sealing the teardrop’s tapered point.
Resting the breaded coxinhas before frying protects the coating’s adhesion, and frying in properly spaced batches at a held temperature produces an evenly golden, crisp shell around a warm, creamy centre.
Ingredient Breakdown
Gently Poached, Finely Shredded Chicken
The filling’s base — cooked at a controlled simmer to stay tender, shredded fine for a smooth, cohesive filling texture.
Requeijão or Cream Cheese
The binding agent — folded in off the heat to hold the shredded chicken together into a creamy, scoopable filling without adding excess liquid.
Cooked-Starch Coxinha Dough
The structural shell — flour cooked directly into hot broth and milk, developing the elasticity needed to stretch and seal around the filling.
Flour-Egg-Breadcrumb Coating
The crisp exterior — three layers, each giving the next something to properly adhere to, for an even, well-sealed coating.
Rested Breaded Shells
The pre-fry protection — a 20–30 minute rest lets the coating set fully before the coxinhas meet hot oil.
Flavor Structure Explained
This coxinha follows a layered balance model:
- Crisp golden foundation (fried breadcrumb shell)
- Soft neutral body (cooked dough shell)
- Rich creamy centre (chicken and cheese filling)
- Warm savoury depth (tomato paste, smoked paprika)
- Fresh herbal lift (parsley)
The crisp, golden breadcrumb shell provides an audible crunch that gives way to the soft, mild dough beneath it. That dough acts as a neutral bridge to the rich, creamy filling at the centre, where shredded chicken bound with cheese delivers the dish’s core savoury payoff. Tomato paste and smoked paprika layer in warm, gently smoky depth throughout the filling. Fresh parsley folded in at the end adds a clean, herbal note that keeps the rich centre from feeling one-note, while hot sauce and lime at the table bring a final sharp, bright contrast.
Common Mistakes to Avoid
- Leaving the Chicken Filling Too Wet – Excess moisture builds pressure inside the dough during frying and causes splitting. Always cook the filling down until creamy and genuinely dry before cooling.
- Shaping the Dough Around Warm Filling – Warm filling melts the dough on contact, making clean shaping impossible. Always cool the filling completely before assembling.
- Undercooking the Coxinha Dough – Dough that hasn’t fully pulled away from the pan tastes floury and tears when shaped. Always cook until it forms a smooth, cohesive ball.
- Rushing the Seal at the Teardrop’s Point – This is the thinnest, most vulnerable part of the shape and a common site for splitting in the fryer. Always seal it carefully and completely.
- Frying Immediately After Breading – Freshly breaded coxinhas are more prone to shedding crumbs or splitting. Always rest for 20–30 minutes before frying.
Variations
Coxinha de Catupiry
Increase the requeijão or a similar soft, mild cheese spread in the filling for an even creamier, more indulgent centre.
Spicier Version
Add a finely minced malagueta or other small hot pepper to the filling alongside the onion and garlic for background heat throughout.
Baked Version
After breading and resting, arrange on a wire rack over a baking sheet, spray lightly with oil, and bake at 220°C for 20–25 minutes, turning once, for a lighter, less crisp alternative to frying.
Smaller Party Coxinhas
Divide the dough and filling into 30 smaller portions instead of 20 for bite-sized versions, adjusting fry time down slightly to about 3–4 minutes.
Storage & Make-Ahead
Shaped, breaded, unfried coxinhas can be frozen on a tray until solid, then transferred to a bag or container and frozen for up to 3 months — fry directly from frozen, adding a couple of extra minutes to the fry time.
The chicken filling can be made 1–2 days ahead and refrigerated in an airtight container. The dough is best made fresh close to when it’s needed for shaping, though it can be refrigerated, covered, for a few hours if necessary.
Fried coxinhas are best eaten the same day; they lose their crisp shell within a few hours and are best refreshed briefly in a hot oven rather than a microwave if reheating.
Frequently Asked Questions
Why does the chicken filling need to be creamy and dry rather than loose or saucy?
Any excess moisture in the filling has nowhere to escape once it’s sealed inside the dough. As that trapped liquid heats during frying, it builds internal pressure that finds the weakest point in the seal and bursts through, which is why the filling is cooked down and bound with cheese until genuinely dry before it’s ever used.
Why does the filling need to cool completely before shaping the coxinhas?
Warm filling softens and partially melts the dough on contact, making it difficult to form a clean, even wrap around it. Cooling completely first protects the dough’s structure during the shaping process, allowing for a properly sealed, intact coxinha.
Why is the teardrop’s tapered point given extra attention during sealing?
That point is traditionally the thinnest part of the whole shape, which makes it the most vulnerable spot for splitting once the coxinha hits hot oil. Taking extra care to seal it fully, even if the rest of the shape is already well formed, meaningfully reduces the risk of bursting during frying.
Why rest the breaded coxinhas before frying instead of frying them right away?
The rest gives the egg wash time to fully bind the breadcrumbs to the dough’s surface. Coxinhas fried immediately after breading are considerably more likely to shed crumbs into the oil or split open along a coating that hasn’t fully set.
Are there other Brazilian recipes worth trying alongside coxinha?
Brazilian Pão de Queijo is a natural pairing if you enjoy this style of Brazilian snack — a much simpler tapioca-based cheese bread that shares the same warm, comforting, shareable appeal as coxinha, though with a completely different dough and no filling to shape.
Nutrition Facts
( per serving )
Calories
~680 kcal
Protein
30 g
Fat
26 g
Carbs
78 g
Calories
~680 kcal
Protein
30 g
Fat
26 g
Carbs
78 g
Related Recipes
Related Recipes

Crispiest Fried Chicken
Buttermilk-brined chicken with a thick, craggy double-dredged crust built using a cold-water rehydration dip, then double-fried until aggressively crunchy.
Mexican Chicken Taco Salad
Seasoned chicken breast, chopped lettuce, black beans, charred corn, cherry tomatoes, avocado, shredded cheese, and crushed tortilla chips with chipotle crema.
Classic Fresh Lemonade
Simple syrup without reduction, fresh lemon juice with natural pulp — salt, cold water, syrup adjusted by taste, chilled. Crisp, bright, and precisely balanced.

You might also like
You might also like
Korean BBQ Chicken Wings
Double-fried wings glazed in sticky gochujang barbecue deliver shattering crunch with sweet-heat intensity and garlic depth.
Crispy Pork Belly Chicharrón
Skin-on pork belly simmered, dried, and double-fried until the skin is blistered and crisp over rendered fat and tender meat, served with chunky guacamole.
Chicken Parmigiana
Crispy fried cutlets topped with homemade marinara, fresh mozzarella, and Parmesan, baked until bubbling and golden — the complete American-Italian classic from scratch in 55 minutes.
Brazilian Coxinha
Ingredients
Method
- Place the chicken breast, stock or water, onion, garlic, bay leaves, salt, and black pepper in a pot. Bring to a gentle simmer, then reduce the heat to medium-low. Cook for 18–22 minutes, until the chicken reaches 74°C internally and shreds easily. Do not hard-boil it. Boiled chicken breast turns dry and stringy fast. Remove the chicken and rest for 10 minutes. Strain and reserve the cooking broth for the dough. Shred the chicken into fine strands. A gentle simmer rather than a hard boil protects this leaner cut from toughening, and straining the broth here means it’s ready to reuse directly in the dough later, carrying the chicken’s own flavour into the shell that surrounds it.
- Heat the oil in a skillet over medium heat. Add the diced onion and cook for 4–5 minutes until soft. Add the garlic and cook for 30 seconds. Add the tomato paste, smoked paprika or colorau, cumin if using, salt, and black pepper. Cook for 1 minute until the paste darkens slightly and the spices smell warm. Add the shredded chicken and stir until coated. Add 60ml reserved broth if needed, then cook for 2–3 minutes until juicy but not wet. Turn off the heat and fold in the requeijão or cream cheese and parsley. The filling should be creamy and cohesive, not loose or saucy. If it is wet, the coxinhas will split during frying. Folding in the requeijão or cream cheese only once the heat is off, rather than cooking it further, is what keeps the filling creamy and cohesive without breaking or thinning it — this cheese is the binding agent that holds the shredded chicken together into a scoopable, shapeable mass.
- Spread the filling on a tray and let it cool completely. Warm filling melts the dough and makes shaping messy. Spreading the filling out into a thin layer on a tray, rather than leaving it mounded in a bowl, speeds up this cooling considerably by exposing far more surface area to the air — a meaningful time-saver given how much else this recipe requires.
- Add the reserved chicken broth, milk, butter, and salt to a large saucepan. Bring to a simmer. Add the flour all at once and stir aggressively with a sturdy spoon over medium-low heat. Cook for 3–5 minutes, stirring constantly, until the dough forms a smooth heavy ball and pulls away from the sides of the pan. This step matters. Undercooked dough tastes floury and tears when shaped. This is the same choux-adjacent technique used for other cooked-dough preparations in this collection — cooking the flour directly into the hot liquid gelatinises its starches, which is what gives the finished dough enough elasticity to stretch cleanly around a ball of filling without tearing.
- Transfer the hot dough to a clean work surface or bowl. Let it cool for 10 minutes, until warm enough to handle. Knead for 2–3 minutes until smooth. The dough should be soft, elastic, and not sticky. Cover so it does not dry out. Kneading briefly once the dough has cooled enough to handle helps distribute any remaining heat and moisture evenly throughout, producing a more uniformly smooth, pliable dough than simply letting it sit and cool without any working.
- Divide the dough into 20 equal pieces, about 55–60g each. Flatten one piece in your palm into a thick disc. Add about 30–35g chicken filling to the centre. Wrap the dough around the filling, seal it fully, then shape into the classic teardrop with a rounded base and tapered point. Seal carefully. Any cracks or thin spots can burst open in the oil. The teardrop shape isn’t purely decorative — that tapered point is traditionally where the dough is thinnest and most likely to be a weak spot, so extra attention to sealing that area specifically is what prevents the filling from breaking through during frying.
- Lightly dust each shaped coxinha with flour, shaking off the excess. Whisk the eggs with milk in a bowl. Place the breadcrumbs in a separate bowl. Dip each coxinha into the egg mixture, let excess drip off, then coat fully in breadcrumbs. Press gently so the breadcrumbs stick evenly, but do not crush the teardrop shape. The light flour dusting before the egg wash gives the wet egg something dry and textured to grip onto first, which in turn is what the breadcrumbs adhere to — skipping this first layer produces a patchier, less even final coating.
- Place the breaded coxinhas on a tray and rest for 20–30 minutes. This helps the coating set and reduces the chance of splitting in the oil. This rest allows the egg wash to fully bind the breadcrumbs to the dough’s surface before the shock of hot oil — coxinhas fried immediately after breading are considerably more prone to shedding crumbs or splitting along a poorly sealed edge.
- Heat the oil to 170–175°C. Fry the coxinhas in batches for 4–5 minutes, turning gently, until evenly deep golden-brown and crisp. Do not overcrowd the pot. Crowding drops the oil temperature and gives greasy, pale coxinhas. Transfer to a rack and let drain briefly. Turning the coxinhas gently rather than aggressively throughout the fry ensures even colour development on all sides of the teardrop shape, since its irregular form doesn’t naturally rest evenly in the oil the way a round shape would.
- Serve 5 coxinhas per serving with hot sauce and lime wedges. Cut one open if presenting immediately so the creamy shredded chicken filling is visible. Serve hot while the crust is crisp and the filling is still warm. The crisp shell begins softening as it cools and as residual steam from the hot filling works against it from the inside, so serving without much delay preserves the contrast between crunchy exterior and creamy centre.