Ingredients
Method
Poach the Chicken
- Place the chicken breast, stock or water, onion, garlic, bay leaves, salt, and black pepper in a pot. Bring to a gentle simmer, then reduce the heat to medium-low. Cook for 18–22 minutes, until the chicken reaches 74°C internally and shreds easily. Do not hard-boil it. Boiled chicken breast turns dry and stringy fast. Remove the chicken and rest for 10 minutes. Strain and reserve the cooking broth for the dough. Shred the chicken into fine strands. A gentle simmer rather than a hard boil protects this leaner cut from toughening, and straining the broth here means it's ready to reuse directly in the dough later, carrying the chicken's own flavour into the shell that surrounds it.
Make the Chicken Filling
- Heat the oil in a skillet over medium heat. Add the diced onion and cook for 4–5 minutes until soft. Add the garlic and cook for 30 seconds. Add the tomato paste, smoked paprika or colorau, cumin if using, salt, and black pepper. Cook for 1 minute until the paste darkens slightly and the spices smell warm. Add the shredded chicken and stir until coated. Add 60ml reserved broth if needed, then cook for 2–3 minutes until juicy but not wet. Turn off the heat and fold in the requeijão or cream cheese and parsley. The filling should be creamy and cohesive, not loose or saucy. If it is wet, the coxinhas will split during frying. Folding in the requeijão or cream cheese only once the heat is off, rather than cooking it further, is what keeps the filling creamy and cohesive without breaking or thinning it — this cheese is the binding agent that holds the shredded chicken together into a scoopable, shapeable mass.
Cool the Filling
- Spread the filling on a tray and let it cool completely. Warm filling melts the dough and makes shaping messy. Spreading the filling out into a thin layer on a tray, rather than leaving it mounded in a bowl, speeds up this cooling considerably by exposing far more surface area to the air — a meaningful time-saver given how much else this recipe requires.
Make the Coxinha Dough
- Add the reserved chicken broth, milk, butter, and salt to a large saucepan. Bring to a simmer. Add the flour all at once and stir aggressively with a sturdy spoon over medium-low heat. Cook for 3–5 minutes, stirring constantly, until the dough forms a smooth heavy ball and pulls away from the sides of the pan. This step matters. Undercooked dough tastes floury and tears when shaped. This is the same choux-adjacent technique used for other cooked-dough preparations in this collection — cooking the flour directly into the hot liquid gelatinises its starches, which is what gives the finished dough enough elasticity to stretch cleanly around a ball of filling without tearing.
Cool and Knead the Dough
- Transfer the hot dough to a clean work surface or bowl. Let it cool for 10 minutes, until warm enough to handle. Knead for 2–3 minutes until smooth. The dough should be soft, elastic, and not sticky. Cover so it does not dry out. Kneading briefly once the dough has cooled enough to handle helps distribute any remaining heat and moisture evenly throughout, producing a more uniformly smooth, pliable dough than simply letting it sit and cool without any working.
Shape the Coxinhas
- Divide the dough into 20 equal pieces, about 55–60g each. Flatten one piece in your palm into a thick disc. Add about 30–35g chicken filling to the centre. Wrap the dough around the filling, seal it fully, then shape into the classic teardrop with a rounded base and tapered point. Seal carefully. Any cracks or thin spots can burst open in the oil. The teardrop shape isn't purely decorative — that tapered point is traditionally where the dough is thinnest and most likely to be a weak spot, so extra attention to sealing that area specifically is what prevents the filling from breaking through during frying.
Bread the Coxinhas
- Lightly dust each shaped coxinha with flour, shaking off the excess. Whisk the eggs with milk in a bowl. Place the breadcrumbs in a separate bowl. Dip each coxinha into the egg mixture, let excess drip off, then coat fully in breadcrumbs. Press gently so the breadcrumbs stick evenly, but do not crush the teardrop shape. The light flour dusting before the egg wash gives the wet egg something dry and textured to grip onto first, which in turn is what the breadcrumbs adhere to — skipping this first layer produces a patchier, less even final coating.
Rest Before Frying
- Place the breaded coxinhas on a tray and rest for 20–30 minutes. This helps the coating set and reduces the chance of splitting in the oil. This rest allows the egg wash to fully bind the breadcrumbs to the dough's surface before the shock of hot oil — coxinhas fried immediately after breading are considerably more prone to shedding crumbs or splitting along a poorly sealed edge.
Fry the Coxinhas
- Heat the oil to 170–175°C. Fry the coxinhas in batches for 4–5 minutes, turning gently, until evenly deep golden-brown and crisp. Do not overcrowd the pot. Crowding drops the oil temperature and gives greasy, pale coxinhas. Transfer to a rack and let drain briefly. Turning the coxinhas gently rather than aggressively throughout the fry ensures even colour development on all sides of the teardrop shape, since its irregular form doesn't naturally rest evenly in the oil the way a round shape would.
Serve
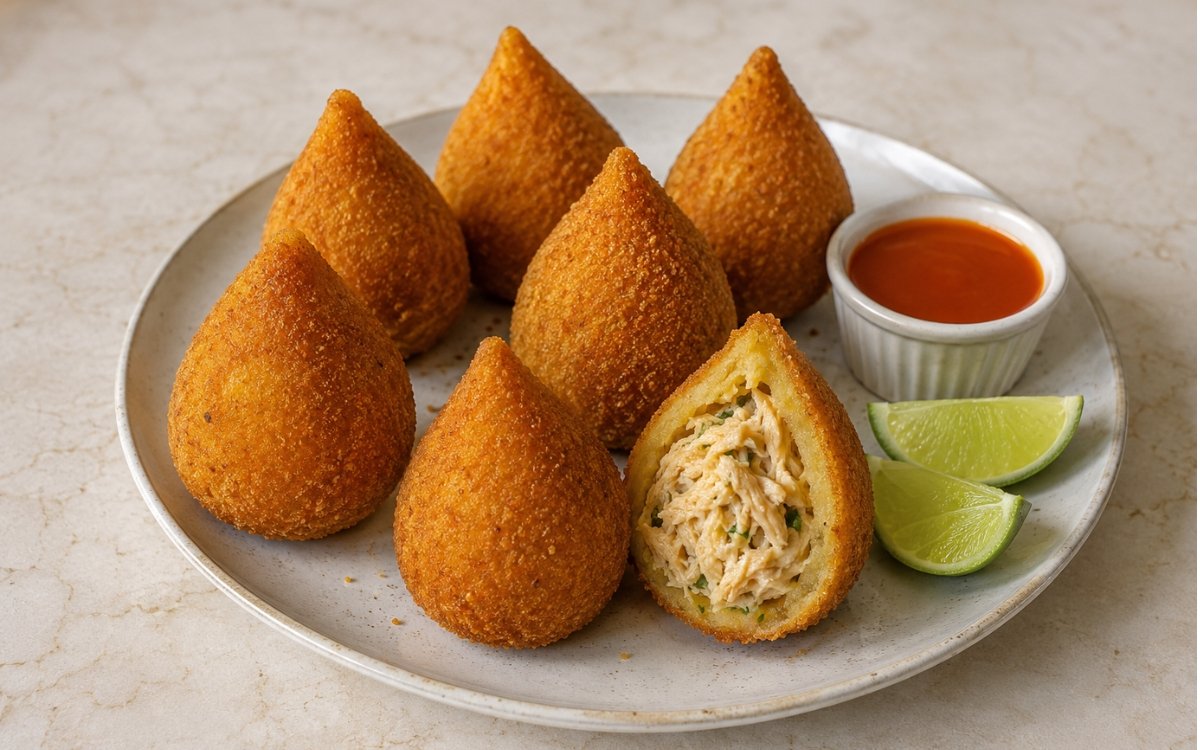
- Serve 5 coxinhas per serving with hot sauce and lime wedges. Cut one open if presenting immediately so the creamy shredded chicken filling is visible. Serve hot while the crust is crisp and the filling is still warm. The crisp shell begins softening as it cools and as residual steam from the hot filling works against it from the inside, so serving without much delay preserves the contrast between crunchy exterior and creamy centre.
Notes
The filling's texture — creamy and cohesive, never loose or wet — is the single detail with the most direct impact on whether the finished coxinhas hold together through frying or split apart. Any excess moisture in the filling has nowhere to go once it's sealed inside the dough, and as that trapped moisture heats up in the fryer, it creates internal pressure that finds the weakest point in the dough's seal and pushes through. Cooking the chicken mixture down until genuinely dry, and folding in the requeijão or cream cheese for binding rather than added liquid, is what keeps that pressure from building in the first place.
Cooling the filling completely before shaping is a step that's tempting to rush given how long this recipe already runs, but doing so compromises the entire shaping stage that follows. Warm filling softens and partially melts the surrounding dough on contact, making it difficult to form a clean, even wrap and increasing the odds of thin spots or tears where the filling shows through. Spreading the filling thin on a tray, rather than leaving it in a mounded bowl, is a practical way to speed this cooling along.
The dough's cooked-starch structure, built the same way as several other doughs in this collection, is what gives it the specific combination of elasticity and strength needed to stretch around a substantial ball of filling without tearing. Undercooked dough that hasn't fully pulled away from the pan's sides lacks that same structural integrity — it tends to feel pasty rather than smooth, and it's considerably more prone to cracking once shaped around the filling.
The teardrop shape's tapered point deserves particular attention during sealing, since it's traditionally the thinnest, most vulnerable part of the whole shape. A coxinha that's carefully and evenly formed everywhere else but rushed at the point is still at meaningful risk of splitting there specifically once it hits hot oil — the extra care this step calls for at that one spot is worth the small amount of additional time it takes.