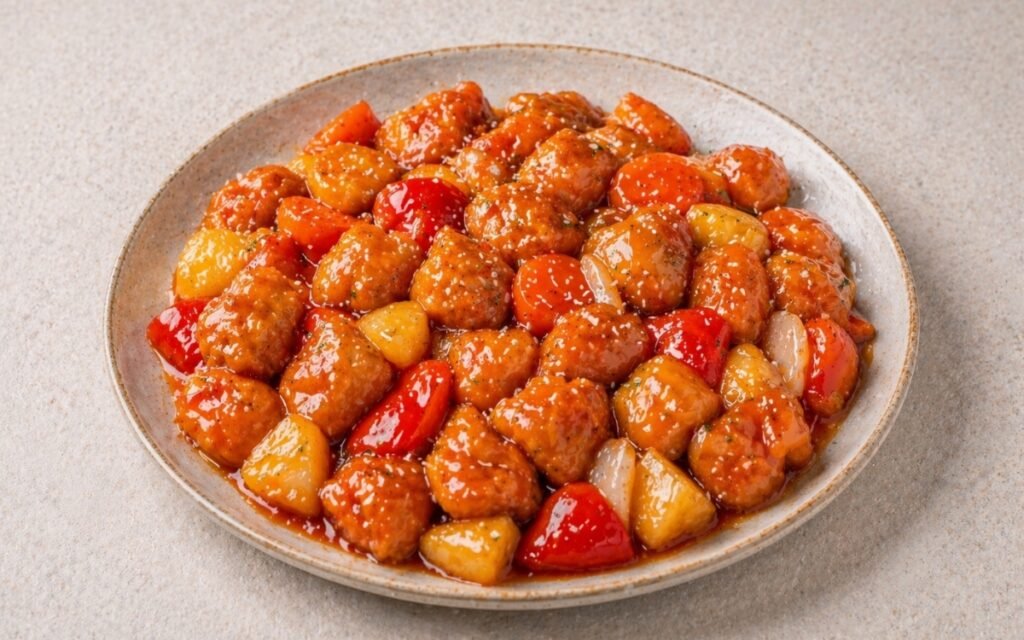
Sweet and Sour Chicken
Restaurant-quality sweet and sour chicken made properly at home — double-fried battered chicken thighs with a crackling, tempura-like crust that stays crispy under the glossy, tangy-sweet sauce. The double-fry technique is the non-negotiable step that separates genuinely crispy Chinese-style fried chicken from the pale, soft version that makes people think the dish is simpler than it is. Bite-sized pineapple, bell pepper, carrot, and onion fried briefly in the same oil, then everything tossed in a bright, balanced sweet and sour sauce with a perfectly calibrated slurry thickness. Serve over plain jasmine rice.
Prep Time : 25 min
Cook Time : 25 min
Servings : 4
25 min
25 min
4
Ingredients
For the Chicken and Marinade
• 700g boneless, skinless chicken thighs, cut into 2.5cm (1-inch) cubes
• 1 tbsp oyster sauce — this one on Amazon
• 1 tbsp light soy sauce
• 2 tbsp cornstarch
• 1 tbsp water
• 4g fine sea salt
For the Batter
• 60g all-purpose flour
• 40g cornstarch
• 1 tbsp baking powder
• 100ml water
• 1 tsp neutral oil
For the Sweet and Sour Sauce
• 75ml ketchup
• 3 tbsp red vinegar, or white distilled vinegar — this one on Amazon
• 1 tbsp rice vinegar — this one on Amazon
• 2g fine sea salt
• 50g sugar
For the Slurry
• 1 tbsp potato starch
• 2 tbsp water
For the Vegetables
• 200g pineapple, cut into 2cm pieces
• 80g carrot, cut into 5mm slices on the diagonal
• 100g red bell pepper, cut into triangles
• 1 large onion, cut into triangles
• Neutral oil, for frying — approximately 700ml–1L for a wok
For the Garnish
• 30g white sesame seeds — this one on Amazon
This post may contain affiliate links. As an Amazon Associate I earn from qualifying purchases, at no additional cost to you.
Directions
- Marinate the Chicken
Cut the chicken thighs into 2.5cm cubes — as uniform in size as possible so every piece cooks through at the same rate in the hot oil. In a medium bowl, combine the oyster sauce, light soy sauce, cornstarch, water, and salt. Add the chicken cubes and mix thoroughly with your hand, turning every piece to ensure complete coating. The cornstarch in the marinade serves two functions simultaneously: it begins tenderising the surface proteins of the chicken through its interaction with the oyster and soy sauces, and it creates a thin, starchy surface layer that helps the subsequent batter adhere more completely during frying. Allow to marinate for a minimum of 15 minutes at room temperature — the flavour penetration in this time is limited but the surface preparation is sufficient for the batter to work correctly. - Prepare All Vegetables and Pineapple
Cut all the vegetables and pineapple to approximately the same size — roughly 2cm in every dimension — so they cook evenly during the brief oil frying step and are proportionate to the chicken cubes in the finished dish. Slice the carrot on a diagonal at approximately 5mm thickness — the diagonal cut increases the surface area and produces a more visually interesting piece. Cut the red bell pepper and onion into triangles of approximately 2cm per side — triangles are the traditional cut for sweet and sour because their pointed edges char slightly in the oil while the thicker centre remains slightly crunchy. Cut the pineapple into 2cm chunks. Have all vegetables and pineapple arranged in separate groups ready for the frying step — they will be cooked in batches and need to be accessible quickly once the oil is at temperature. - Make the Sweet and Sour Sauce and Slurry
In a small bowl or jug, combine the ketchup, red vinegar, rice vinegar, salt, and sugar. Stir until the sugar is completely dissolved — undissolved sugar produces an inconsistently sweet sauce that is overly sweet in some bites and not sweet enough in others. Taste the sauce before it reaches the wok and calibrate: it should taste balanced between sweet, tangy, and slightly salty at full intensity — noticeably sweeter and more acidic than you would want to eat directly because it will be diluted slightly by the wok heat and the slurry. The combination of red vinegar and rice vinegar is deliberate — red vinegar provides a sharper, slightly wine-like acidity with depth; rice vinegar provides a cleaner, milder, slightly sweet acidity. Together they produce a more complex sour note than either alone. In a separate small bowl, mix the potato starch and water for the slurry until completely smooth. The slurry should be lump-free — any lumps of undissolved starch will produce gelatinous chunks in the finished sauce. Set both the sauce and the slurry beside the wok. - Mix the Batter
In a large bowl, combine the flour, cornstarch, baking powder, water, and oil. Whisk until just combined — the batter should be smooth but do not over-mix, which develops the flour’s gluten and produces a dense, chewy crust rather than the light, slightly airy texture of a correctly mixed batter. The consistency should be similar to thick cream — it should coat the back of a spoon and drip slowly rather than running off immediately. The cornstarch in the batter — the same principle as in Japanese tempura — produces a crispier, more rigid crust than flour alone, because cornstarch has no gluten and does not form the chewy, elastic network that pure flour does. The baking powder provides gas expansion during frying, creating small air pockets in the crust that make it lighter and crispier. The teaspoon of oil lubricates the batter and produces a smoother, more even coating on each chicken piece. Add the marinated chicken cubes to the batter and turn to coat every piece completely. - First Fry at 175°C (350°F)
Heat approximately 700ml–1L of neutral oil in a wok over high heat until it reaches 175°C (350°F). The wok is the correct vessel for this preparation — its curved sides and wide opening allow the oil to distribute efficiently, the high heat to maintain temperature between batches, and the surface area to accommodate the relatively large quantity of chicken without the significant temperature drop that a straight-sided pot would experience. Test the oil temperature with a small drop of batter — it should sizzle immediately and rise to the surface within 3–4 seconds. Begin frying the battered chicken in batches of 6–8 pieces maximum — crowding drops the oil temperature dramatically and produces pale, oil-saturated batter rather than crispy, golden crust. Lower each piece gently into the oil. Fry for 3–4 minutes per batch, turning occasionally, until the batter is set and pale golden — the colour at this stage should be pale, not the deep golden of the finished product. The first fry’s purpose is to cook the chicken through to 74°C internal temperature — the full colour and crispness develop in the second fry. Transfer each batch to a wire rack. After all the chicken has been first-fried, proceed immediately to the second fry — do not allow the chicken to cool for more than a few minutes. - Second Fry at 193°C (380°F)
Increase the oil temperature to 193°C (380°F). Return all the first-fried chicken to the oil simultaneously — all pieces going back in together is correct at this stage because the second fry is brief and the chicken is already cooked through. Fry for 60–90 seconds until the batter is a deep, even golden-brown and shatteringly crisp when you lift a piece and hear it with tongs. The elevated temperature in the second fry is what produces the dramatic improvement in crispness: the higher heat drives off the remaining surface moisture in the already-cooked batter almost instantly, producing a rigid, dry, crackling crust that would require significantly longer at the lower first-fry temperature to achieve — by which point the chicken would be overcooked. Remove all the chicken to a wire rack. Skim any loose batter pieces or burnt bits from the oil surface with a slotted spoon. - Fry the Vegetables
With the oil still hot at approximately 175–180°C, fry the vegetables in batches. Do not add all vegetables simultaneously — a large volume of cold, wet vegetables added at once drops the oil temperature severely and causes the vegetables to absorb oil rather than being sealed quickly. Fry each vegetable type separately, or in small batches of one layer, for approximately 60 seconds per batch. The vegetables should emerge slightly softened at the edges but retaining a noticeable crunch — they will soften further when tossed in the hot sauce in the wok. Remove each batch with a slotted spoon and set aside. Once all vegetables and pineapple are fried, pour the oil from the wok into a heatproof container — do not wait for it to cool, as the wok needs to be available immediately and waiting for the oil to cool loses valuable time. - Make and Finish the Sauce
Working quickly while the wok is still hot, wipe any oil residue from the inside with a folded paper towel held with tongs — caution, the wok is extremely hot. Return the wok to the burner over high heat. Pour in the prepared sweet and sour sauce. Bring to a full boil while stirring — the sauce will bubble vigorously as the vinegar’s acidity and the ketchup’s sugars heat rapidly. Once the sauce is at a full boil, reduce the heat to medium. Give the slurry a quick stir — it separates on standing — and add approximately half of it to the boiling sauce while stirring continuously. The sauce will begin to thicken within 20–30 seconds as the potato starch gelatinises. Assess the consistency: a well-thickened sweet and sour sauce should coat the back of a spoon and hold a clear line when you run your finger through it, but should not be so thick that it forms a gel-like layer. If it needs more thickness, add the remaining slurry in small additions. If it has thickened beyond the correct point, add a small splash of water and stir. - Combine and Serve
Add the fried vegetables and pineapple to the sauce first and stir to coat every piece completely. The vegetables go in before the chicken because they are slightly more delicate and benefit from an additional 30–60 seconds in the sauce to fully absorb its flavour. Turn the heat off. Add all the double-fried chicken and stir vigorously but carefully — thorough coating of every chicken piece with the glossy sauce is the visual and flavour goal, but aggressive stirring can break the crispy crust. Either stir the sesame seeds into the combined dish now for even distribution throughout, or scatter generously over each portion when serving. Serve immediately over jasmine rice — the crispness of the double-fried batter begins to diminish the moment the sauce contacts it, and the dish is at its best within the first 5–10 minutes of final assembly.
*Notes :
- The double-fry technique is the defining step of this recipe and the reason restaurant sweet and sour chicken has a distinctly more satisfying crust than most home versions. The physics are straightforward: during the first fry at 175°C, the chicken cooks through and the batter sets into a pale, slightly soft structure that still contains residual moisture from the batter’s water content. During the brief second fry at 193°C, this higher temperature rapidly drives off the remaining moisture through flash evaporation, simultaneously drying and hardening the batter’s starch structure into a rigid, crackling crust. The crust developed at 193°C in 90 seconds could not be achieved at 175°C in the same time — it would require several additional minutes of frying that would overcook the chicken interior. The two-stage process separates the cooking of the chicken from the development of the crust’s maximum crispness.
- Potato starch rather than cornstarch for the slurry is a small but noticeable detail. Potato starch produces a slightly clearer, more glossy thickened sauce than cornstarch, which can produce a slightly cloudy, gluey consistency at the same ratio. For a sweet and sour sauce where the glossy, jewel-like appearance is part of the visual identity, potato starch produces the more restaurant-accurate result.
- The combination of red vinegar and rice vinegar in the sweet and sour sauce produces a more layered acidity than any single vinegar would. Red vinegar’s depth — slightly wine-like, with a rounded sourness — provides the background acidity. Rice vinegar’s clean, subtle sweetness provides the foreground brightness. White distilled vinegar can replace the red vinegar entirely for a sharper, more straightforward sour note.
Why This Recipe Works
This recipe works because it applies the three specific techniques that restaurant Chinese sweet and sour chicken uses: marinating with cornstarch to prepare the surface for batter adhesion, double-frying to separate chicken cooking from crust development, and slurry-thickened sauce calibrated to coat rather than drown.
Adding vegetables to the oil rather than stir-frying them directly preserves their colour, slightly crisps their surfaces, and prevents them from releasing moisture into the sauce. And the sesame seed garnish — stirred in or scattered — provides the finishing aromatic nuttiness and visual texture that completes the dish.
Ingredient Breakdown
Chicken Thighs
More forgiving than breast at frying temperatures — the fat content keeps the interior moist through the double-fry process without any risk of drying.
Cornstarch in Marinade
Surface preparation — creates the thin starchy layer that helps the batter adhere and contributes to the crispy crust.
Cornstarch and Flour Batter with Baking Powder
The crackling crust system — cornstarch for rigidity and crispness, flour for structure, baking powder for aeration and lightness.
Double-Fry (175°C then 193°C)
The crispness technique — first fry cooks the chicken through, second fry develops the crackling crust in the 90-second window that doesn’t overcook the already-cooked interior.
Ketchup, Red Vinegar, Rice Vinegar, Sugar
The sweet-sour balance — ketchup for tomato sweetness and body, dual vinegars for layered acidity, sugar for concentrated sweetness.
Potato Starch Slurry
The sauce thickener — produces a clearer, more glossy consistency than cornstarch at the same ratio.
Pineapple
The traditional sweet-acidic fruit element — its natural sugars and acidity specifically complement the sweet and sour sauce character.
Flavor Structure Explained
This sweet and sour chicken follows a layered balance model:
- Sweet forward base (ketchup, sugar, pineapple)
- Sharp acidic contrast (vinegar)
- Savory umami depth (oyster sauce, soy, chicken)
- Crispy-glossy texture contrast (fried batter, sauce)
- Balanced sweet-sour tension (overall integration)
Sweetness defines the first impression, delivering an immediate, approachable flavor. Vinegar cuts through with sharp acidity, preventing the profile from becoming cloying and keeping it lively. Savory elements ground the dish, adding umami depth that gives the sweetness substance. The crispy batter contrasts with the glossy sauce, creating a dynamic texture that keeps each bite engaging. The structure relies on tension — sweet and sour held in balance, supported by depth and texture.
Common Mistakes to Avoid
- Skipping the Double Fry – Single-fried battered chicken produces a crust that softens under the sauce within minutes. The double fry is what produces the crust durable enough to remain pleasantly crispy through tossing and serving.
- Crowding the Oil – Too many pieces at once drops the oil temperature significantly and produces pale, oil-saturated batter. Always fry in small batches that maintain oil temperature.
- Adding All Vegetables to the Oil Simultaneously – A large volume of cold vegetables drops the oil temperature dramatically and produces steamed rather than sealed vegetables. Always fry in batches.
- Not Tasting the Sauce Before It Reaches the Wok – The sauce’s balance is set before cooking — it is much harder to correct in the wok. Taste and calibrate sweetness, sourness, and saltiness before heating.
- Adding All the Slurry at Once – Sauce thickened beyond the correct consistency cannot easily be thinned without diluting the flavour. Always add half first, assess, and add more incrementally.
- Letting the Sauce Cool Before Adding Chicken – A cooled sauce does not coat the chicken evenly and the batter begins absorbing liquid rather than being coated by it. Add chicken to hot, freshly sauced vegetables immediately off the heat.
Variations
General Tso’s Style
Add 2 tsp of chili garlic paste and 1 tbsp of dark soy sauce to the sweet and sour sauce for a spicier, deeper, more complex version with a distinctly different character.
Pork Version
Replace the chicken thighs with 700g of pork shoulder cut into 2.5cm cubes. The marinade and batter technique are identical. Pork’s fat content makes it slightly more forgiving than chicken at frying temperatures.
Tofu Version
Replace the chicken with 700g of extra-firm tofu pressed dry and cut into cubes. The marinade time extends to 30 minutes. The double-fry technique applies identically — tofu develops an excellent crackling crust using the same batter.
Extra Pineapple Version
Increase the pineapple to 300g and reduce the sugar to 35g — the additional pineapple’s natural sugars compensate for the reduced added sugar and add more tropical, acidic freshness to the sauce character.
Storage & Make-Ahead
Sweet and sour chicken is always best served immediately after assembly. Once the sauce is added, the batter crust begins to soften significantly within 20 to 30 minutes. Leftovers can be refrigerated for up to 2 days, but the crust will become completely soft. The flavor will still be excellent, but the textural contrast will be gone.
The double-fried chicken can be held on a wire rack at room temperature for up to 30 minutes before saucing without much loss in quality. This is the most practical make-ahead strategy if you are serving a crowd.
The sauce can be prepared up to 3 days in advance and stored in a sealed jar in the refrigerator. Let it come to room temperature before using. The slurry, however, should always be made fresh immediately before use.
Frequently Asked Questions
Why chicken thighs rather than breast?
Thigh meat’s higher fat content keeps the interior moist through the two high-heat frying stages without the drying risk that breast meat faces at these temperatures. Breast meat can be used but requires careful temperature monitoring to avoid drying.
What oil is best for deep frying in a wok?
Any neutral, high smoke point oil — peanut oil is the traditional and most flavourful choice for Chinese deep frying, with a distinctly nutty aroma when hot. Vegetable, canola, or sunflower oil are excellent neutral alternatives.
Can I use an air fryer instead of deep frying?
The air fryer produces a result that is acceptable but significantly different — no oil-frying produces the same airy, light, crackling batter as the wok method. The double-fry technique specifically cannot be replicated in an air fryer. For a home alternative without deep frying, shallow-frying in a cast iron skillet in 1cm of oil produces a better result than an air fryer, though still not equivalent to the wok method.
What rice pairs best with sweet and sour chicken?
Plain steamed jasmine rice is the classic and most appropriate pairing — its neutral, slightly floral character does not compete with the intensely flavoured sauce and provides the clean, starchy base that absorbs the excess sauce from the plate. Avoiding strongly seasoned or herb-flavoured rice with this dish is recommended.
How do I prevent the batter from falling off during frying?
The cornstarch in the marinade prepares the surface — without it, the batter has insufficient adhesion to the smooth meat surface. Ensure the batter is mixed to the correct consistency (thick cream) and that each piece is fully coated before entering the oil. Avoid moving pieces too aggressively in the first 60 seconds of frying — the batter needs uninterrupted contact with the hot oil to set against the meat surface.
Nutrition Facts
( per serving )
Calories
~580 kcal
Protein
38 g
Fat
22 g
Carbs
58 g
Calories
~580 kcal
Protein
38 g
Fat
22 g
Carbs
58 g
Related Recipes
Related Recipes

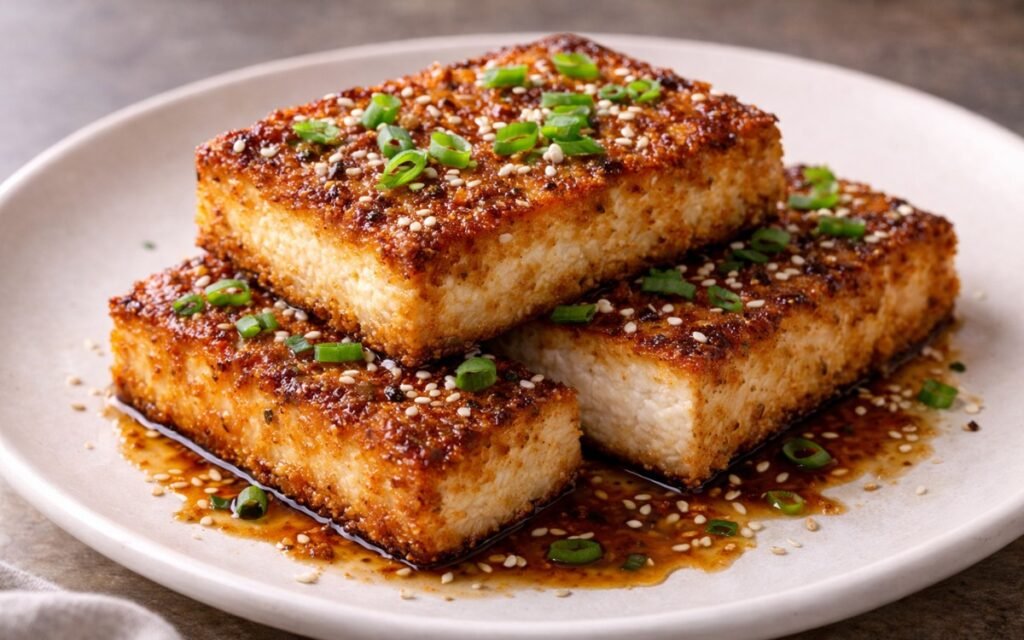
Crispy Tofu Steaks
Golden cornstarch-coated tofu steaks with savory soy-sesame marinade and ultra-crispy texture.
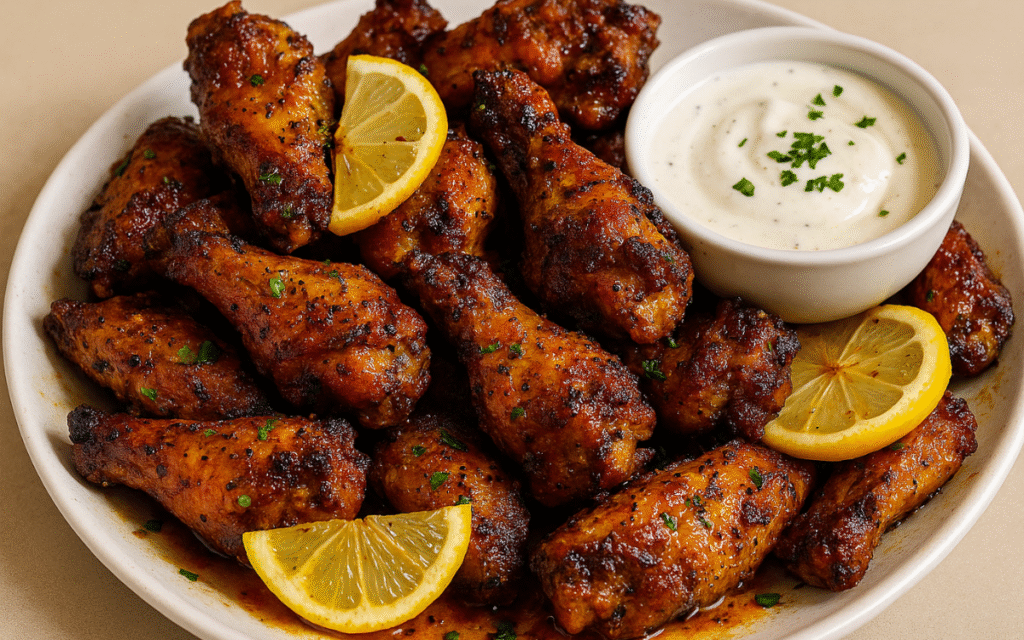
Honey Lemon Pepper Wings
Crispy wings coated in glossy honey-lemon pepper glaze deliver citrus bite, heat, and buttery richness.
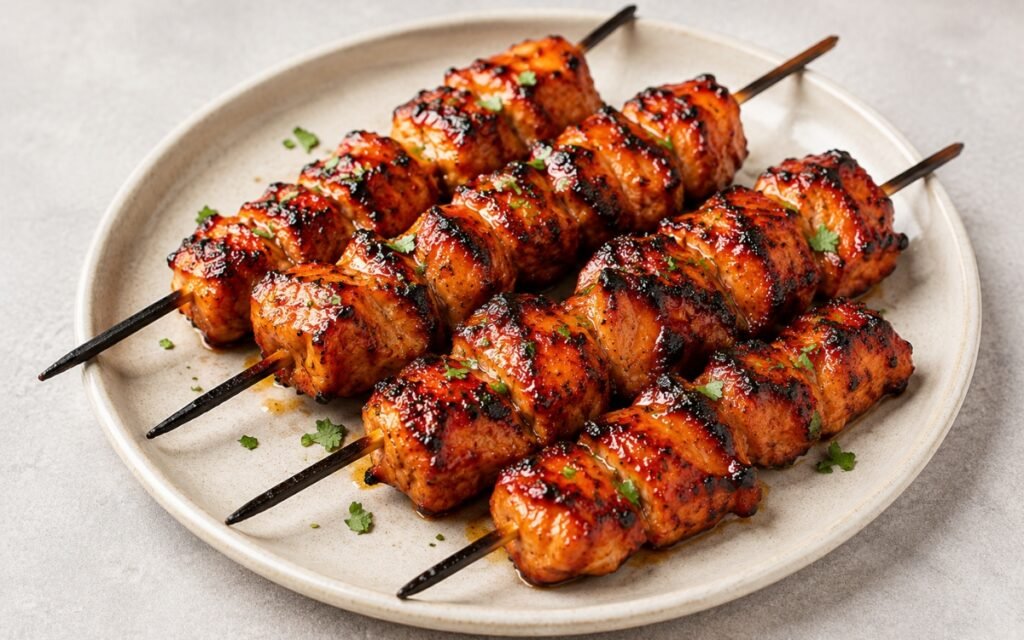
Grilled Chicken Skewers
Juicy grilled chicken skewers lacquered with caramelized honey–sriracha glaze for smoky, sticky heat.
You might also like
You might also like
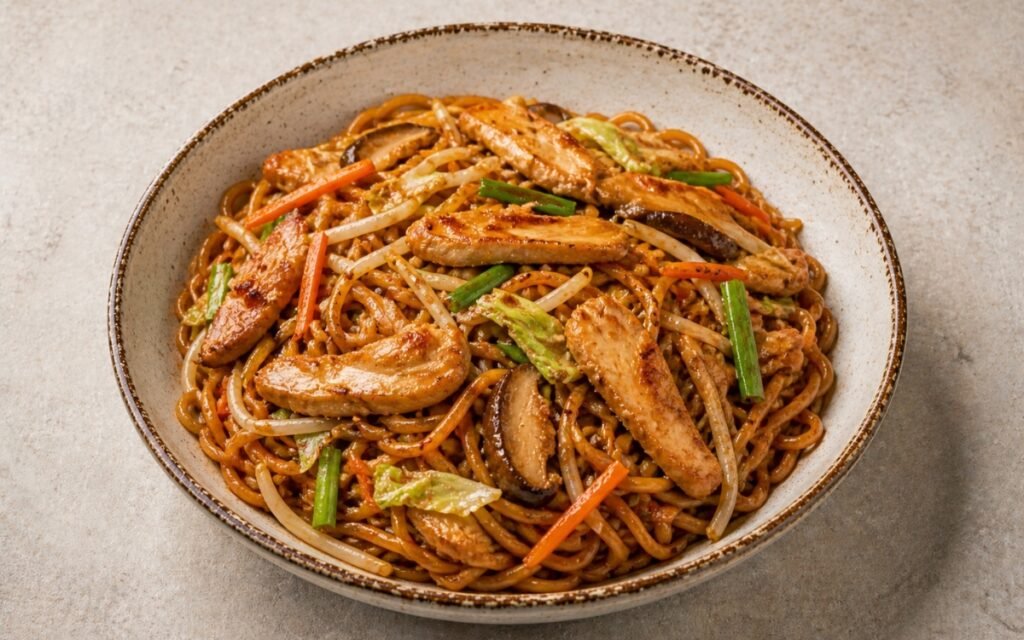
Easy Chicken Chow Mein Noodles
Hong Kong egg noodles crisped in a smoking-hot wok with seared chicken and vegetables — four-component soy sauce, cornstarch glaze, 35 minutes.
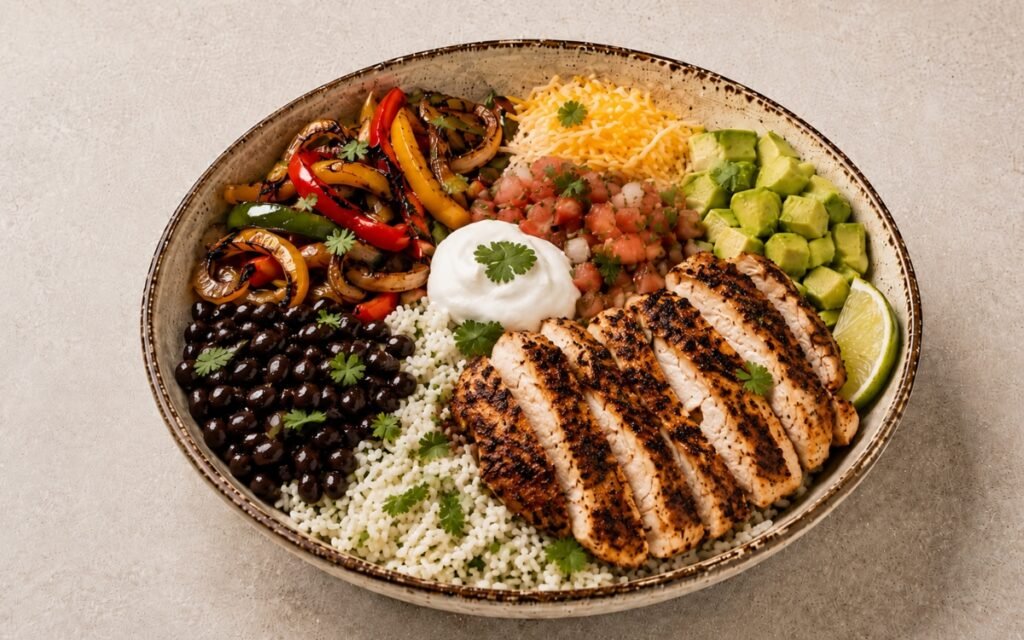
Chicken Fajita Rice Bowl
Charred chicken and peppers over cilantro-lime rice with black beans and fresh toppings.
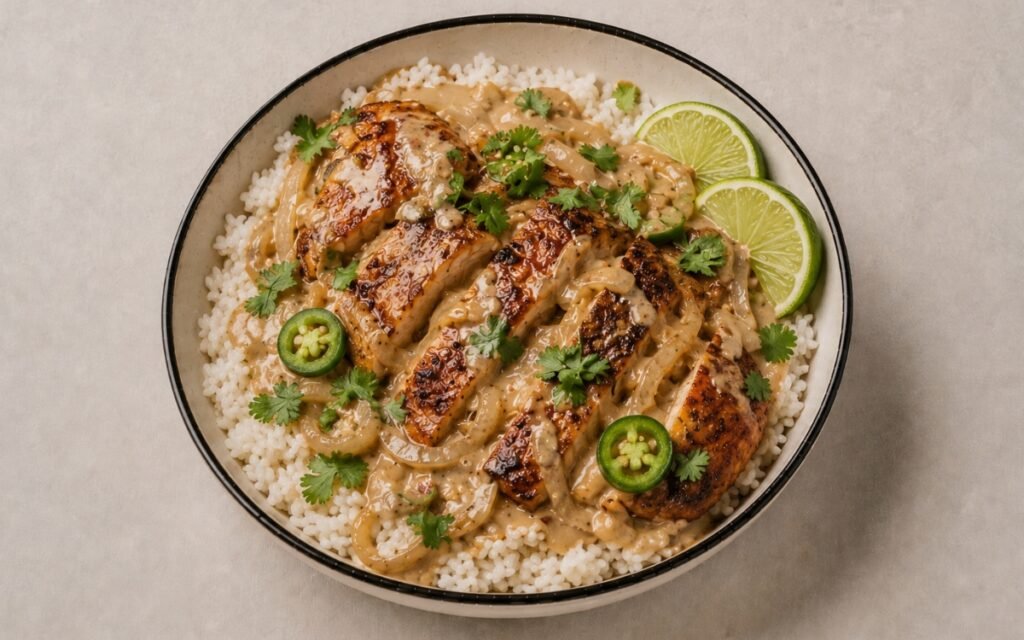
Creamy Coconut Chicken Rice Bowl
Seared chicken thighs simmered in coconut cream, ginger, lime, and soy sauce built in the same skillet — over coconut-lime jasmine rice. 45 minutes and better the next day.

Sweet and Sour Chicken
Ingredients
Method
- Cut the chicken thighs into 2.5cm cubes — as uniform in size as possible so every piece cooks through at the same rate in the hot oil. In a medium bowl, combine the oyster sauce, light soy sauce, cornstarch, water, and salt. Add the chicken cubes and mix thoroughly with your hand, turning every piece to ensure complete coating. The cornstarch in the marinade serves two functions simultaneously: it begins tenderising the surface proteins of the chicken through its interaction with the oyster and soy sauces, and it creates a thin, starchy surface layer that helps the subsequent batter adhere more completely during frying. Allow to marinate for a minimum of 15 minutes at room temperature — the flavour penetration in this time is limited but the surface preparation is sufficient for the batter to work correctly.
- Cut all the vegetables and pineapple to approximately the same size — roughly 2cm in every dimension — so they cook evenly during the brief oil frying step and are proportionate to the chicken cubes in the finished dish. Slice the carrot on a diagonal at approximately 5mm thickness — the diagonal cut increases the surface area and produces a more visually interesting piece. Cut the red bell pepper and onion into triangles of approximately 2cm per side — triangles are the traditional cut for sweet and sour because their pointed edges char slightly in the oil while the thicker centre remains slightly crunchy. Cut the pineapple into 2cm chunks. Have all vegetables and pineapple arranged in separate groups ready for the frying step — they will be cooked in batches and need to be accessible quickly once the oil is at temperature.
- In a small bowl or jug, combine the ketchup, red vinegar, rice vinegar, salt, and sugar. Stir until the sugar is completely dissolved — undissolved sugar produces an inconsistently sweet sauce that is overly sweet in some bites and not sweet enough in others. Taste the sauce before it reaches the wok and calibrate: it should taste balanced between sweet, tangy, and slightly salty at full intensity — noticeably sweeter and more acidic than you would want to eat directly because it will be diluted slightly by the wok heat and the slurry. The combination of red vinegar and rice vinegar is deliberate — red vinegar provides a sharper, slightly wine-like acidity with depth; rice vinegar provides a cleaner, milder, slightly sweet acidity. Together they produce a more complex sour note than either alone. In a separate small bowl, mix the potato starch and water for the slurry until completely smooth. The slurry should be lump-free — any lumps of undissolved starch will produce gelatinous chunks in the finished sauce. Set both the sauce and the slurry beside the wok.
- In a large bowl, combine the flour, cornstarch, baking powder, water, and oil. Whisk until just combined — the batter should be smooth but do not over-mix, which develops the flour’s gluten and produces a dense, chewy crust rather than the light, slightly airy texture of a correctly mixed batter. The consistency should be similar to thick cream — it should coat the back of a spoon and drip slowly rather than running off immediately. The cornstarch in the batter — the same principle as in Japanese tempura — produces a crispier, more rigid crust than flour alone, because cornstarch has no gluten and does not form the chewy, elastic network that pure flour does. The baking powder provides gas expansion during frying, creating small air pockets in the crust that make it lighter and crispier. The teaspoon of oil lubricates the batter and produces a smoother, more even coating on each chicken piece. Add the marinated chicken cubes to the batter and turn to coat every piece completely.
- Heat approximately 700ml–1L of neutral oil in a wok over high heat until it reaches 175°C (350°F). The wok is the correct vessel for this preparation — its curved sides and wide opening allow the oil to distribute efficiently, the high heat to maintain temperature between batches, and the surface area to accommodate the relatively large quantity of chicken without the significant temperature drop that a straight-sided pot would experience. Test the oil temperature with a small drop of batter — it should sizzle immediately and rise to the surface within 3–4 seconds. Begin frying the battered chicken in batches of 6–8 pieces maximum — crowding drops the oil temperature dramatically and produces pale, oil-saturated batter rather than crispy, golden crust. Lower each piece gently into the oil. Fry for 3–4 minutes per batch, turning occasionally, until the batter is set and pale golden — the colour at this stage should be pale, not the deep golden of the finished product. The first fry’s purpose is to cook the chicken through to 74°C internal temperature — the full colour and crispness develop in the second fry. Transfer each batch to a wire rack. After all the chicken has been first-fried, proceed immediately to the second fry — do not allow the chicken to cool for more than a few minutes.
- Increase the oil temperature to 193°C (380°F). Return all the first-fried chicken to the oil simultaneously — all pieces going back in together is correct at this stage because the second fry is brief and the chicken is already cooked through. Fry for 60–90 seconds until the batter is a deep, even golden-brown and shatteringly crisp when you lift a piece and hear it with tongs. The elevated temperature in the second fry is what produces the dramatic improvement in crispness: the higher heat drives off the remaining surface moisture in the already-cooked batter almost instantly, producing a rigid, dry, crackling crust that would require significantly longer at the lower first-fry temperature to achieve — by which point the chicken would be overcooked. Remove all the chicken to a wire rack. Skim any loose batter pieces or burnt bits from the oil surface with a slotted spoon.
- With the oil still hot at approximately 175–180°C, fry the vegetables in batches. Do not add all vegetables simultaneously — a large volume of cold, wet vegetables added at once drops the oil temperature severely and causes the vegetables to absorb oil rather than being sealed quickly. Fry each vegetable type separately, or in small batches of one layer, for approximately 60 seconds per batch. The vegetables should emerge slightly softened at the edges but retaining a noticeable crunch — they will soften further when tossed in the hot sauce in the wok. Remove each batch with a slotted spoon and set aside. Once all vegetables and pineapple are fried, pour the oil from the wok into a heatproof container — do not wait for it to cool, as the wok needs to be available immediately and waiting for the oil to cool loses valuable time.
- Working quickly while the wok is still hot, wipe any oil residue from the inside with a folded paper towel held with tongs — caution, the wok is extremely hot. Return the wok to the burner over high heat. Pour in the prepared sweet and sour sauce. Bring to a full boil while stirring — the sauce will bubble vigorously as the vinegar’s acidity and the ketchup’s sugars heat rapidly. Once the sauce is at a full boil, reduce the heat to medium. Give the slurry a quick stir — it separates on standing — and add approximately half of it to the boiling sauce while stirring continuously. The sauce will begin to thicken within 20–30 seconds as the potato starch gelatinises. Assess the consistency: a well-thickened sweet and sour sauce should coat the back of a spoon and hold a clear line when you run your finger through it, but should not be so thick that it forms a gel-like layer. If it needs more thickness, add the remaining slurry in small additions. If it has thickened beyond the correct point, add a small splash of water and stir.
- Add the fried vegetables and pineapple to the sauce first and stir to coat every piece completely. The vegetables go in before the chicken because they are slightly more delicate and benefit from an additional 30–60 seconds in the sauce to fully absorb its flavour. Turn the heat off. Add all the double-fried chicken and stir vigorously but carefully — thorough coating of every chicken piece with the glossy sauce is the visual and flavour goal, but aggressive stirring can break the crispy crust. Either stir the sesame seeds into the combined dish now for even distribution throughout, or scatter generously over each portion when serving. Serve immediately over jasmine rice — the crispness of the double-fried batter begins to diminish the moment the sauce contacts it, and the dish is at its best within the first 5–10 minutes of final assembly.