Ingredients
Method
Activate the Yeast
- In a bowl or jug, combine the warm water, active dry yeast, and sugar. Stir briefly and let stand for 5–10 minutes, until lightly foamy. The mixture should show small bubbles or foam on the surface. If nothing happens, the yeast is weak or the water temperature was wrong. Do not continue with dead yeast. This early check is a genuinely useful diagnostic — proceeding with unfoamed, inactive yeast means discovering the problem only after the full mixing, kneading, and rising process has already failed to produce any rise at all.
Mix the Dough
- In a large bowl, combine the flour and salt. Add the yeast mixture and the softened lard or shortening. Mix until a rough dough forms and no dry flour remains at the bottom of the bowl. The dough should feel slightly tacky but not wet. If it is dry and tearing, add water 1 tbsp at a time. If it is sticky like batter, add a small dusting of flour, but do not bury it in extra flour. Adding water or flour gradually, in small increments, rather than guessing a larger correction at once, is what keeps the dough's hydration in the right range — overcorrecting in either direction is easy to do and hard to walk back cleanly.
Knead
- Knead by hand for 8–10 minutes, or in a stand mixer with a dough hook for 6–8 minutes, until smooth, elastic, and moderately soft. The dough should become more cohesive and pull cleanly from the work surface or mixer bowl. It should stretch without immediately tearing. Telera dough needs enough gluten to hold sandwich fillings, but it should not become tight and dense. Smooth and elastic is the target, not stiff. This is a genuinely different target than a lean, chewy bread dough — telera is meant to stay soft and yielding enough to fold around a torta's fillings, which is why the kneading target stops at smooth and elastic rather than pushing toward the tighter, more developed gluten structure a crusty artisan loaf would need.
First Rise
- Shape the dough into a ball and place it in a lightly greased bowl. Cover and let rise at room temperature for 1–1½ hours, until doubled. The dough must fully rise before shaping. Under-risen dough gives dense rolls that split badly in the oven. Letting the dough reach a genuine doubling gives the yeast time to produce the volume of gas the finished roll needs for a light, open crumb — cutting this rise short is one of the more common reasons homemade rolls turn out dense.
Divide and Pre-Shape
- Turn the dough onto a lightly floured surface. Divide into 4 equal pieces, about 210–215g each. Shape each piece into a loose oval. Cover and rest for 10 minutes. This short rest relaxes the gluten so the rolls can be shaped wide and flat without springing back aggressively. Dough that's just been divided and shaped has tight, springy gluten from that handling — the brief rest lets those strands relax before the more demanding final shaping stage, which is what makes flattening the dough into a wide oval considerably easier.
Shape the Telera Rolls
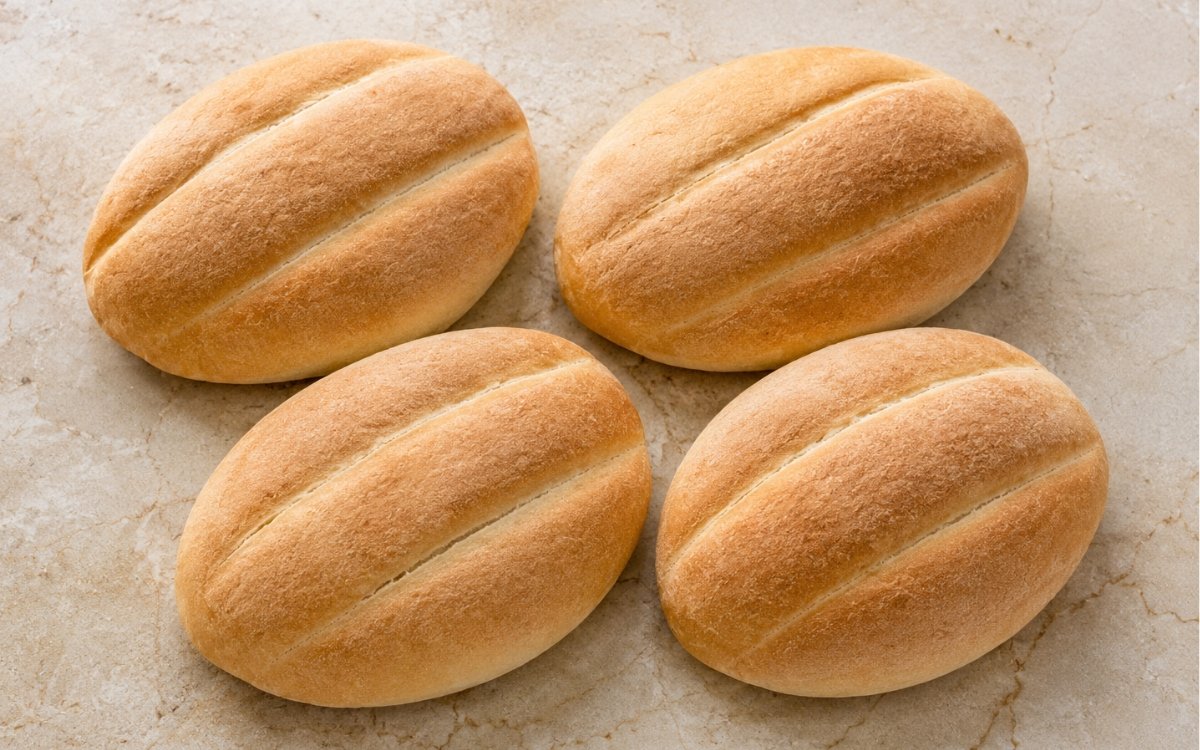
- Flatten each piece gently into a wide oval, about 14–16cm long and 8–9cm wide. Using the handle of a wooden spoon, a thin rolling pin, or a clean dowel, press two deep lengthwise grooves into each roll, dividing the top into three raised sections. Press firmly almost down to the tray, but do not cut through the dough. Lightly flour the tool if it sticks. The grooves need to be deep. Shallow decorative lines are useless because they disappear during proofing and baking. If the dough springs back, let it rest 5 minutes and press again. Pressing the tool almost all the way down to the tray, without actually cutting through, is what gives the grooves enough depth to survive the dough's expansion during proofing and oven spring — grooves pressed only lightly will simply fill back in and vanish by the time the roll finishes baking.
Second Rise
- Place the shaped rolls on a parchment-lined baking tray. Cover loosely and let proof for 40–60 minutes, until puffy and expanded but still showing clear grooves. Preheat the oven to 210°C during the final 20 minutes of proofing. The rolls should feel light and slightly airy when gently touched. If the grooves nearly disappear, press them again very gently before baking. Preheating during the final stretch of proofing, rather than only once proofing is complete, means the oven is fully up to temperature the moment the rolls are ready to bake — a cold or partially heated oven at that point would let the dough overproof while waiting.
Bake with Steam
- Lightly spray the rolls with water, or place a small tray of hot water in the oven for steam. Bake at 210°C for 16–20 minutes, until lightly golden, set, and hollow-sounding when tapped on the base. The crust should be thin and lightly crisp, not hard like a baguette. Telera is a torta roll, not a jaw workout. Steam in the oven's early baking minutes keeps the dough's surface pliable for slightly longer before it sets, which is part of what produces telera's specific thin, delicate crust rather than the thicker, harder crust a dry oven environment would build.
Cool
- Transfer the rolls to a wire rack and cool for at least 30 minutes before slicing. Cutting them hot compresses the crumb and makes the interior gummy. Bread continues setting internally for a period after it leaves the oven — slicing while still hot disrupts that final structural setting, compressing the still-soft crumb into something denser and gummier than the same roll would have once properly cooled.
Notes
The depth of the two signature grooves is worth treating as the single most important shaping detail in this whole recipe, since it's directly responsible for telera's recognisable look and function. Pressed only lightly, the grooves read as a nice decorative touch at first but disappear almost entirely by the time the roll has proofed and baked — the dough's own expansion simply fills them back in. Pressing genuinely deep, close to the tray without actually severing the dough, is what gives the grooves enough structural depth to survive both rises and the oven's own additional spring.
The two rest periods built into the shaping stage — a brief 10-minute rest after dividing, and the longer second proof after the grooves are pressed — both address the same underlying issue of gluten tension from different points in the process. Freshly divided and shaped dough resists further manipulation with a springy, elastic push-back; the short rest relaxes that tension enough to make the wide, flat shaping considerably easier, while the second proof lets the fully shaped rolls develop their final volume and lightness.
Baking with steam, whether from a light water spray directly on the rolls or a tray of hot water placed in the oven, is a technique borrowed from crustier bread baking but applied here for a different purpose. Rather than building a thick, shattering crust, the steam here keeps the dough's surface pliable just long enough in the early bake to produce telera's specifically thin, lightly crisp exterior — genuinely different from the harder crust a completely dry oven environment would create on the same dough.
Resisting the temptation to enrich this dough with eggs, butter, or extra sugar is worth understanding as a deliberate constraint rather than a missed opportunity. Telera's identity depends on staying a relatively lean, simple roll — soft enough to hold a torta's fillings without falling apart, but not sweet or rich enough to compete with those fillings. Adding those enrichments would produce a pleasant bun, but a genuinely different one from a proper telera.