Ingredients
Method
Prepare and Brine the Chicken
- If the thighs are very uneven in thickness, trim and lightly flatten the thickest areas so each piece cooks more evenly without tearing the meat. In a large bowl, whisk together the buttermilk, salt, garlic powder, onion powder, paprika, white pepper, cayenne if using, and hot sauce if using. Add the chicken and turn to coat every piece fully. Cover and refrigerate for at least 2 hours, ideally overnight. The chicken should be fully coated in the brine and seasoned all over. Overnight gives the best flavour and the most even internal seasoning. Buttermilk's mild acidity works gently on the meat's surface proteins over the extended soak, tenderising while its slightly thickened texture clings to the chicken better than a thinner liquid would — that clinging quality is what gives the first dry dredge something substantial to bond with.
Prepare the Dredge and Cold-Water Dip
- In a wide shallow tray or bowl, whisk together the flour, cornstarch, salt, garlic powder, onion powder, paprika, white pepper, black pepper, and baking soda until evenly combined. Fill a second bowl or container with ice-cold water and enough ice to keep it very cold. Set a wire rack over a tray nearby for holding the coated chicken. Cornstarch fries into a noticeably lighter, crisper texture than flour alone, while the small amount of baking soda raises the coating's pH slightly, speeding up browning in the fryer — useful in this small quantity, but bitter and soapy if overdone.
First Dredge
- Remove one piece of chicken from the buttermilk, letting the excess drip off but not wiping it clean. Place it into the dry dredge and press the flour mixture firmly onto all surfaces so it adheres well. Transfer the coated piece to the wire rack. Repeat with the remaining chicken. The coating should fully cover the meat, including edges and folds, with no large wet patches showing through. Leaving the buttermilk clinging rather than wiping it off gives the dry dredge plenty of moisture to bind to immediately, turning the pressed flour into a genuinely adherent first layer rather than a loose, easily shed dusting.
Set the First Coating
- Let the dredged chicken rest on the wire rack for 5–10 minutes. This first rest allows the flour to hydrate from the buttermilk and begin forming the base layer of the crust. The surface should look slightly damp and pasty in spots rather than dry and powdery. This transformation from powdery to semi-set and tacky is a prerequisite for what the cold-water dip does next — a fully dry, unhydrated coating wouldn't respond the same way to the brief ice-water dunk.
Cold-Water Dip and Second Dredge
- Working one piece at a time, lower the coated chicken into the ice-cold water for 10–20 seconds without disturbing it. Lift it out, let the excess water drip off briefly, then return it immediately to the dry dredge. Press the dredge onto the surface again, building a rough, thick, craggy coating. Transfer the finished piece back to the wire rack and repeat with the remaining chicken. This stage is what creates the distinct rugged crust. After the second dredge, the chicken should look uneven, shaggy, and heavily coated. The brief ice-water dip partially dissolves the surface of the already-set first coating into a sticky paste without washing it away — that sticky surface is exactly what the second layer of dry dredge grabs onto, building genuine thickness rather than repeating a thin single coat.
Rest the Final Coating
- Let the coated chicken rest on the wire rack for 10–15 minutes while you heat the oil. This second rest helps the crust attach securely so it does not shed in the fryer. Giving the fully built, double-pressed coating time to set before it ever touches oil is what keeps it intact through the shock of frying — coating that's still loose or wet in spots is far more likely to shed into the oil.
First Fry
- Heat the frying oil to 150–155°C. Fry the chicken in batches without crowding the fryer. Fry each piece for 5–6 minutes, turning as needed, until the coating is set, pale golden to medium golden, and the chicken is nearly cooked through. Transfer the chicken back to the wire rack. If you are using larger deboned whole leg portions rather than standard thighs, they may need 1–2 minutes longer on the first fry. This lower-temperature first fry cooks the chicken through and sets the thick, double-pressed crust without pushing it toward deep colour — that colour-building is deliberately saved for the second, hotter fry.
Rest Between Fries
- Let the chicken rest on the wire rack for 8–10 minutes. This pause allows the crust to dry slightly and the internal heat to redistribute so the second fry crisps the exterior without overcooking the meat. Letting residual heat equalise through each piece reduces the risk of the hotter second fry overcooking the exterior before the interior has fully caught up.
Make the Nashville Hot Sauce
- While the chicken rests, place the cayenne, brown sugar, paprika, garlic powder, chili powder if using, and salt in a heatproof bowl. Carefully ladle in 120ml of hot frying oil and whisk until smooth. The sauce should be glossy, loose, and vividly red-orange, with the sugar dissolved and the spices evenly suspended. Using the fryer's own hot oil, rather than separately warmed neutral oil, is what gives this sauce its authentic character — the oil is already carrying a faint fried-chicken flavour from the frying process, and its heat immediately blooms the cayenne and other spices on contact rather than needing a separate stovetop step.
Second Fry
- Increase the oil temperature to 185–190°C. Return the chicken to the fryer in batches and fry for 2–3 minutes, until deeply golden, very crisp, and fully cooked through. Transfer the chicken to the wire rack and let it rest for 1–2 minutes. The internal temperature should reach 74°C. Since the chicken is already fully cooked from the first fry, this second, much hotter pass exists purely to drive off remaining surface moisture and build deep, aggressive colour and crunch across the thick, double-pressed crust.
Coat in Nashville Hot Sauce
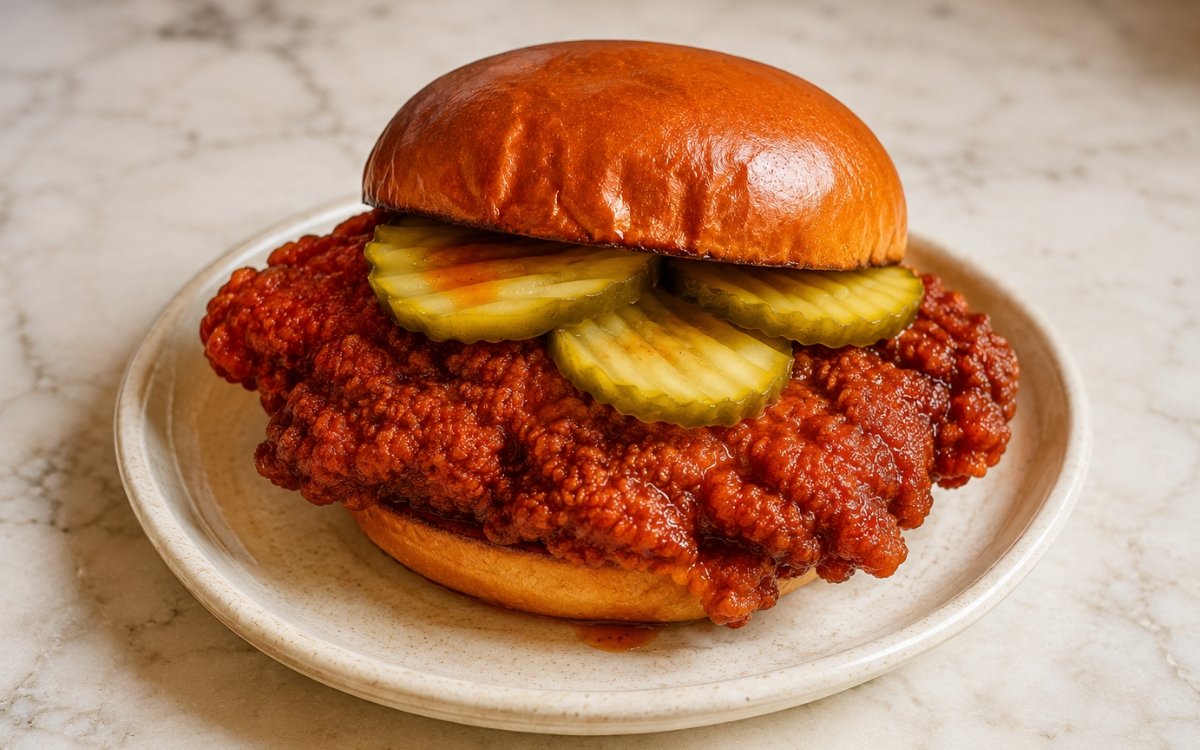
- While still hot, transfer the fried chicken to a large bowl. Pour over the Nashville hot sauce and turn each piece carefully until evenly coated. Return the coated chicken to the wire rack for a brief 30–60 second rest so excess sauce drips off but the crust stays fully glazed. The coating should be glossy and fiery red-orange, clinging to every ridge of the crust. The brief 1–2 minute rest before saucing, rather than glazing the instant the chicken leaves the fryer, lets the crust firm up just enough that it holds together under the sauce's weight rather than shedding.
Toast the Buns and Assemble
- Split the brioche buns and toast the cut sides in a little butter until golden. Spread mayonnaise on the bottom bun of each sandwich. Place one hot chicken piece on each bun, then top with 5–6 crinkle-cut dill pickle slices. Close with the top bun. Serve immediately while the chicken is hot and crisp. Keeping the toppings simple — just mayonnaise and pickles — is a deliberate choice that lets the Nashville hot glaze remain the clear centrepiece of the sandwich, rather than competing with a more elaborate topping list.
Notes
The cold-water dip is worth understanding as the specific mechanism responsible for this sandwich's defining crust texture. A single dredge, however firmly pressed, produces a relatively thin, uniform coating. Dunking that set first coating briefly in ice water partially dissolves its surface back into a sticky paste without washing it away — and it's specifically that sticky surface that gives a second full layer of dry dredge something substantial to bond to, building the thick, uneven, genuinely rugged crust this style of chicken is known for.
Building the Nashville hot sauce from the fryer's own hot oil, rather than oil warmed separately on the stovetop, is a detail specific to this dish's authenticity rather than a matter of convenience. That oil carries a faint fried-chicken flavour from the frying process itself, and its immediate heat blooms the cayenne, paprika, and other spices on contact, producing a sauce with real depth rather than one that tastes purely of raw spice suspended in generic oil.
Resting the fried chicken briefly — just 1–2 minutes — before it ever meets the hot sauce is a small timing detail with a real structural payoff. Chicken sauced the instant it leaves the fryer, while the crust is at its most fragile and still settling, is considerably more likely to shed pieces of coating into the sauce or lose adhesion in patches. The brief rest lets the crust firm up just enough to hold together under the sauce's weight.
Keeping the sandwich's toppings deliberately simple — mayonnaise and crinkle-cut dill pickles, nothing more — is a genuine style choice rather than an underdeveloped one. Nashville hot chicken's defining feature is its fiery, glossy glaze, and a more elaborate topping list would compete with and dilute that focus. The mayonnaise provides cooling richness and the pickles provide sharp acidity, both in service of letting the chicken and its sauce remain the clear centre of the sandwich.