Ingredients
Method
Combine the Dry Ingredients and Work in the Fat
- In a large bowl, whisk together the all-purpose flour, fine sea salt, and baking powder until evenly combined. The baking powder is a small but impactful addition — at the quantity specified it produces no discernible leavening lift but acts on the gluten structure during cooking, contributing to the soft, pliable texture rather than the cracker-like rigidity of a tortilla made without it. Add the honey directly to the flour mixture. Honey in a flatbread performs what bakers call a hygroscopic function — it attracts and retains moisture from the surrounding environment, keeping the tortilla soft and pliable for significantly longer after cooking than one made without it. At 5g it contributes no detectable sweetness but makes a noticeable difference to how the tortillas feel and bend after cooking. Add the fat of your choice. If using cold butter, cut it into small pieces first. Work the fat into the flour mixture using your fingertips — rub the fat between your fingers and into the flour with a pressing and smearing motion, breaking it down into increasingly smaller pieces until the mixture resembles coarse, irregular crumbs with some slightly larger pea-sized pieces remaining. This fat-into-flour step is the technique that makes homemade tortillas soft rather than tough. When fat coats the flour particles before the water is added, it physically interrupts the gluten formation — fat-coated flour proteins cannot link into long gluten chains as readily as uncoated ones. The result is a shorter, more tender, more extensible gluten network that produces soft, pliable tortillas rather than the dense, chewy texture of an insufficiently fat-worked dough.
Add Water and Knead
- Pour the warm water into the flour-fat mixture gradually — add approximately half first, mixing with your hand or a spoon until roughly combined, then add the remaining water incrementally while mixing until a shaggy dough forms. The warm water — approximately 40°C, warm to the touch but not hot — helps the fat distribute more evenly and the gluten develop more readily than cold water would. Once a rough dough has come together with no dry flour remaining, transfer it to a clean work surface. Knead for 5–7 minutes using firm, rhythmic strokes — push the dough away from you with the heel of your hand, fold it back, rotate a quarter turn, and repeat. The dough is ready when it is completely smooth, soft, and elastic — it should feel like a firm earlobe when pressed, spring back slowly and completely when poked, and stretch a few centimetres without tearing when pulled. If it is too dry and tears easily, add a very small splash of water and knead it in. If it is sticking aggressively to the counter and your hands, dust lightly with flour — a small amount only, as excess flour at this stage changes the recipe's hydration balance.
First Rest
- Shape the kneaded dough into a smooth ball, return it to the bowl, and cover with a clean kitchen towel, plastic wrap, or an inverted plate. Allow to rest at room temperature for 20–30 minutes. This rest period is the most important step between mixing and rolling, and skipping it produces tortillas that are frustratingly difficult to roll to the correct thinness. During the kneading process the gluten network becomes tightly wound and elastic — the dough wants to spring back to its original shape when stretched. The 20–30 minute rest allows the gluten to relax and the fat to redistribute into a more even distribution throughout the dough, producing a dough that can be stretched and rolled thin without resistance or contraction.
Divide and Ball
- Divide the rested dough based on your intended size. For 8 small tortillas (8 inches): divide into 8 equal pieces, each approximately 65g. For 4 large tortillas (12 inches): divide into 4 equal pieces, each approximately 130g. Roll each piece into a smooth, tight ball by placing it on the counter and rolling in a circular motion with a cupped hand, applying light pressure to develop surface tension. Cover all the dough balls with a damp cloth or plastic wrap and allow to rest for a further 10 minutes. This second, shorter rest is specifically for the freshly-shaped balls — the brief shaping created some surface tension and gluten tightening that relaxes during this 10-minute window, making the subsequent rolling easier and more even.
Roll the Tortillas
- On a lightly floured surface, working with one ball at a time while keeping the others covered, roll each ball into a thin, even round. Apply even, consistent pressure from the centre outward in all directions, rotating the tortilla a quarter turn after every few passes of the rolling pin to maintain a round rather than oval shape. For 8-inch tortillas: aim for very thin, almost translucent discs where you can just barely see your hand through the dough when held up to light. For 12-inch large burrito tortillas: keep them slightly thicker — about 2mm rather than 1mm — because a paper-thin 12-inch tortilla will tear under the weight of a full burrito filling. The larger size requires a correspondingly large cooking surface — a 12-inch round requires a 12-inch or larger skillet or griddle. Keep this in mind when deciding which size to make. Slight irregularity in shape is completely acceptable and characterises a handmade tortilla — the imperfect edges and slightly uneven surface of a hand-rolled tortilla are visual markers of quality, not flaws.
Cook on a Dry, Hot Surface
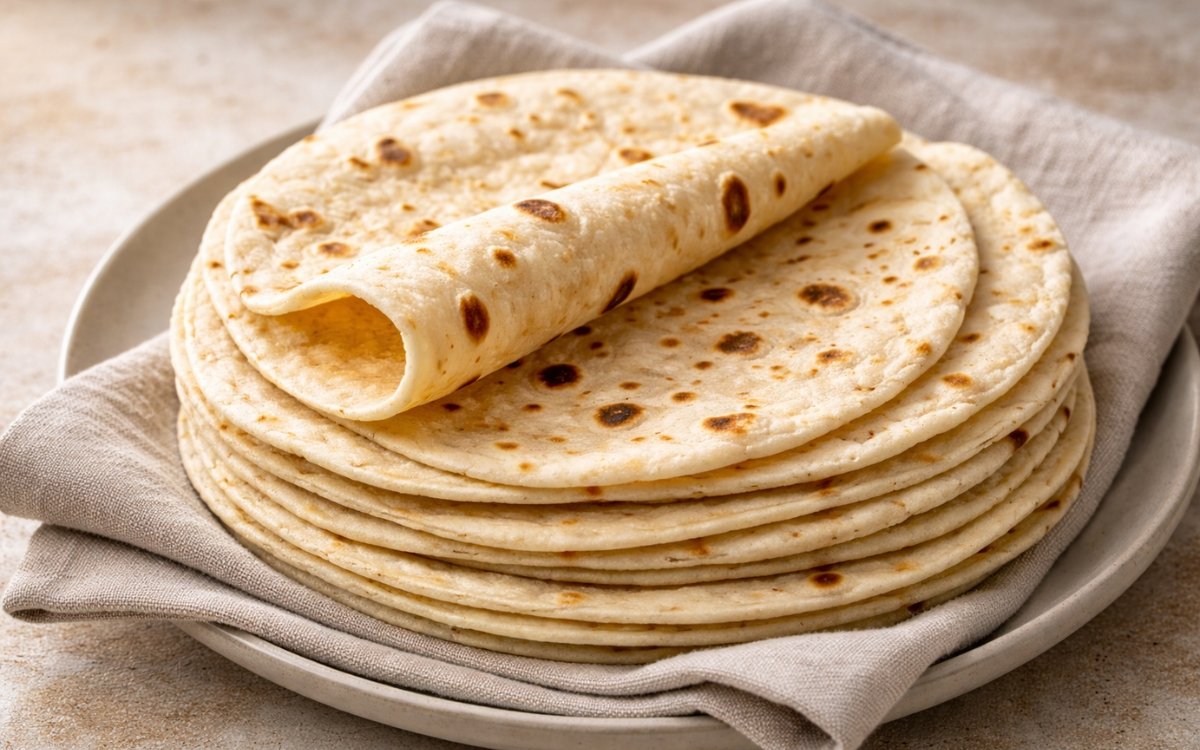
- Heat a cast iron skillet, griddle, or heavy-bottomed pan over medium-high heat until it is genuinely hot — a drop of water should evaporate almost instantly on contact with the surface. No oil is added to the cooking surface. Cook the tortillas one at a time, laying each one flat on the dry, hot surface. Cook the first side for 30–45 seconds until the bottom surface shows irregular charred spots — pale, irregular char marks across the surface are the visual and flavour signature of a properly cooked tortilla, produced by the direct contact between the dough's surface starch and the hot, dry pan. Flip with tongs or a spatula and cook the second side for 20–30 seconds. The tortilla will puff slightly during cooking as steam trapped between the gluten layers expands — this puffing is a sign of correct dough development. Stack the cooked tortillas on top of each other immediately, covered with a clean cloth — the residual steam from each hot tortilla keeps the stack warm and soft, and the weight of the stack above prevents each tortilla from drying out and cracking. Do not allow cooked tortillas to cool uncovered, as they will crisp and crack rather than remaining flexible.
Notes
Flour quality matters for tortillas more than it might seem for a simple flatbread. Standard all-purpose flour produces a good tortilla. A slightly lower-protein all-purpose flour — the kind typically used for cakes and pastries, around 9–10% protein — produces a marginally more tender, more pliable tortilla because its weaker gluten network creates less resistance when the tortilla is bent around a filling. Higher-protein bread flour produces a chewier, less pliable tortilla that is acceptable but less suited to taco and burrito applications where flexibility is the primary functional requirement.
The cooking surface temperature is the most common source of failure in home tortilla making. Too low a heat produces pale, dry, stiff tortillas without any char marks that taste bland and crack when folded. Correct heat produces the characteristic irregular charring that creates both visual appeal and the slightly smoky flavour contrast that makes a handmade tortilla genuinely enjoyable to eat rather than simply functional. The pan should be hot enough that the tortilla begins cooking immediately on contact — a 30-second delay before any colour appears indicates insufficient heat.
Large 12-inch tortillas require patience and practice to roll evenly — the larger the disc, the more difficult it is to maintain uniform thickness throughout. Rotating the dough consistently, applying pressure from the centre outward, and using a longer rolling pin than the disc's diameter all help. Slightly uneven thickness in a large tortilla is normal and does not affect the eating quality.
The choice of fat is the primary flavour decision in this recipe. Lard produces the most traditional, most flavourful tortilla — slightly savoury, incredibly soft, and with the most extensible, tear-resistant texture of the three options. It is the fat used in authentic Mexican flour tortillas and the one that produces the result closest to what the recipe was designed around. Unsalted butter produces a richer, slightly more European-tasting tortilla with a mild dairy flavour and good pliability. Neutral oil produces a lighter, slightly less tender tortilla that is vegan-friendly and entirely acceptable — slightly less flavourful than either fat option but still dramatically better than packaged.