Ingredients
Method
Mix the Dough
- In a large bowl or the bowl of a stand mixer, combine the 00 flour, fine semolina, and instant yeast. Add the warm water and 30g olive oil and mix until no dry flour remains and you have a very shaggy, sticky dough. Let it rest for 15 minutes. Add the salt and mix again until fully incorporated. If using a stand mixer with a dough hook, mix on low to medium-low speed for 6–8 minutes. If mixing by hand, use a folding and squeezing motion for 2–3 minutes until the dough becomes more cohesive. The dough should be very soft and high-hydration. It will not feel like a stiff bread dough. Do not add extra flour to "fix" it. That initial 15-minute rest lets the flour begin hydrating passively before the salt is introduced, building real gluten structure before that ingredient has any chance to slow the early process down.
Strengthen the Dough
- Cover the bowl and let the dough rest for 20 minutes. Then perform a set of stretch and folds or coil folds. Repeat 3 more times at 20-minute intervals, for a total of 4 sets. After the last fold, the dough should feel noticeably smoother, stronger, and more elastic, while still remaining soft and extensible. This strengthening stage is important. With a wet focaccia dough, the folds build structure without tightening the dough the way heavy kneading can. That repeated, gentler folding technique is specifically what lets this genuinely wet dough develop real gluten strength without ever tightening it the way traditional, aggressive kneading would, protecting the airy, open crumb this focaccia depends on.
Cold Ferment
- Transfer the dough to a lightly oiled container, cover well, and refrigerate for 48–72 hours. This long cold ferment is what gives the dough its complex flavor, better browning, and airy internal structure. A same-day version will not produce the same result. That extended cold time is genuinely the main flavour-building stage of this whole recipe, giving the yeast real time to develop complexity a same-day dough simply couldn't achieve in the same window.
Pan the Dough
- Remove the dough from the refrigerator. Generously oil a parchment-lined sheet pan or directly oil a metal sheet pan very well. A standard roughly 33 x 45cm / 13 x 18 in pan works well. Pour 2–3 tablespoons of olive oil into the pan. Gently transfer the dough into the pan. Turn it once so both sides are lightly coated in oil. Let it rest for 20–30 minutes, then gently stretch it toward the corners. If it resists, stop and let it relax for another 15 minutes before stretching again. Do not force it aggressively. The dough should eventually fill the pan with gentle stretching over time, not by pressing out all the gas. That generous pan oiling does genuine, active work beyond preventing sticking — it will essentially shallow-fry the dough's underside during baking, producing this focaccia's characteristically crisp, olive-oil-rich bottom.
Final Proof
- Once the dough is spread in the pan, cover lightly and let it proof at room temperature for 1½ to 2½ hours, until very puffy and visibly aerated. Toward the end of proofing, drizzle a little more olive oil over the surface. Using your fingertips, dimple the dough all over, pressing down gently but not deflating it completely. The dough is ready when it looks pillowy and bubbly. If it still looks tight and flat, it needs more time. That gentle dimpling, pressed down without fully deflating the dough, releases the largest surface gas bubbles while preserving the overall structure built through the earlier cold ferment and folds.
Pre-Bake the Focaccia Base
- Preheat the oven to 245°C. Bake the plain dimply dough for 8–10 minutes, until the surface is set and just barely starting to color at the edges, but not yet deeply browned. This pre-bake is the critical step for this pizza variation. The dough must be set enough to support the sauce and cheese without sinking, but not baked so far that it dries out before the second bake. That deliberately brief pre-bake window is calibrated precisely to lock in the crumb's own airy structure while leaving genuine room for the second, topped bake still to come.
Top the Pizza
- Remove the pan from the oven. Spread the tomato sauce over the pre-baked base in an even layer, leaving a small border around the edge. Use a thick sauce layer, not a watery one. Scatter the mozzarella evenly over the sauce. If needed, add a very light pinch of salt, depending on how seasoned the sauce and cheese are. Do not overload the focaccia with sauce. Too much moisture is the fastest way to weigh down the airy crumb you just built. That deliberately thick sauce, used with real restraint, protects the pre-baked crumb's own structure from the excess moisture a looser or heavier-handed sauce layer would introduce.
Final Bake
- Return the pan to the oven and bake for 10–16 minutes, until the cheese is melted and bubbling, the edges are deep golden, and the bottom is crisp. If your oven browns unevenly, rotate the pan partway through the second bake. The pizza is done when the edges are well colored, the cheese is fully melted, and the interior crumb remains airy rather than wet or compressed. That final visual check — an airy, not compressed, interior — confirms the pre-bake and moisture control throughout the recipe have actually worked as intended.
Finish
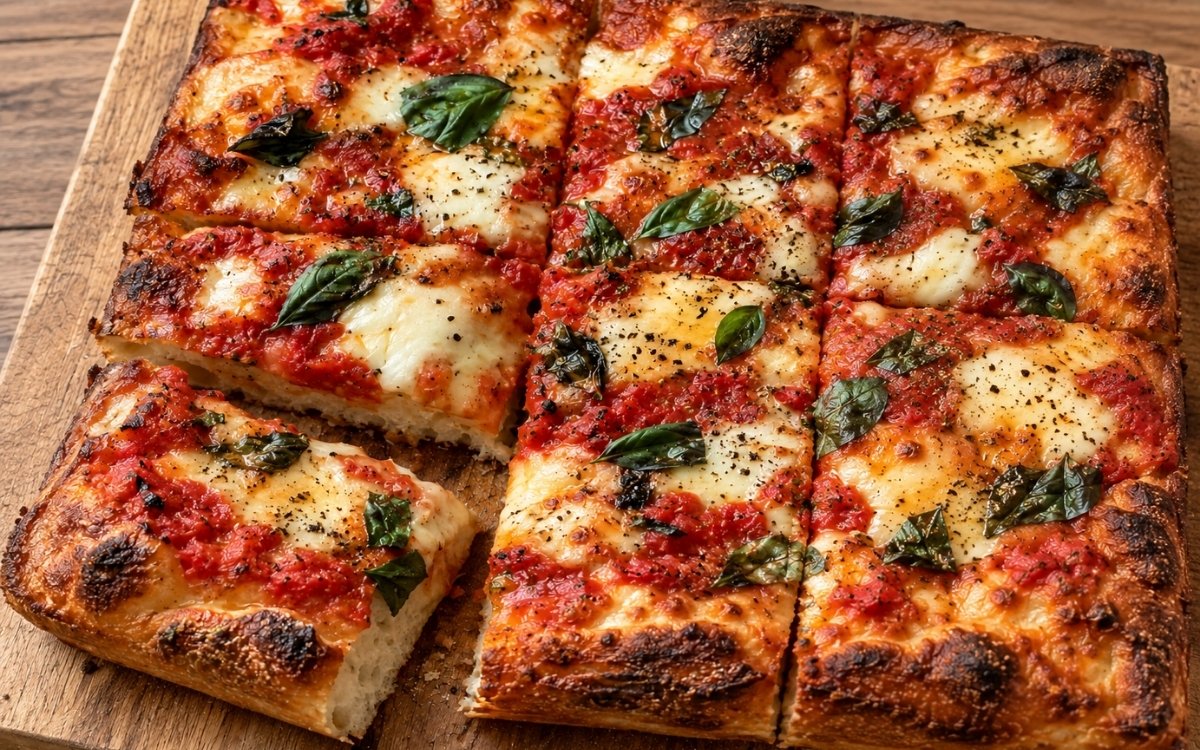
- Remove from the oven and let it rest for 5–8 minutes. Top with basil leaves and drizzle with the finishing olive oil. If you want the basil just lightly wilted, add it for the last 1 minute of baking. If you want fresher, cleaner basil flavor, add it after baking. That choice between adding the basil during the final minute of baking or entirely after gives you real control over whether the finished herb reads as softly wilted or genuinely fresh and crisp.
Slice and Serve
- Lift the pizza from the pan if needed, transfer to a board, and cut into 8 pieces. Serve warm. That brief resting period lets the cheese set slightly, making for genuinely cleaner slices rather than ones that pull and stretch messily under the knife.
Notes
Pre-baking the plain, dimpled dough before any sauce or cheese ever touches it deserves recognition as the single technique most responsible for this focaccia pizza's whole defining texture. The recipe's own explicit description of this stage as "the critical step for this pizza variation" reflects exactly how much it matters — without it, the sauce and cheese's own weight and moisture would work directly against the airy structure the long fermentation and folding worked so hard to build.
Building the dough's strength through repeated gentle folds, rather than reaching for heavy kneading, deserves the same attention this technique receives throughout this collection's other high-hydration doughs. That gentler approach is specifically what lets a dough this wet develop real gluten structure without ever tightening it the way aggressive kneading would, protecting the open, pillowy crumb this focaccia is built around.
Keeping the tomato sauce genuinely thick and used with real restraint deserves attention as a deliberate, functional choice given how directly excess moisture threatens this style of pizza. The recipe's own warning that too much sauce is "the fastest way to weigh down the airy crumb" reflects a real, specific vulnerability — a wetter or heavier-handed sauce layer would soak straight into the crumb this whole recipe was built to keep light.
Generously oiling the pan before the dough ever goes in deserves genuine respect as the technique responsible for this focaccia's signature crisp, fried bottom. That pooled oil actively shallow-fries the dough's underside as it bakes, producing a texture a dry pan simply couldn't replicate, regardless of how well every other stage of the recipe is executed.