Ingredients
Method
Activate the Yeast and Mix the Dough
- In a medium bowl, combine the water heated to 32°C with the active dry yeast and barley malt syrup. Whisk until both are fully dissolved — the barley malt syrup is viscous and takes 20–30 seconds of whisking to fully incorporate into the water. Allow to stand for 5 minutes. The barley malt syrup is not a dispensable ingredient and has no adequate substitute in bagel making. Made from sprouted barley grain, it contains maltose and diastatic enzymes that feed the yeast during fermentation, contribute a distinctive malt flavour to the finished bagel's crumb and crust, and participate in the Maillard browning reaction during baking to produce the deep golden-brown exterior characteristic of authentic bagels. Without it, the dough ferments less actively, the flavour is noticeably flatter, and the crust browns less richly. In a separate large bowl, whisk the bread flour and salt together until combined. Bread flour rather than all-purpose flour is specified because its higher protein content — typically 12–14% compared to all-purpose's 10–12% — produces more gluten when hydrated and kneaded. This stronger gluten network is what gives bagels their characteristic dense, chewy bite rather than the soft, open crumb of standard bread. Pour the yeast-water mixture into the flour-salt mixture and begin mixing with your hand, working from the edges toward the centre, until no dry flour remains and a rough, shaggy dough has formed. If the dough is too dry to come together as a cohesive mass, add water one tablespoon at a time, kneading briefly between additions until the dough is uniform.
Knead to the Windowpane
- Turn the dough out onto a clean, unfloured counter — bagel dough is relatively stiff and does not require flouring at this stage, and a lightly tacky surface-to-counter friction actually assists the kneading process. Knead by pushing the dough away from you with the heel of your hand, folding it back over itself, rotating a quarter turn, and repeating. Work continuously for 5 minutes. The dough will become progressively smoother, more elastic, and less sticky as the gluten network develops. Assess the gluten development using the windowpane test: pinch a small piece of dough between your fingers, stretch it slowly and steadily outward, and hold it up to a light source. If the dough stretches thin enough to be translucent — allowing light to pass through without the dough tearing — the gluten network is fully developed and kneading is complete. If the dough tears before reaching translucency, continue kneading for another 2 minutes and test again. The windowpane test is not ceremonial — it is a diagnostic tool that tells you precisely whether the gluten development is sufficient to produce a chewy bagel rather than a dense, compact one. This entire process can be done in a stand mixer with a dough hook at medium speed for 8–10 minutes if preferred.
First Rest
- Shape the kneaded dough into a smooth ball and transfer to a large bowl lightly greased with cooking spray. Turn the dough once in the bowl to coat all surfaces in a thin film of oil, which prevents the surface from drying out during the rest. Cover tightly with plastic wrap and allow to rest at room temperature for 30–45 minutes. The dough does not need to double in size during this rest — bagel dough is stiffer than standard bread dough and rises less dramatically. What the rest accomplishes is allowing the yeast to begin its fermentation activity and the gluten to relax slightly from the vigorous kneading, making the dough easier to divide and shape without it springing back aggressively.
Divide and Shape
- Weigh the rested dough and divide by 8 — note the per-piece weight and cut accordingly, using a kitchen scale to confirm each piece is equal. Uniform weight produces bagels that cook evenly in the boiling bath and bake at the same rate. Unequal pieces produce some undercooked and some over-baked bagels in the same batch. Spray a large baking sheet with cooking spray and dust evenly with a thin, uniform layer of fine cornmeal or semolina — this prevents the bagels from sticking to the tray during the proof and produces the characteristic slightly gritty bottom crust of an authentic bagel. There are two shaping methods that produce equally valid results. The log-and-coil method: roll each dough piece on the counter into an even 8-inch log, applying consistent pressure throughout. Flatten one end with a rolling pin until it is slightly wider. Bring the opposite end around and lay it on top of the flattened end. Pull the edges of the flattened section up and around the non-flattened end to fully enclose it, then press and pinch the seam firmly until completely sealed. The ball-and-punch method: shape each piece into a tight, smooth ball by rolling on the counter with cupped hands in a circular motion, applying slight downward pressure. Cover the balls with a damp towel and rest for 10–15 minutes to allow the gluten to relax — without this rest the balls resist stretching and tear rather than opening smoothly. Press your thumb through the centre of each ball from one side and your index finger through from the other, meeting in the middle to create an opening, then gently stretch the hole by rotating the bagel ring with both hands, widening the opening evenly until it is approximately 1.5–2 inches in diameter.
Cold Proof Overnight
- Place the shaped bagels on the prepared cornmeal-dusted tray with 5–6cm of space between each one. Spray the tops lightly with cooking spray — this prevents the plastic wrap covering from adhering to the bagels as they expand. Cover the tray as tightly as possible with greased plastic wrap, pressing it around the edges of the tray to create a near-airtight seal without pressing down onto the bagels themselves. Leave the covered tray at room temperature for 5–10 minutes before refrigerating — this brief room-temperature exposure allows the yeast to activate slightly before the cold environment slows its activity, which helps initiate the fermentation process that continues slowly overnight in the refrigerator. Refrigerate for 8–12 hours, ideally overnight. The slow, cold fermentation is the single most flavour-developing step in the entire recipe. Rapid room-temperature fermentation produces bagels with a one-dimensional, simple yeast flavour. Overnight cold fermentation produces complex flavour compounds — organic acids, esters, and other fermentation byproducts — that give the finished bagel a depth and subtlety that immediately distinguishes it from anything commercially produced.
Boil the Bagels
- When ready to bake, preheat the oven to 230°C (450°F) and line two baking sheets with parchment paper sprayed with cooking spray. If using a pizza stone, place it in the oven while preheating. In a large, wide pot, combine the boiling bath water with the barley malt syrup and a generous pinch of salt. Bring to a full boil over medium-high heat. Remove the bagels from the refrigerator and remove the plastic wrap. The boiling step is the defining technique that separates bagels from all other bread. When the bagel's surface contacts boiling water, the outer starch layer gelatinises almost instantly — the water molecules penetrate the outermost starch granules and cause them to absorb water and swell, forming a dense, continuous, semi-rigid shell around the bagel's exterior before it enters the oven. This gelatinised exterior is what produces the tight, glossy, chewy crust rather than the open, soft crust of standard oven-baked bread. Gently lower the bagels into the boiling water top-side down, working in batches of 2–3 to avoid crowding. Boil for exactly 30 seconds, then flip with a slotted spoon or spider strainer and boil for another 30 seconds on the second side. 30 seconds per side is the calibrated time for the correct crust density — longer produces an increasingly thick, tough crust; shorter produces a thinner, less definitive crust.
Season and Bake
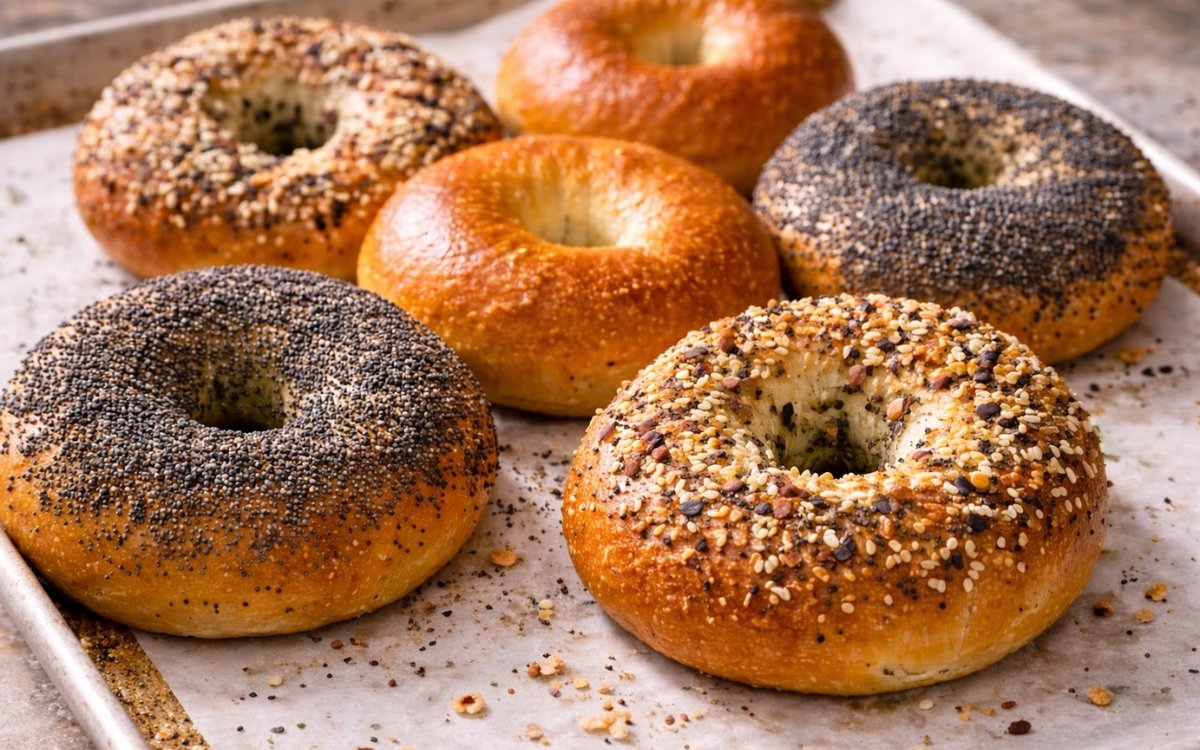
- Using a slotted spoon or spider strainer, lift each boiled bagel from the water and hold it briefly over the pot to allow excess water to drip away, then transfer to the prepared lined baking sheets. Work quickly for the seasoning application — the window for the topping to adhere is narrow. The wet, gelatinised surface of a freshly boiled bagel is intensely sticky and provides excellent adhesion for any topping. As the surface cools and dries, this adhesion decreases rapidly. Immediately after transferring each bagel, apply the topping: for everything bagels, scatter the combined seasoning blend generously and evenly over the top surface, pressing very gently to ensure contact. For poppy seed bagels, cover the top surface with a uniform, generous layer of poppy seeds. For plain bagels, proceed directly to baking without any topping. If making a mixed batch of all three types, plan the order before beginning — season the everything bagels first, then poppy, then plain, working quickly through each boiled batch. Bake for 15–18 minutes until the exterior is a deep, rich golden-brown — not pale gold but a genuine, dark amber. The deep colour indicates that the Maillard reaction has run its full course and the complex flavour compounds associated with it have developed completely. Transfer to a wire rack and allow to cool completely before cutting — cutting a hot bagel traps steam in the crumb and produces a gummy, compressed interior.
Notes
The everything bagel seasoning blend is one of the most widely-used condiment preparations in American deli culture, credited to various New York bagel bakers of the 1970s and 1980s though its precise origin is disputed. Its four-component combination — sesame, poppy, dried onion, dried garlic — produces a flavour profile specifically designed for the bagel's dense, malty crumb: the sesame and poppy seeds provide nutty, slightly bitter toastiness; the dried onion provides sweet, caramelised allium depth when toasted in the oven; and the dried garlic provides pungent, savory background. When all four are toasted on the bagel's exterior at 230°C for 15–18 minutes, they develop flavour compounds that raw versions of the same ingredients cannot produce, and the combination of all four simultaneously creates a flavour greater than any single one alone.
Bread flour is not interchangeable with all-purpose flour in this recipe without affecting the final texture. The higher protein content of bread flour is the source of the chewiness that defines bagel texture. Bakers who find their homemade bagels soft rather than chewy have almost always used all-purpose flour. If bread flour is unavailable, adding 10g of vital wheat gluten per 100g of all-purpose flour approximates bread flour's protein content.
The characteristic hole in the centre of a bagel is not merely decorative — it was originally a practical feature that allowed bagels to be threaded onto a dowel or string for transportation and display. The hole also ensures even cooking: without it, the dense dough would take considerably longer to cook through completely and the exterior would over-bake before the interior set.