Ingredients
Method
Prepare the Corn Tortillas
- Prepare the Homemade Corn Tortilla dough according to its separate recipe, using 240g masa harina, 3g salt, and 300g warm water. Mix until a soft dough forms with no dry patches. Cover and rest for 20 minutes. Divide into 8 equal balls, about 67–68g each. Keep covered. Press each tortilla to about 20cm / 8 inches diameter and cook on a hot dry skillet or comal until just cooked through, flexible, and lightly speckled, about 45–60 seconds per side. Stack the cooked tortillas under a towel so they stay soft and pliable. This larger 20cm diameter is specific to the enchilada format — it needs enough surface area to wrap fully around a generous filling and still overlap cleanly at the seam.
Cook the Chicken
- Heat the oil in a skillet or saucepan over medium heat. Add the onion and cook for 4–5 minutes until softened. Add the garlic and cook for 30 seconds. Add the chicken breasts, salt, cumin, oregano, and black pepper. Pour in the chicken stock or water. Cover and cook gently over medium-low heat for 12–15 minutes, turning once, until the chicken is fully cooked and reaches 74°C internally. Remove the chicken and rest for 5 minutes. Shred into medium strands, then return to the pan with any remaining cooking liquid. Add the lime juice and toss over low heat for 1–2 minutes until the chicken is moist but not wet. The filling should stay juicy but not loose. If it is watery, keep cooking briefly until the liquid reduces. A gentle covered simmer rather than a hard boil protects chicken breast specifically well here — this leaner cut dries out and toughens quickly under more aggressive heat, while the gentler approach keeps it moist right up to temperature.
Make the Green Enchilada Sauce
- Place the tomatillos, onion wedges, jalapeños, and garlic on a tray. Toss lightly with the oil. Roast at 220°C / 425°F for 12–15 minutes, until the tomatillos soften and blister lightly. Do not roast until everything turns deeply browned. Heavy browning dulls the bright green colour and gives a muddy sauce. Transfer the roasted vegetables to a blender. Add the chicken stock, cilantro, salt, cumin, and blend until smooth. Pour into a saucepan and simmer gently for 5–7 minutes. Taste and adjust salt. Add the lime juice only if needed for brightness. The sauce should be vivid green, glossy, and thick enough to coat the back of a spoon. If it is too thick to coat the enchiladas evenly, loosen it with a small splash of stock or water. This is a narrower roasting window than many other roasted salsa bases in this collection — the goal is just enough char to soften the tomatillos and add light complexity, stopping well before the kind of deep browning that would push the finished sauce toward brown rather than staying vividly green.
Soften the Tortillas
- Heat the neutral oil in a skillet over medium heat. Briefly pass each tortilla through the oil for about 5–8 seconds per side, just enough to make it flexible and resistant to cracking. Transfer to a plate lined with paper towel. This step matters. Dry corn tortillas crack when rolled, especially at this larger 20cm size. The larger diameter used here makes this step more consequential than it would be for a small taco tortilla — more surface area means more opportunity for a dry spot to crack under the stress of a tight roll, so the brief oil pass is worth doing for every single tortilla rather than skipping it for ones that look pliable enough already.
Fill and Roll the Enchiladas
- Spoon some of the chicken filling across the lower third of each tortilla. Roll tightly and place seam-side down in a baking dish or large ovenproof pan. Do not overfill. Overstuffed enchiladas split and leak filling into the sauce. Placing each rolled enchilada seam-side down uses the tortilla's own weight, along with the surrounding sauce, to help hold the seam closed through the oven stage without needing anything additional to secure it.
Sauce the Enchiladas
- Pour enough green enchilada sauce over the rolled enchiladas to coat them completely. Reserve a little extra sauce for serving if you want more on the plate. The enchiladas should be covered generously, but they should not be drowning in a soupy layer. Coating completely but not drowning the enchiladas is a specific balance point — enough sauce to protect every exposed surface of tortilla from drying out in the oven, without so much that the dish becomes a soupy pool rather than distinct, sauced enchiladas.
Warm Through
- Place the dish in a 180°C / 350°F oven for 10–12 minutes, just until the enchiladas are heated through and the sauce is bubbling lightly at the edges. You are not baking for browning here. This is just to heat, marry the sauce and filling, and keep the green sauce glossy and fresh-looking. This is a heating and melding stage rather than a true bake, since every component going into the dish is already fully cooked — the oven's only job is bringing everything up to serving temperature while letting the sauce briefly soak into the tortilla's surface.
Garnish and Serve
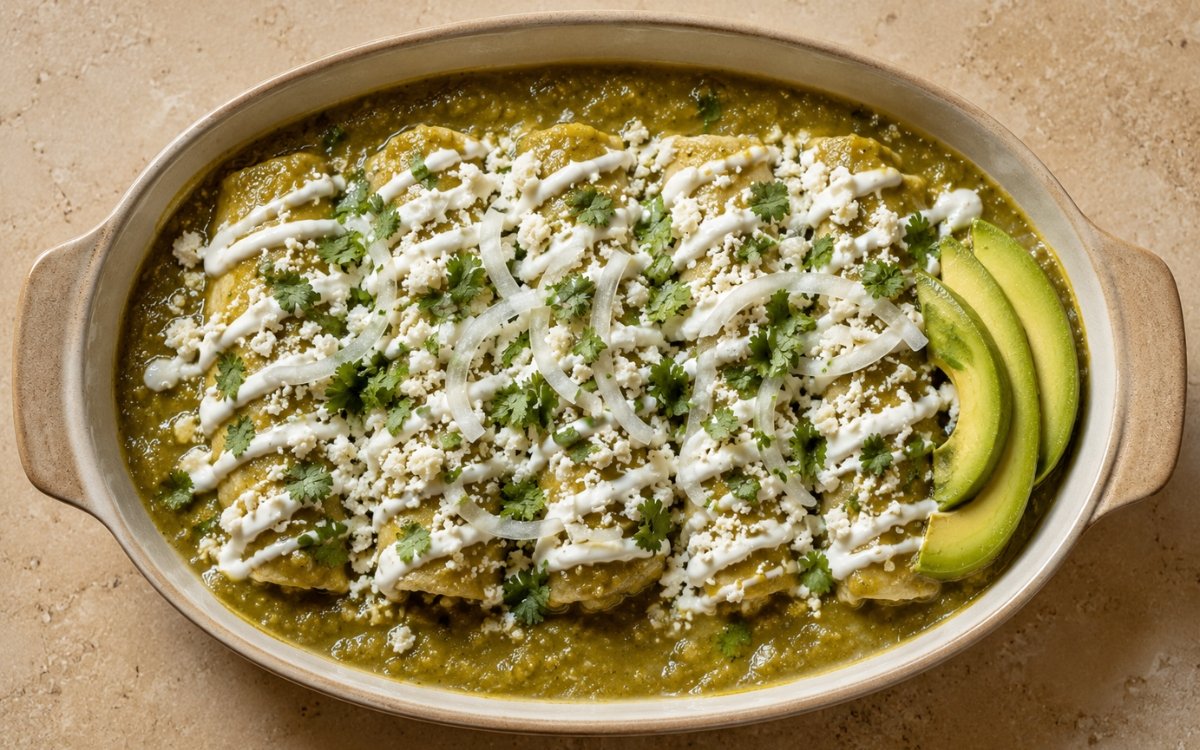
- Top the hot enchiladas with crumbled queso fresco, a zigzag drizzle of crema, thinly sliced white onion, and plenty of fresh cilantro leaves. Serve with sliced avocado on the side. Serve immediately while hot. Adding every garnish only after the dish is hot from the oven keeps the queso fresco from melting into the sauce and the crema from breaking down, preserving the sharp visual contrast between the vivid green sauce and the pale, fresh toppings on top of it.
Notes
The green enchilada sauce's colour is worth protecting deliberately through both the roasting and simmering stages, since it's essentially the entire visual identity of this dish. Tomatillos and their accompanying aromatics can easily be roasted past the point of usefulness here — pushed toward deep, dark browning the way many other roasted salsa bases in this collection are, the resulting sauce shifts from vivid green toward something duller and more brownish. The lighter roast specified, stopping at soft and lightly blistered, is what keeps the finished sauce genuinely vivid.
Passing the tortillas through hot oil before rolling addresses a problem that becomes more pronounced the larger the tortilla is. A small taco tortilla can sometimes get away with skipping this step if it's warm and pliable enough already, but at this recipe's 20cm diameter, dry spots are considerably more likely to crack under the stress of a tight roll — the brief oil pass, taking only seconds per side, meaningfully reduces that risk across a larger surface area.
Keeping the shredded chicken filling moist but not wet is a balance this recipe shares with virtually every other rolled or stuffed dish in this collection, and the underlying reasoning is identical. Excess liquid in the filling has nowhere to go once the tortilla is rolled and sauced except into the masa itself, which weakens the tortilla's structure from the inside and can cause it to fall apart during the final oven stage.
The final assembly sequence — sauce completely but not drowning, warm through briefly rather than truly baking, garnish only once hot — exists to preserve the dish's specific balance of textures and colours. Each step protects something particular: enough sauce to keep every tortilla surface from drying out, a short oven time that heats without overcooking, and garnishes added late enough to stay fresh, pale, and visually distinct against the green.