Ingredients
Method
Prepare the Salsa Verde
- Toss the tomatillos, onion wedges, jalapeños, and garlic with olive oil and salt. Broil or roast on a hot tray until the tomatillos soften, collapse slightly, and develop charred spots, about 8–12 minutes depending on broiler strength. Transfer everything to a blender with the cilantro, lime juice, and 3 tbsp water. Blend until spoonable but still slightly textured. Add more water only if needed. Taste and adjust with salt or extra lime juice. For this recipe, use the full salsa verde batch even though it normally serves 8. The chips need enough salsa to coat generously and soften slightly at the base. Broiling the tomatillos and aromatics rather than simmering them develops a light char that adds real depth and a subtle smokiness the raw-blended version wouldn't have — a meaningful difference for a salsa that's about to become the entire visual and flavour identity of the dish.
Warm the Salsa Verde
- Pour the salsa verde into a wide skillet or saucepan and bring it to a gentle simmer over medium heat. Cook for 3–5 minutes, stirring occasionally, until hot, glossy, and vivid green. Do not reduce it too far. Chilaquiles need enough loose salsa to coat the chips without turning into a dry paste. The goal of this warming step is temperature and looseness, not concentration — a salsa reduced too aggressively at this stage won't have enough volume left to properly coat a full batch of chips.
Prepare the Garnishes
- Slice the white onion very thinly. Crumble the cotija. Slice the avocado and divide it into 4 portions. Loosen the Mexican crema with a few drops of water or lime juice only if needed so it can drizzle in thick white zigzags. Keep everything ready before adding the chips to the sauce. Chilaquiles move fast once the chips hit the pan. Having every single garnish measured, sliced, and within arm's reach before the chips ever meet the hot salsa is what makes the next several steps possible to execute in the narrow window they require — there's no time to slice onion or crumble cheese once the chips are already in the pan.
Fry the Eggs
- Heat the lard in a nonstick skillet over medium heat. Crack in the eggs and fry for 2–3 minutes, until the whites are just set and the yolks stay bright orange and runny. Season lightly with salt if needed. Do not overcook the yolks. The egg is part of the visual and should sit glossy on top of the green chilaquiles. Medium heat rather than high heat is what allows the whites to finish setting at roughly the same pace the yolks reach their ideal soft, glossy consistency — too hot, and the whites toughen well before the yolk has warmed through to that point.
Coat the Chips
- Add the tortilla chips to the hot salsa verde and fold gently for 45–60 seconds, just until the chips are coated. The bottom chips should begin to soften, but the top edges should still have structure and some crunch. Do not stir aggressively. Broken chips turn this into green tortilla mush. Folding rather than stirring distributes the hot salsa across the chips without applying the kind of pressure that snaps them — this is the single step where the whole dish can go wrong fastest, since even a few extra seconds in the pan pushes every chip past crisp into soft.
Plate the Chilaquiles
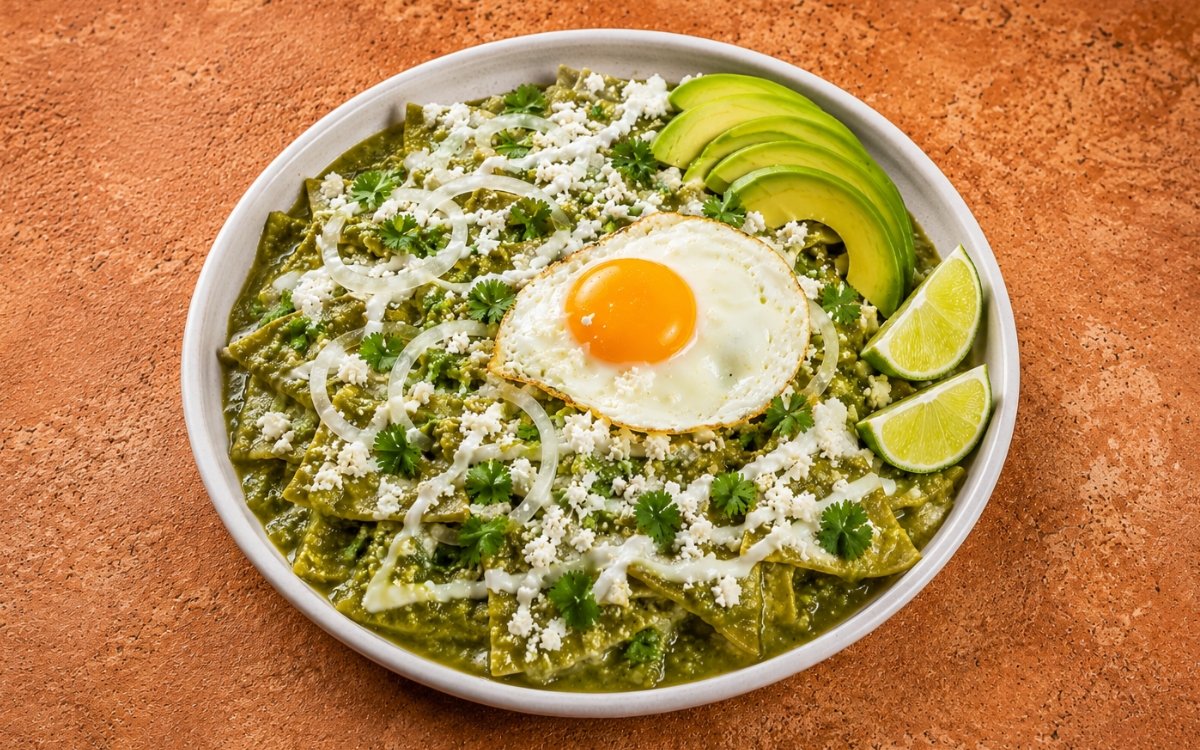
- Divide the salsa-coated chips among four shallow bowls. Spoon any remaining salsa verde around and over the chips so the bowl looks generous and glossy. Top each serving with one fried egg. Add a fan of avocado slices on one side. Scatter cotija heavily across the top. Add thin white onion rings, fresh cilantro leaves, and a thick zigzag drizzle of Mexican crema. Placing the egg on top of the fully plated chips, rather than folding it in or plating it first, is what keeps its yolk sitting glossy and visible rather than getting lost or broken beneath the other garnishes.
Serve
- Serve immediately with lime wedges if using. The chilaquiles should be hot, saucy, and vivid green, with some tortilla pieces softened at the base and some still crisp at the peaks. Every minute this dish sits after plating erodes the specific textural contrast it's built around, so serving without any delay is what preserves the difference between the softened base and the still-crisp top pieces.
Notes
The timing sequence in this recipe deserves real attention rather than being treated as a loose guideline. Chilaquiles have almost no forgiveness once the chips meet the hot salsa — the entire point of the dish is a specific, narrow-window texture where the bottom layer has just begun to soften while the top pieces retain genuine crunch, and that window closes within roughly a minute of contact. Every step before that point, from warming the salsa to prepping every garnish, exists specifically to make sure nothing delays or interrupts the chip-coating stage once it begins.
Broiling the tomatillos and aromatics for the salsa verde, rather than simmering them in water, is a small technique choice with an outsized effect on this particular dish. Since the salsa verde is essentially the entire visual and flavour identity of chilaquiles — there's no competing sauce or protein diluting its presence — the brighter, more complex flavour that broiling produces compared to a simmered version matters more here than it might in a dish where the salsa plays a smaller supporting role.
Folding the chips into the salsa, rather than stirring, is a deliberate technique for a fragile ingredient. Tortilla chips are inherently brittle, and any vigorous mixing motion will snap them into smaller fragments faster than the salsa can properly coat them. A gentle folding motion distributes the sauce while keeping the triangular shape of each chip largely intact, which matters both for the dish's texture and for how it looks once plated — recognisable, coated triangles rather than a green tortilla porridge.
Keeping the fried egg's yolk visible and glossy, added only at the very final plating step, is as much about the dish's identity as its flavour. A yolk broken or buried under the salsa loses its role as a bright visual anchor against the deep green — and functionally, the egg is meant to be broken and mixed in by the person eating it, at the table, rather than pre-mixed during plating.