Ingredients
Method
Prepare the Quick Pickled Red Onion
- Combine the vinegar, hot water, sugar, salt, and lime juice in a bowl or jar. Stir until the sugar and salt dissolve. Add the thinly sliced red onion and press it down so it is mostly submerged. Let pickle for at least 30 minutes while the pork cooks. The onion should turn bright pink, soften slightly, and stay sharp-crisp. Drain before using so the tacos do not become wet. The hot water speeds up the pickle considerably compared to a cold brine — dissolving the sugar and salt fully and gently softening the onion's surface within the 30-minute window, which is what produces that vivid pink colour so quickly.
Prepare the Small Corn Tortillas
- Prepare the Homemade Corn Tortilla dough according to its separate recipe, using 160g masa harina, 2g salt, and 200g warm water. Mix until soft and hydrated, then rest covered for 20–30 minutes. Divide into 16 equal balls of about 22–23g each. Keep the dough covered at all times so the masa does not dry out. Press each tortilla to about 11.4cm / 4.5 inches diameter and cook on a dry hot skillet or comal until lightly charred, flexible, and cooked through. Stack immediately under a towel so the tortillas steam and stay soft. Covering the dough balls and finished tortillas continuously, rather than only at the end, is what keeps every single one pliable — even a few minutes of open air exposure is enough for the edges to start drying and cracking later when folded.
Season and Brown the Pork
- Pat the pork shoulder chunks dry with paper towels. Season all over with kosher salt and black pepper. Heat the neutral oil in a heavy Dutch oven or wide pot over medium-high heat. Sear the pork in batches for 3–4 minutes per side, until deeply browned. Do not crowd the pot. The goal is a strong golden-brown crust and browned fond on the bottom of the pot. Pale pork now means weaker carnitas later. This initial browning is building flavour in two places at once — directly into the meat's surface and into the fond left on the pot, which the onion and garlic will scrape up and carry into the braising liquid moments later.
Braise the Carnitas
- Reduce the heat to medium. Add the onion and garlic to the pot and cook for 2–3 minutes, scraping the browned bits from the bottom. Add the orange juice, lime juice, water or stock, bay leaves, oregano, cumin, cinnamon, and lard. Return the pork and any juices to the pot. Bring to a simmer, then reduce the heat to low. Cover and cook gently for 2 hours to 2 hours 15 minutes, turning the pork every 40 minutes, until the meat is fork-tender and pulls apart easily. The liquid should bubble gently, not boil hard. If the pot gets dry before the pork is tender, add water 100ml at a time. The lard added directly to the braising liquid isn't just for richness — it's what eventually crisps the shredded pork later, since the fat rendered and infused with the braise's citrus and spice flavours becomes the exact medium the pork is finished in.
Reduce and Shred the Pork
- Transfer the pork to a tray and rest for 10 minutes. Discard the bay leaves. Simmer the remaining liquid uncovered for 8–12 minutes until reduced, glossy, and slightly fatty. Shred the pork into medium pieces, keeping some chunks and fatty edges. Do not shred it into dry strings. Toss the pork with enough reduced cooking liquid to coat it lightly. Keeping some larger chunks and fatty edges rather than shredding uniformly fine is what gives the finished carnitas real textural variety — very finely shredded pork crisps evenly but loses the contrast between tender interior and crackling edge that makes carnitas interesting to eat.
Crisp the Carnitas
- Heat a large skillet or griddle over medium-high heat. Add a spoonful of reserved pork fat or lard. Add the shredded pork in a single layer and cook undisturbed for 2–3 minutes, until the underside becomes deeply golden and crisp. Turn in sections and cook another 2–3 minutes. The carnitas should be juicy inside with caramelised crisp edges. Do this in batches if needed. Crowding the pan will steam the pork and destroy the texture. This skillet stage is the actual defining step of carnitas as a dish rather than simply braised pulled pork — cooking in the reserved fat at real heat is what caramelises the exposed edges of the shredded meat while the interior stays moist from the earlier braise.
Prepare the Salsa Verde
- Toss the tomatillos, onion wedges, jalapeños, and garlic with olive oil and salt. Broil or roast on a hot tray until the tomatillos soften, collapse slightly, and develop charred spots, about 8–12 minutes depending on broiler strength. Transfer everything to a blender with the cilantro, lime juice, and 3 tbsp water. Blend until spoonable but still slightly textured. Add more water only if needed. Taste and adjust with salt or extra lime juice. The salsa should be vivid green, tangy, and loose enough to drizzle. Broiling rather than boiling the tomatillos develops a light char that adds a subtle smokiness the aromatics wouldn't get from simmering in water, producing a noticeably brighter, more complex final salsa.
Warm the Tortillas
- Just before serving, rewarm the tortillas on a dry skillet or comal for 10–15 seconds per side until soft and flexible. Keep covered in a towel. This is a brief warm-through rather than a second cook, restoring pliability and heat right before the tacos are assembled.
Assemble the Tacos
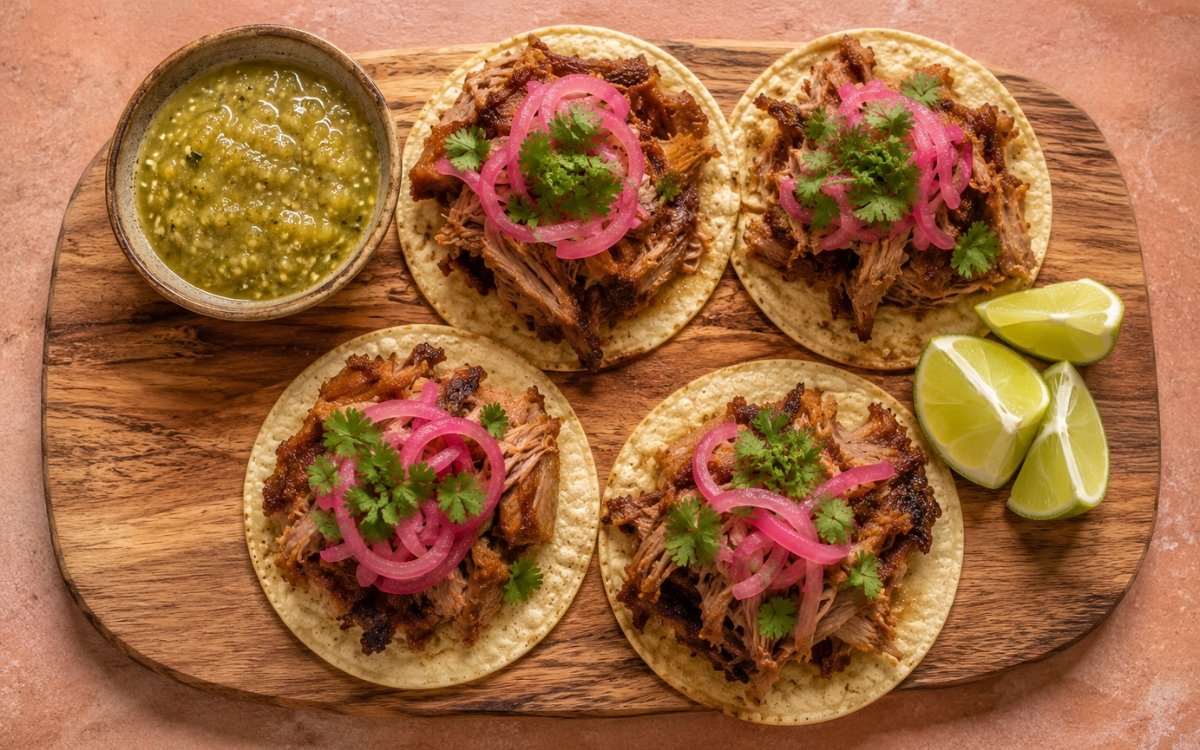
- Place 4 warm corn tortillas per serving on plates or a board. Add a generous portion of crispy carnitas to each tortilla, keeping some browned edges visible. Add bright pink pickled red onion on top. Scatter with fresh cilantro. Keeping some of the pork's caramelised, browned edges visibly on top rather than buried is what signals the crisping stage was done properly — it's as much a visual cue of good technique as it is a textural one.
Serve
- Serve with salsa verde in a small bowl beside the tacos, or drizzle a little salsa verde directly over each taco. Add lime wedges on the side and squeeze fresh lime over the tacos just before eating. Serve immediately while the pork is hot and crisp at the edges, the tortillas are soft, and the pickled onion is still vivid pink. Serving without delay protects the pork's crisp edges above all else — even a short wait under the salsa's moisture will begin softening the exact texture the skillet-crisping stage was built to create.
Notes
The two-stage cooking method — a long, gentle braise followed by a hard skillet finish — is genuinely non-negotiable for carnitas rather than an optional flourish. Braised pork shoulder alone, however tender and flavourful, is soft and uniform throughout, with nothing to distinguish one bite from another. It's specifically the second stage, cooking the shredded meat hot and undisturbed in its own reserved fat, that produces the caramelised, crispy edges against a juicy interior that define carnitas as a dish separate from simple pulled pork.
Browning the pork thoroughly before braising is a step that's easy to rush but costs real flavour if skipped or shortened. A dark, well-developed crust and the resulting fond on the bottom of the pot both carry directly into the braising liquid once the onion and garlic are added and the pot is deglazed — pork that goes into the braise pale, without that initial sear, produces a noticeably flatter, less complex final flavour even after the same amount of braising time.
The citrus-and-lard braising liquid does more than one job simultaneously. The orange and lime juice both tenderise the meat and contribute bright acidity that balances the pork's richness, while the lard added directly to the liquid renders and infuses with those same citrus and spice flavours over the long braise — that same fat then becomes the exact cooking medium used in the final crisping stage, carrying the braise's flavour directly into the crisped exterior.
Draining the pickled onion before it goes on the tacos is a small step with an outsized effect on the finished dish. Quick pickled onion straight from its brine carries a meaningful amount of liquid, and left undrained, that vinegar liquid will soak into and soften the warm tortillas from the top down, undermining their texture before the taco is even eaten.