Ingredients
Method
Preheat and Season
- Preheat the oven to 160°C (325°F). While it heats, season the chuck steak portions evenly and generously with the fine sea salt and freshly ground black pepper on all surfaces — both flat sides and all edges. Press the seasoning firmly into the meat with your palm rather than simply sprinkling it over the surface. Proper, thorough seasoning at this stage is important because the long cooking process that follows will drive the salt deeper into the meat's structure, seasoning it throughout rather than only on the surface. A lightly seasoned chuck steak after 2.5 hours of braising tastes under-seasoned all the way through — there is no correction available after the braise begins. Be deliberate and be generous.
Sear for the Flavor Foundation
- Heat the olive oil in a large, heavy-bottomed oven-safe pot — a Dutch oven or enamelled cast iron is ideal — over high heat until the oil is shimmering and beginning to smoke lightly at the edges. This high heat is essential: the sear that follows is not merely for color but for flavour. The Maillard reaction that occurs when seasoned beef meets a screaming-hot surface in the presence of fat creates hundreds of complex flavour compounds — nutty, caramelised, deeply savory molecules that will infuse the entire braising liquid over the hours that follow and define the character of the finished dish. Place the seasoned chuck portions in the hot oil without crowding — work in two batches if necessary to maintain the pan temperature. Sear without moving for 3 minutes until a deep, dark, almost mahogany crust forms on the bottom. Flip and sear the second side for another 3 minutes. The crust should be dark and firmly adhered — not lightly browned, not grey. Remove the beef and set aside on a plate. Do not discard anything remaining in the pot.
Build the Aromatic Base
- Reduce the heat to medium. Add the roughly chopped onion to the same pot, directly into the rendered fat and oil left from searing. The browned bits adhering to the bottom of the pot — called the fond — are concentrated flavour that must be preserved and incorporated into the sauce. The onion's moisture will begin to lift and dissolve the fond as it cooks. Stir occasionally and cook for approximately 5 minutes until the onion has softened and taken on a light golden color. Add the smashed garlic cloves and cook for a further 60 seconds until fragrant. The aromatics at this stage are absorbing the fat and the dissolved fond — they are not just flavoring the liquid, they are carrying the flavour history of the sear forward into the sauce.
Deglaze and Build the Braising Liquid
- Pour in the red wine first, scraping the bottom of the pot firmly with a wooden spoon or spatula to release any remaining browned bits that the onion moisture did not dissolve. The wine's acidity is particularly effective at lifting the fond completely clean. Allow the wine to bubble vigorously for 60–90 seconds — this brief reduction cooks off the harshest alcohol compounds and begins concentrating the wine's fruit and tannin character. Add the beef stock and Worcestershire sauce. Add the fresh thyme sprigs and bay leaves. Stir everything together and taste the liquid — it should taste bold, slightly acidic from the wine, deeply savory from the stock and Worcestershire, and well-seasoned. This liquid is not merely a cooking medium; it will become the final sauce, and its balance at this stage determines the balance of everything it produces.
Return the Beef and Establish Submersion
- Place the seared chuck portions back into the pot, nestling them into the braising liquid. The correct liquid level is critically important: the beef should be submerged approximately halfway up its sides — not fully covered, and not barely touching the liquid. Full submersion dilutes the flavour concentration of both the meat and the liquid — the meat leaches its juices into an excessive amount of liquid, producing bland meat and a thin, flavourless sauce. Insufficient liquid leads to the exposed upper surfaces drying out and the pot bottom potentially scorching before the braise is complete. Halfway submersion produces the correct result: the submerged half cooks through liquid conduction, the exposed upper half cooks through steam trapped under the lid, and the liquid remains in the concentrated ratio needed for a glossy, rich finished sauce. Bring the liquid to a gentle simmer over medium heat before covering.
Braise Low and Slow
- Cover the pot tightly with its lid and transfer to the preheated 160°C oven. The oven environment is preferable to stovetop for braising because it provides even, ambient heat from all directions rather than the uneven, bottom-only heat of a burner — this produces more even cooking throughout the braise and eliminates the risk of the bottom of the pot overheating. The liquid should maintain a gentle, barely-there simmer throughout — occasional small bubbles breaking the surface is the target. A vigorous boil at this stage is the most common braising error: boiling temperatures cause the muscle proteins to contract aggressively and squeeze moisture out of the fibres, producing tough, dry meat despite the long cooking time. If you lift the lid at any point and see a rolling boil, reduce the oven temperature by 10°C immediately. Braise for 2 to 2.5 hours. Do not open the lid unnecessarily — each opening releases the built-up steam that is cooking the top half of the beef.
Check Doneness Correctly
- At the 2-hour mark, check the beef by pressing the thickest portion firmly with a fork. Properly braised chuck steak should yield and begin to pull apart under gentle fork pressure — the fibres separate easily and the meat offers almost no resistance. If it resists with any firmness, it is not done and needs more time. This is a counter-intuitive moment for many cooks: when braised chuck feels tough at the 1.5-hour mark, the instinct is to assume something went wrong. It has not. Collagen breakdown is not linear — the transformation from tough to tender accelerates as the connective tissue reaches its breakdown temperature and converts to gelatin. A tough chuck at 1.5 hours can be fork-tender 45 minutes later. Do not increase the temperature to hurry it. Time is the only variable that works.
Finish the Sauce and Serve
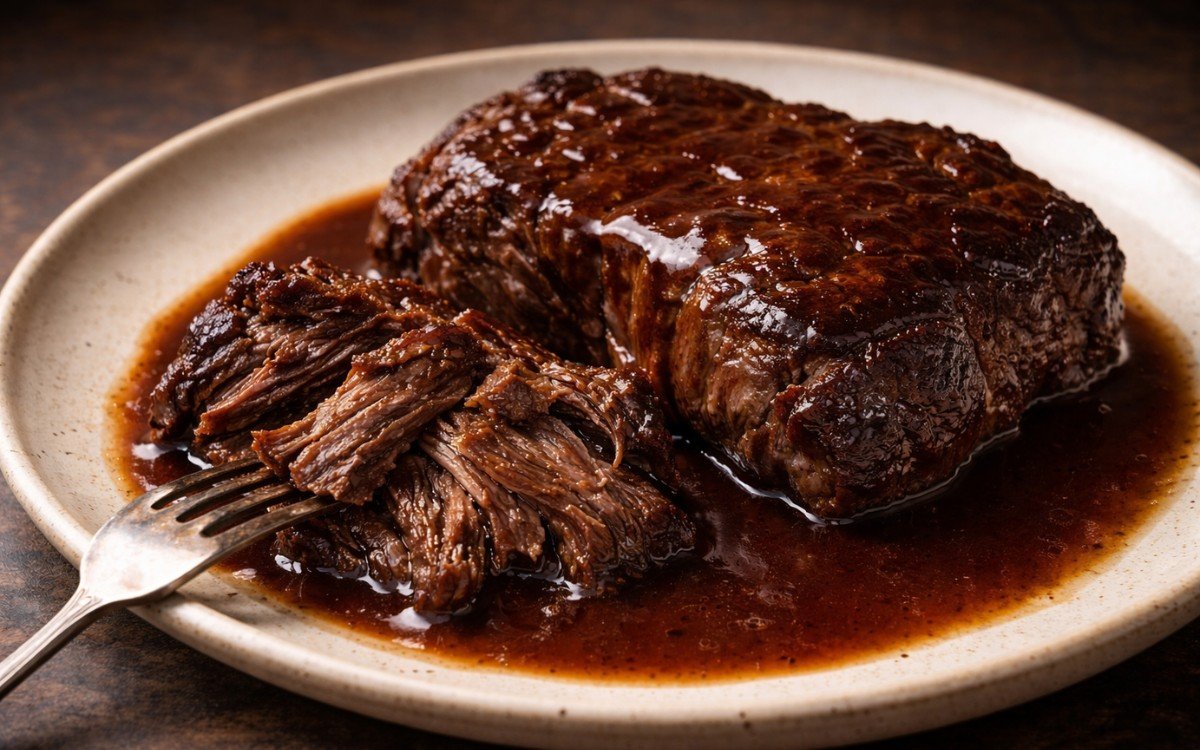
- Remove the beef carefully from the pot and set aside to rest, tented loosely with foil. Pour the braising liquid through a fine mesh strainer into a clean saucepan, pressing the solids gently to extract all the liquid. Discard the strained solids — the onion, garlic, thyme, and bay leaves have given everything they have to the liquid and their texture is no longer pleasant. Evaluate the strained liquid: it should be glossy and lightly thickened from the gelatin released by the collagen breakdown, but if it appears thin or watery, bring it to a simmer over medium heat and reduce for 5–10 minutes, stirring occasionally, until it reaches a coating consistency. Spoon the finished sauce generously over the rested beef at serving. The beef itself needs 5 minutes of rest before serving — the gelatin-rich juices need a brief moment to redistribute and settle after the long cook.
Notes
Chuck steak's location on the animal explains everything about how it behaves. It comes from the shoulder — one of the most heavily worked muscle groups in the animal, responsible for supporting the head and driving forward movement. Heavily worked muscles develop dense connective tissue, particularly collagen, which cross-links the muscle fibres in a matrix of tough, fibrous bands. Collagen is what makes raw chuck chewy and resistant. It is also what makes braised chuck extraordinary — when held at temperatures between 70–80°C for extended periods, collagen denatures and converts to gelatin, a silky, slippery protein that coats every muscle fibre, creating the fork-tender, almost liquid-rich texture of a perfect braise.
The temperature window of 160°C oven is deliberate. At this temperature, the braising liquid maintains a gentle simmer of approximately 85–95°C — below a full boil and within the optimal range for collagen breakdown without protein tightening. Higher oven temperatures push the liquid into a rolling boil, which aggressively contracts the muscle fibres faster than the collagen can break down, producing a paradox: tough meat in a lot of liquid after a long time. Lower temperatures slow the collagen breakdown and extend cooking time without additional benefit.
Braised chuck is genuinely better the next day. As the dish cools, the gelatin in the sauce sets slightly and redistributes throughout the meat, improving texture and deepening flavour through a process of osmotic equilibration. Reheated the following day, gently in a covered pot with a splash of stock, the dish reaches a level of tenderness and flavour integration that is difficult to achieve on the day of cooking.