Ingredients
Method
Prepare the Ribs
- Remove the membrane from the bone side of the ribs. Slide a small knife under one edge of the membrane, loosen it, then grip it with paper towel and pull it off in one sheet if possible. Pat the racks dry well. Cut each rack in half so you end up with 4 rib sections, each roughly 5–6 bones. The membrane should be removed cleanly enough that the seasoning can contact the meat side and bone side properly. Drying the ribs matters because the rub clings better to a dry surface than a wet one. Removing that membrane isn't cosmetic — left in place, it acts as a barrier that blocks both the rub and eventual smoke or heat from properly reaching the underside of the meat, and it also toughens into an unpleasant, chewy layer once cooked.
Season the Ribs
- In a small bowl, combine the garlic powder, onion powder, smoked paprika, sweet paprika, instant coffee, cumin, salt, and black pepper. Drizzle the ribs lightly all over with the apple cider vinegar or rice vinegar — just enough to moisten the surface, not soak it. Sprinkle the spice rub evenly over all sides and press it onto the meat so it adheres well. Let the ribs rest for 30 minutes at room temperature. The light vinegar layer helps the rub cling and keeps the surface slightly tacky, but too much liquid will wash the rub off and steam the surface instead of helping it develop flavor. The instant coffee folded into the rub isn't there to add coffee flavour directly — its bitter compounds deepen the eventual bark's savoury complexity in a way that's felt more than tasted outright.
Wrap and Slow-Bake
- Preheat the oven to 140°C. Wrap each rib section first in pink butcher paper. If you do not have butcher paper, use baking paper. Then wrap each piece again in aluminum foil so it is tightly sealed. Arrange the wrapped ribs on a baking tray. Bake for 2 hours 45 minutes to 3 hours 15 minutes, depending on thickness. The ribs are ready when the meat has visibly pulled back from the ends of the bones, a skewer slides into the meat with very little resistance, the rack bends easily when lifted, and the meat is tender but still holds together and is not collapsing apart. This is the stage to stop before the meat becomes too soft. You want tender ribs that can still handle the grill and repeated glazing without falling apart. The paper-then-foil sequence gives the ribs two different kinds of protection at once — the paper sits directly against the rub-coated surface and keeps it from sitting in pooled liquid the way foil alone would, while the outer foil layer still traps enough heat and steam to tenderise the meat over the long, slow bake.
Make the BBQ Sauce
- While the ribs bake, combine the ketchup, brown sugar, molasses, vinegar, Worcestershire sauce, Dijon mustard, chopped chipotle peppers, adobo sauce, smoked paprika, garlic powder, onion powder, and water in a saucepan. Bring to a gentle simmer over medium-low heat and cook for 10–15 minutes, stirring occasionally, until the sauce thickens to a glossy, spoon-coating consistency. Taste and adjust with a little salt and black pepper if needed. The finished sauce should be thick enough to cling to the ribs in layers, but still loose enough to brush on smoothly. If it becomes too thick, loosen with a small splash of water. This brief simmer concentrates the sauce's sweetness and smoky chipotle heat into something that will hold up to multiple glazing passes on the grill — a thinner, unreduced sauce would simply run off the ribs rather than building into layered, sticky glaze.
Unwrap and Prepare for Grilling
- Remove the ribs from the oven and let them rest in their wrapping for 10 minutes. Unwrap carefully. If there are juices collected in the packets, you can pour them into a bowl, let the fat separate, and stir a little of the defatted juices into the sauce for extra depth. Preheat a grill to medium to medium-high heat. Clean and oil the grates. Letting the ribs rest briefly after baking helps the juices settle and makes the meat less likely to tear when moved to the grill. Stirring the defatted resting juices into the barbecue sauce is a small addition that carries real concentrated pork flavour directly from the ribs' own cooking liquid into the glaze, rather than letting that flavour go to waste.
Grill and Glaze
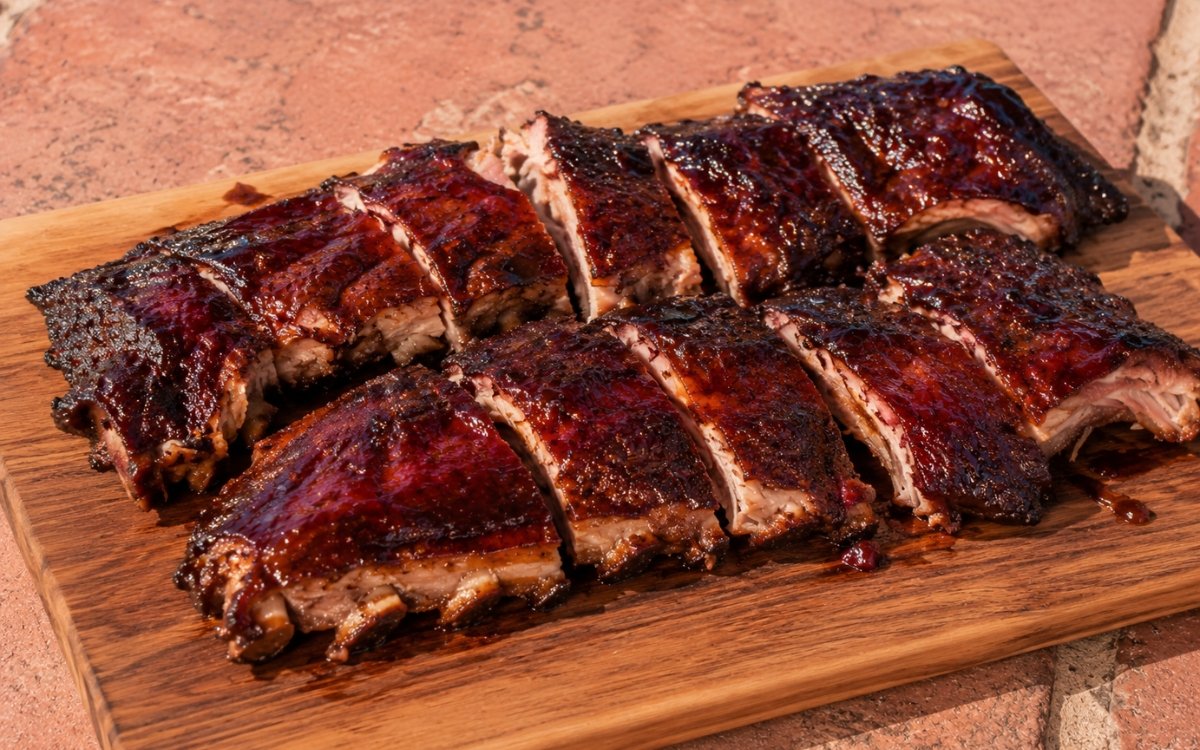
- Place the ribs on the grill meat-side down first for 2–3 minutes to set the surface and add some grill char. Flip and brush generously with BBQ sauce. Grill for another 2–3 minutes. Turn again and continue glazing 2–3 times per side, flipping between layers so the sauce caramelizes gradually instead of burning. Move the ribs to a slightly cooler part of the grill if the glaze darkens too quickly. The ribs are done when the surface is dark mahogany, glossy, sticky, and lacquered, with slightly caramelized edges and a light smoky char. The glaze should look tacky and shiny, not wet and loose. If the sugars begin to scorch aggressively, the heat is too high. Building the glaze in multiple thin layers, rather than one heavy coat, gives each application time to set and caramelise slightly before the next goes on — a single thick coat would either slide off or scorch on the outside before penetrating, while thin repeated layers build depth and shine gradually.
Rest and Serve
- Transfer the ribs to a board and rest for 5–10 minutes. Serve each half-rack section as one portion, or cut further if needed. The final ribs should be tender enough to bite cleanly from the bone, glazed and sticky outside, with a smoky bark under the sauce. This final rest lets the glaze set just enough to stay glossy and clinging rather than sliding off the moment the ribs are cut or handled.
Notes
The paper-then-foil wrapping method is worth understanding as two distinct forms of protection working together rather than a single redundant layer. Butcher or baking paper against the rub-coated surface keeps that surface from sitting directly in pooled fat and juices the way foil alone would allow, which helps preserve some bark texture even through the long, moist cooking stage. The outer foil layer then does the heavier lifting of trapping heat and steam for genuine tenderising over nearly three hours. Foil alone tends to produce a softer, slightly steamed bark by comparison.
Pulling the ribs from the oven at the specific point described — tender, bending easily, meat pulled back from the bone ends, but still holding together rather than falling apart — is a genuinely narrow window worth watching for carefully. Ribs pushed past this point into full fall-off-the-bone territory won't survive the subsequent grilling and repeated glazing; they'll simply break apart under the tongs. Stopping the bake at properly tender-but-intact is what sets up the grilling stage to succeed.
The multi-layer glazing technique on the grill deserves patience rather than rushing toward a single, generous coat. Each thin layer of sauce gets its own brief window against the grill's heat to set and slightly caramelise before the next is brushed on — that gradual buildup is what produces the dark, glossy, lacquered finish this recipe describes, genuinely different from the result of one heavy application, which tends to either slide off unevenly or scorch on top while staying wet underneath.
Using the defatted resting juices from the wrapped ribs as an addition to the barbecue sauce is a small technique that's easy to skip but adds real value. Those juices carry concentrated pork flavour built up over the entire slow bake, and stirring even a modest amount into the sauce before glazing threads that flavour directly back into the final glaze rather than discarding it along with the wrapping.