Ingredients
Method
Debone the Chicken Thighs
- Place each chicken thigh skin-side down on a cutting board. Using a small, sharp boning knife or paring knife, locate the central bone by pressing along the length of the thigh — it runs from end to end and is easy to find by feel. Make an incision along the length of the bone, pressing the knife flush against the bone surface and scraping the meat away in short, controlled strokes. Work the meat away from both sides until the bone is free of flesh, leaving only the joint knuckles at each end still attached. Cut through these knuckle attachments to release the bone entirely. The skin must remain fully intact throughout this process — the skin is what delivers the crackling exterior and protects the meat during frying. If the skin tears, press it back together as best as possible before marinating. The deboned thigh should lie relatively flat, skin-side down, with a roughly even thickness across its surface. This even thickness is important for uniform frying — a thick section will still be underdone when the thin section has begun to overcook.
Make the Marinade
- In a large bowl, whisk together the buttermilk, hot sauce, white pepper, gochujang, MSG, kosher salt, sugar, and garlic powder until completely smooth and uniform. The buttermilk marinade serves several functions simultaneously. Its lactic acid gently denatures the surface proteins of the chicken over the marinating period, breaking down some of the tighter muscle fibre structures and creating a more tender texture throughout — this is the physiological reason buttermilk marinades produce noticeably juicier fried chicken than unmarinated versions. The buttermilk's proteins also adhere to the chicken's surface and form the adhesion layer that allows the dredge to bond firmly rather than sliding off during frying. Gochujang contributes complex fermented heat — fruity, savory, and deeply spiced — that penetrates the meat during the overnight rest and builds the layered internal flavor that distinguishes a properly marinated sandwich from a simply seasoned one. The MSG amplifies and broadens all the other flavours in the marinade without contributing any detectable flavour of its own. Whisk until the gochujang is fully dissolved with no visible streaks of paste remaining.
Marinate the Chicken
- Add the deboned thighs to the marinade and turn each piece to ensure complete coverage on all surfaces, including under any folds of skin. Transfer to an airtight container or seal in a ziplock bag, pressing out excess air. Refrigerate overnight — a minimum of 8 hours is ideal. The overnight rest is not simply a flavor step: the lactic acid in the buttermilk requires time to work through the muscle fibre structure, and the salt and seasoning compounds require time to penetrate from the surface inward. A 30–60 minute marinade produces a lightly seasoned, barely tenderised result. An overnight marinade produces chicken that is seasoned all the way through, measurably more tender at the surface, and has fully absorbed the gochujang's complex heat throughout. If time is a genuine constraint, 2 hours produces a noticeably better result than 30 minutes. Remove from the refrigerator 20 minutes before frying to take the worst of the chill off.
Make the Garlic-Sriracha Mayo
- In a small bowl, whisk together the mayonnaise, MSG, finely grated garlic, and sriracha until smooth and fully combined. The garlic must be grated — ideally on a Microplane — rather than minced. Grated garlic dissolves completely into the mayonnaise and distributes evenly throughout, producing consistent garlic flavor in every application rather than occasional intense raw garlic pieces. The MSG in the mayo serves the same function as in the marinade — it broadens and deepens the savory character of the finished sauce. Taste and season with kosher salt and freshly cracked black pepper. The mayo should be noticeably spicy, deeply garlicky, and rich — it is the primary sauce of the sandwich and needs to be bold enough to stand alongside the crust and the pickles. Refrigerate until assembly.
Prepare the Dredge
- In a large, wide bowl, whisk together the all-purpose flour, potato starch, kosher salt, MSG, garlic powder, onion powder, and black pepper until completely uniform. The combination of all-purpose flour and potato starch is the technical foundation of the sandwich's extraordinary crust texture. All-purpose flour alone produces a crust that is crispy initially but softens relatively quickly — the gluten network it forms is too cohesive and absorbs moisture from the steam escaping the hot chicken. Potato starch is a fine, low-moisture starch with almost no gluten that creates an extremely light, rigid crust structure that shatters rather than bends when bitten. The specific ratio of flour to starch produces a crust with both the structural integrity of flour and the shatterability of starch — the combination that produces the distinctive crunch that makes exceptional fried chicken immediately recognizable. Set this dredge bowl aside and do not add the baking soda yet — it joins the marinade in the next step, not the dredge.
Thicken the Marinade into Batter
- Remove the chicken thighs from the marinade, allowing the excess to drip off briefly, and set them aside on a clean tray. Do not discard the marinade — it becomes the binding batter. Add ½ cup of the prepared dredge mixture and the baking soda to the remaining marinade and whisk firmly until it thickens to a batter-like consistency, roughly similar to a thick pancake batter. The baking soda reacts with the buttermilk's acidity, producing small bubbles throughout the batter. These bubbles create micro-pockets in the coating that expand during frying, producing the dramatically craggy, irregular surface texture that creates the extra surface area responsible for exceptional crunch. Without this step, the coating is relatively smooth. With it, the surface is dramatically textured.
Double-Coat the Chicken
- Dip each deboned thigh back into the thickened marinade batter, turning to coat every surface completely and allowing the excess to drip off. The drip-off is important — excessive batter pooling creates thick, uneven patches that fry unevenly and can fall off during the second fry. Transfer the battered thigh to the dredge bowl and press firmly into the flour-starch mixture with both hands, pressing down, turning, pressing again. The pressing motion is as important as the dredge itself — it compresses the coating into the batter and creates mechanical adhesion between the two layers. Every surface — including folds and edges — must be covered with no batter patches visible. Place the coated thighs on a clean wire rack and allow them to rest for 5 minutes before frying. This brief rest allows the coating to hydrate slightly and adhere more firmly, reducing the amount of coating that releases in the oil during the first fry.
First Fry: Build and Set the Crust
- Fill a large, heavy-bottomed pot with the vegetable oil and heat to exactly 149°C (300°F) using a frying or instant-read thermometer — temperature accuracy is critical in double-frying. The first fry at this lower temperature has one purpose: cooking the chicken through to a safe internal temperature while allowing the coating to set without colouring significantly. Lower frying temperature means the coating sets slowly and gently, forming a stable, adhered structure around the chicken without the surface browning before the interior has cooked. Fry in batches of 1–2 pieces maximum — adding more drops the oil temperature significantly. Lower the chicken into the oil carefully and fry for 2–4 minutes until the vigorous bubbling that occurs when the chicken first enters the oil has reduced substantially. The reduction in bubbling indicates that the majority of surface moisture has been driven off. The coating at this stage will be pale and set but not golden. Remove to a clean wire rack — not paper towels — and allow to cool for at least 5 minutes before the second fry. The wire rack allows air circulation on all sides; paper towels trap steam and soften the crust.
Second Fry: Develop the Crunch
- Raise the oil temperature to 177°C (350°F). Return the rested, once-fried thighs to the hot oil and fry for 2–3 minutes until deeply golden brown and shatteringly crisp — the color should be a rich, uniform amber-brown with no pale patches remaining. The second fry at this higher temperature serves an entirely different purpose from the first: the chicken is already cooked through, so the second fry is exclusively about achieving color, crunch, and final fat expulsion. At 177°C, the residual moisture in the coating evaporates completely and the starches fully gelatinise and harden, creating the rigid, crackling crust structure. The higher temperature also drives any remaining fat from the surface and interior of the coating outward, producing a lighter, less greasy crust. Remove to paper towels for 60 seconds to drain the surface fat, then transfer immediately to a wire rack.
Toast the Buns
- Place a skillet over medium heat and add a generous amount of unsalted butter. When the butter is foaming, place the buns cut-side down in the pan and press gently. Toast for 60–90 seconds until the cut surfaces are golden, slightly crisp, and deeply buttery. Repeat with remaining buns. Buttered, toasted brioche provides structural integrity against the sauces and juices, a rich butterscotch note that bridges the brioche's sweetness to the savory chicken, and a warm temperature contrast to the cool pickle and mayo. An untoasted bun softens and collapses within minutes of assembly.
Assemble and Serve
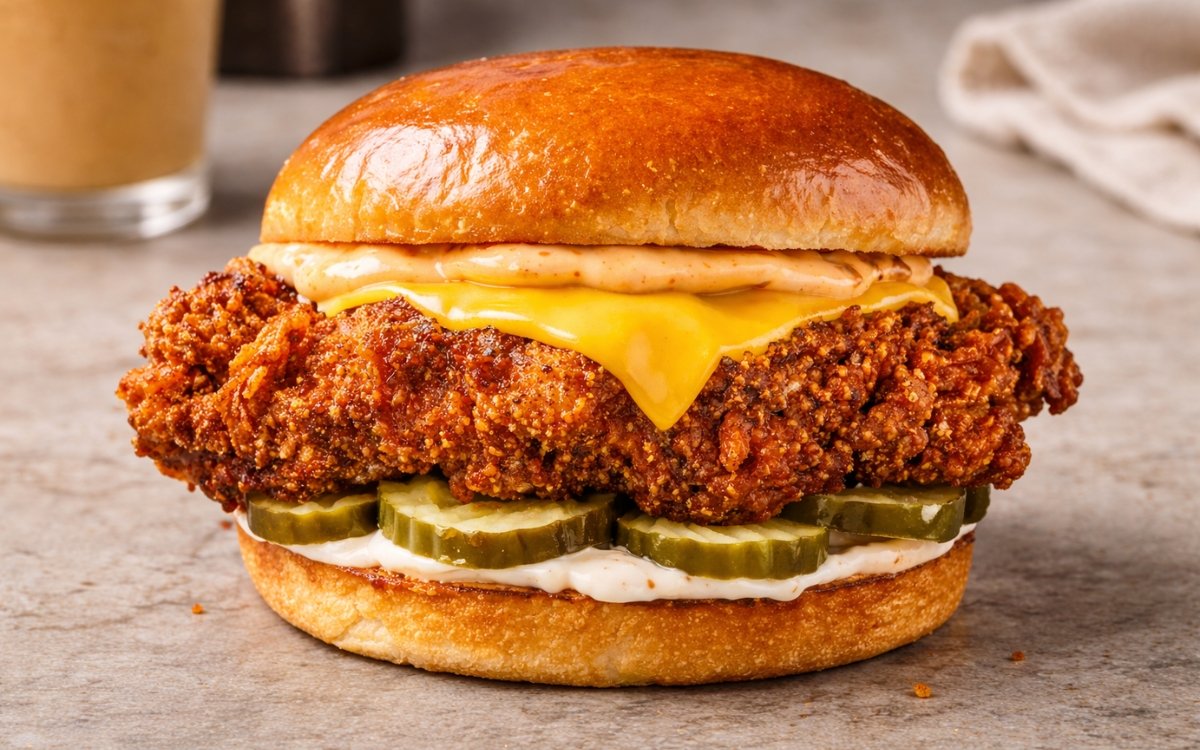
- Spread a layer of plain mayonnaise on the bottom bun. Add a slice of American cheese directly on top of the still-hot chicken immediately — the heat from the freshly fried chicken melts the cheese from below. American cheese is specified deliberately: its emulsified fat structure melts evenly and smoothly at low temperatures, creating a uniform molten layer rather than the separated pools and clumps that natural cheeses produce under these conditions. Add the pickle rounds in a generous, overlapping layer across the cheese. Place the hot, crispy chicken thigh on top of the pickles, skin-side up. Spread 2 tablespoons of garlic-sriracha mayo on the inside face of the top bun and close the sandwich. Allow to rest for 2 minutes — the cheese finishes melting, the flavors settle, and the internal steam pressure equalises slightly. Serve immediately while the crust is still audible.
Notes
Double-frying is the technique that separates a genuinely exceptional fried chicken crust from everything else, and understanding why it works makes it non-negotiable. The first fry at 149°C drives moisture from the chicken and coating while cooking the meat through, but at this temperature the starch network does not fully harden — the crust is set but fragile and pale. During the rest between fries, residual moisture from the meat's interior redistributes to the surface of the coating. The second fry at 177°C drives this redistributed moisture out rapidly, simultaneously hardening the starch network completely and expelling surface fat, producing the rigid, golden, crackling structure that single-frying cannot achieve. Single-frying at high temperature produces a crust that is golden on the outside but still contains trapped moisture within — it softens within minutes. The double-fry produces a fully dried, fully hardened crust that maintains its crunch for longer and at a depth that single-frying cannot replicate.
Potato starch deserves emphasis. The difference between all-flour and flour-plus-potato-starch fried chicken is immediately, dramatically obvious to anyone who eats both side by side. Potato starch's fine, moisture-free particles create an extremely tight, rigid matrix when fried that shatters rather than bends — this is the physical mechanism behind the distinctive sound and sensation of excellent fried chicken. Without it, the best technique produces a good crust. With it, the same technique produces an extraordinary one.
White pepper rather than black pepper is specified in the marinade for a reason that extends beyond authenticity. White pepper's aromatic compounds are different from black pepper's — it has a more fermented, earthier, slightly musty heat that has a specific and well-established affinity with fried chicken and Chinese-Korean cooking applications. Its flavor integrates into the marinade as a background warmth rather than the sharp, piney notes that black pepper contributes. In a buttermilk marinade context, white pepper is the correct choice.