Ingredients
Method
Build the Levain (4–6 Hours Before Mixing)
- In a small, clean jar or container, combine the 30g of active starter, 30g bread flour, 30g whole wheat flour, and 60g of room-temperature water. Stir vigorously until completely smooth and no dry flour remains. Cover loosely — a jar lid left slightly ajar, or a cloth secured with a rubber band — and leave to ferment in a warm spot at approximately 24–26°C for 4–6 hours. The levain is ready to use when it has increased in volume by 30–50%, when the surface shows a dome of fine bubbles, when it feels noticeably airy and slightly springy rather than dense, and when a small amount dropped into a glass of water floats rather than sinks — this float test is the most reliable single indicator of levain readiness. Using the levain at its peak — when it has risen fully but before it begins to collapse — is critical. An under-ripe levain lacks sufficient yeast and bacterial activity to leaven and flavour the dough adequately. An over-ripe levain has consumed most of its available sugars and produces an overly acidic dough with a degraded gluten structure. Peak timing is the most important single judgment call in sourdough baking, and it is worth building a sense for it over successive bakes with your specific starter.
Autolyse
- In a large bowl, combine the 400g bread flour and 50g whole wheat flour. Add 300g of the warm water and mix with your hand using a folding and squeezing motion until no dry flour patches remain and the mixture forms a rough, shaggy dough. Cover the bowl with plastic wrap or a damp cloth and rest for 1 hour. The autolyse rest is not a rise — the yeast has not yet been introduced and nothing is fermenting. It is a hydration rest during which the flour's starch granules absorb the water and the flour's proteins begin to form gluten bonds spontaneously without any mechanical work. After 1 hour, the dough will feel noticeably smoother, more cohesive, and more extensible than it did immediately after mixing — it will stretch easily without tearing. This improved extensibility significantly reduces the kneading required in the subsequent mixing step and produces a more evenly developed, more extensible final dough.
Mix the Dough
- Add the entire levain to the autolysed dough. Begin incorporating by spreading and folding the levain into the dough with your hand — the levain's wet, airy texture makes it initially slippery and resistant to incorporation, but it will combine fully within 2–3 minutes of working. Gradually add the remaining 20g of water in small increments while continuing to fold — this reserved water, called the bassinage, allows you to adjust the dough's final hydration and helps incorporate the levain more cleanly. Once the levain is roughly incorporated and the dough is coming together, add the salt. Do not add the salt at the beginning: salt strengthens the gluten network and would slow the initial levain incorporation. Distribute the salt through the dough by squeezing it between your fingers repeatedly — 60–90 seconds of firm squeezing until the salt is completely dissolved and evenly distributed throughout the mass. Transfer the dough to a clean, unfloured work surface and perform slap-and-folds for 3–4 minutes: lift the dough with both hands, slap it down onto the counter surface firmly, fold the far portion toward you, rotate 90 degrees, and repeat. This technique develops the gluten quickly and efficiently in a wet, sticky dough without adding flour. After 3–4 minutes the dough should feel noticeably smoother, more elastic, and more manageable than at the start of the slap-and-fold.
Bulk Fermentation
- Transfer the dough to a lightly oiled bowl, turn it once to coat, and cover. Ferment at room temperature — ideally 24–26°C — for 4–5 hours total. During the first 2 hours, perform 3–4 sets of stretch and folds at 30-minute intervals. For each set: wet your hand slightly, reach under one side of the dough in the bowl, stretch it upward until it resists further without tearing, and fold it over the centre of the dough. Rotate the bowl 90 degrees and repeat on all four sides — this constitutes one fold. Perform 4 folds per set, rotating 90 degrees each time. After each set the dough will feel progressively tighter, more organised, and more elastic. After the final stretch-and-fold set at the 2-hour mark, leave the dough completely undisturbed for the remaining 2–3 hours of bulk fermentation. The dough is ready to shape when it has increased in volume by approximately 50–75%, the surface shows small bubbles and doming, the edges of the dough where it contacts the bowl are slightly domed upward rather than flat, and a piece pulled from the surface stretches extensibly without immediately tearing.
Pre-Shape
- Gently turn the dough out onto a clean, unfloured work surface — flour on the surface at this stage would make the dough too slippery for the surface tension-building that pre-shaping requires. Using a bench scraper and your free hand, work the dough into a loose round: slide the bench scraper under one edge of the dough and rotate the ball toward you while dragging the scraper along the surface, building tension on the underside of the dough by slightly tucking it under itself. The goal is a round with a smooth, taut upper surface and a sealed seam on the bottom — not a perfectly smooth sphere, but a noticeably more organised shape than the slack mass that came from the bowl. Cover the pre-shaped round with a damp cloth and allow to rest on the bench for 20 minutes. This bench rest allows the gluten that was tensioned during pre-shaping to relax, making the final shaping easier and reducing the risk of the dough tearing.
Final Shape
- After the bench rest, turn the pre-shaped round upside down onto the work surface so the smooth side faces down. Gently flatten it slightly with your palm to degas it minimally — the goal is to remove large irregular gas pockets while preserving the overall gas structure. Fold the left third of the dough to the centre, then the right third over that, like a letter. Roll the resulting rectangle toward you firmly to create a tight cylinder, applying pressure with your palms and rolling the cylinder toward your body to tighten the surface tension. Seal the seam by pressing firmly. Flip the shaped loaf seam-side down and use the bench scraper and cupped hands to drag the ball toward you a few times, tightening the surface by friction. The final shaped loaf should feel taut and hold its round shape without slumping — this surface tension is what allows the loaf to hold its shape during the long cold proof and bake without spreading flat.
Cold Proof
- Generously and thoroughly dust a banneton (proofing basket) or a medium bowl lined with a clean cotton cloth with rice flour. Rice flour is specified over wheat flour because it does not absorb into the dough surface during the cold proof, preventing the sticky bond that causes the loaf to tear when turned out before baking. Wheat flour hydrates and fuses with the dough surface over 12 hours; rice flour does not. Place the shaped loaf seam-side up in the prepared banneton. Cover with plastic wrap or a shower cap and place in the refrigerator for 12–14 hours. The cold proof slows fermentation dramatically and develops flavour complexity — the lactic and acetic acids produced during the extended cold period give sourdough its characteristic tang — while the cold temperature firms the dough's structure, making it significantly easier to score cleanly before baking.
Preheat the Dutch Oven
- Place a Dutch oven with its lid in the oven and preheat to 250°C (480°F) for a minimum of 45 minutes before baking. The Dutch oven is the home baker's equivalent of a professional deck oven's steam injection system. When the cold dough is placed in the screaming-hot Dutch oven and the lid is sealed, the moisture evaporating from the dough's surface is trapped inside the enclosed environment. This steam performs the same function as the steam injection in a professional oven: it keeps the crust surface moist and flexible during oven spring, allowing the loaf to expand fully before the crust sets into its final rigid form. Without the covered Dutch oven, the crust sets too quickly and constrains the loaf's expansion — producing a denser, lower loaf with a thicker, tougher crust. The 45-minute minimum preheat ensures the Dutch oven's cast iron walls are fully saturated with heat and will maintain temperature when the cold dough is introduced.
Score and Bake
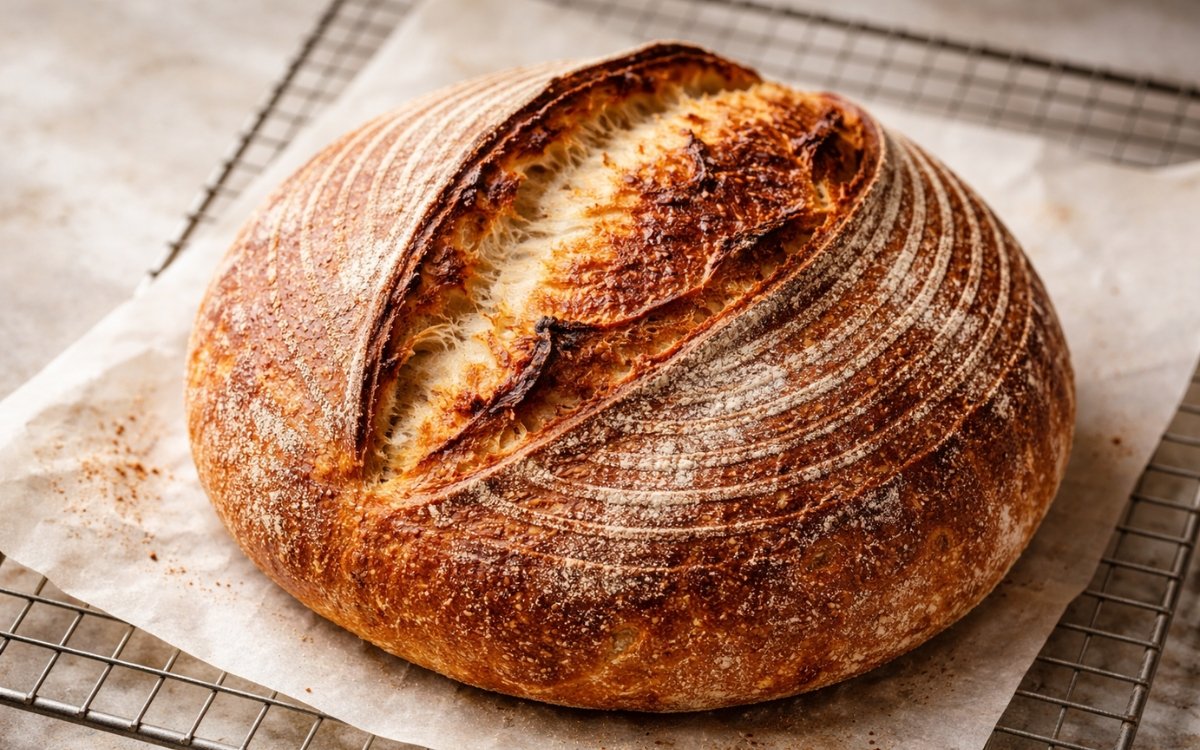
- When ready to bake, remove the banneton from the refrigerator — baking from cold is correct and preferable: cold dough scores more cleanly because the firm surface resists the blade dragging, and the temperature gradient between cold interior and hot oven environment promotes stronger oven spring. Cut a piece of parchment paper to fit inside your Dutch oven. Turn the loaf out of the banneton directly onto the parchment — the rice flour dusting should allow it to release cleanly. If the banneton has left a pattern of rice flour rings on the surface, these are correct and characteristic. Score the surface immediately using a bread razor (lame) or very sharp, thin knife: make one confident, decisive cut at approximately 30–45 degrees to the surface, approximately 1cm deep, running 70–80% of the loaf's diameter in a single clean stroke. A single confident cut made quickly and decisively produces a cleaner, more useful score than multiple hesitant passes that tear rather than slice. The score creates the controlled weak point at which the loaf will expand during oven spring — without scoring, the loaf bursts at an uncontrolled point. Remove the Dutch oven from the oven, lift the lid, lower the parchment and loaf carefully into the pot, replace the lid immediately, and return to the oven. Bake covered at 250°C for 20 minutes — the steam environment during this phase produces the oven spring and the initial gelatinisation of the surface starch. Remove the lid and reduce the temperature to 230°C (450°F) and bake for a further 20–25 minutes until the crust is deeply golden brown with significant colour at the score opening and no pale patches remaining. Cool on a wire rack for a minimum of 1 hour before slicing — cutting a hot sourdough loaf produces a gummy, compressed crumb as the still-setting interior steam is trapped rather than allowed to equalise.
Notes
The active starter is the foundation of the entire recipe and its health directly determines the quality of the finished bread. An active starter should at least double in volume within 4–8 hours of feeding at room temperature, show a dome of bubbles on the surface at peak, have a pleasantly sour, yeasty aroma, and pass the float test. A starter that has not been fed for more than a week in the refrigerator should be fed at least twice, 8–12 hours apart, before being used to build a levain for baking. A weak starter produces a loaf with insufficient oven spring, a dense crumb, and inadequate crust development.
Temperature is the variable that most affects sourdough timing and is the most common source of confusion for new sourdough bakers. All the timing ranges given in this recipe — 4–6 hours for the levain, 4–5 hours for bulk fermentation — are calibrated for 24–26°C ambient temperature. At 20°C, all stages take approximately 30–50% longer. At 28°C, they proceed approximately 30% faster. A kitchen thermometer is a worthwhile investment for sourdough baking specifically. Learning to read the dough's visual and textural cues — volume increase, bubble structure, surface dome, extensibility — rather than relying solely on clock time produces more consistent results across varying kitchen temperatures.
Rice flour for banneton dusting is the single most impactful supply investment for home sourdough bakers who struggle with dough sticking to the banneton. A mixture of 50% rice flour and 50% all-purpose flour is a workable alternative. Pure rice flour is the most reliable solution.