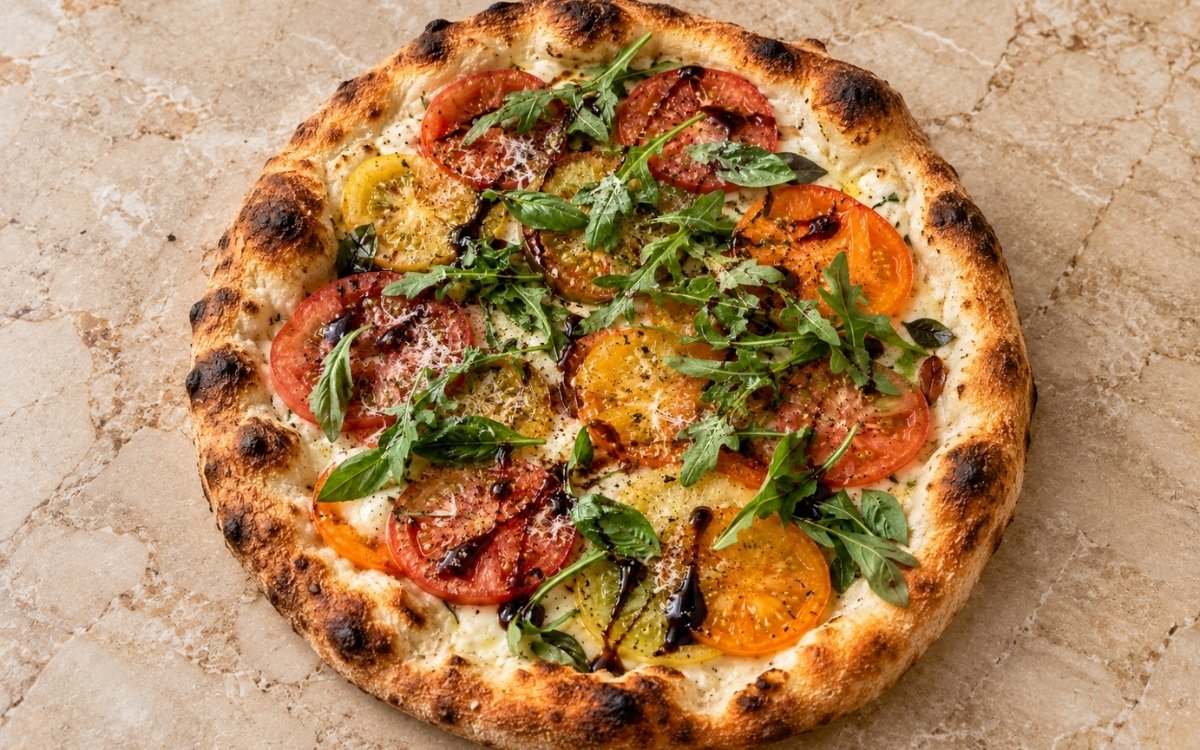
Ingredients
Method
Temper the Dough
- If the dough was cold-proofed, remove the 4 dough balls from the refrigerator 2–3 hours before baking. Keep them covered so the surface does not dry out. The dough should feel relaxed, airy, and extensible before shaping. If it is still tight and cold, it will spring back and be harder to stretch without degassing the rim. That tempering window lets the cold, tightened gluten network genuinely relax and warm through before it ever meets this pizza's own hand-shaping.
Prep and Drain the Tomatoes
- Slice the heirloom tomatoes very thinly, about 2–3mm thick. Lay them in a single layer or slightly overlapping layer on paper towels or a rack set over a tray. Sprinkle evenly with the salt and let them drain for 15–20 minutes. Pat the surface dry gently, then season lightly with black pepper and drizzle with the olive oil. This step is critical. If the tomatoes go onto the pizza wet and unsalted straight away, they release too much liquid during baking and can leave the center soggy. They should still be juicy, but not dripping. That salting and draining stage draws moisture out of the tomatoes through basic osmosis before they ever reach the dough, giving the crust a real chance to bake through rather than fighting a fresh flood of tomato liquid.
Preheat the Oven
- Place a pizza steel or stone in the oven and preheat at the highest setting your oven can safely hold, ideally 260–290°C, for at least 45–60 minutes. A fully saturated steel or stone is essential for strong oven spring and proper bottom browning. If the surface is not thoroughly heated, the crust sets slowly and the center is more likely to soften under the cheese and tomatoes. That extended preheat ensures the surface itself, not just the surrounding air, has genuinely reached its target temperature throughout.
Prepare the Cheese Base
- Combine the grated mozzarella with the 50g Parmigiano and the Pecorino if using. Stir the ricotta separately so it is smooth enough to dollop. Keep all toppings ready before shaping. Do not overload the cheese layer. White pizza needs enough coverage to protect the dough, but too much cheese plus tomatoes will weigh down the center and delay the bake. That measured cheese coverage matters directly here given how much additional moisture the tomato layer still contributes even after draining — a heavier cheese hand on top of that would push the center past what this pizza's brief bake can actually cook through.
Shape the First Pizza
- Dust the bench lightly with semolina or 00 flour. Place one dough ball on the surface and coat lightly. Press outward from the center with your fingertips, leaving a 1.5–2cm rim untouched. Stretch gently into a round about 28–30cm wide with a thinner center and a defined edge. Do not use a rolling pin. You want to preserve the gas around the rim so the crust bakes up puffy and airy. If the dough fights you and snaps back, let it rest for 10–15 minutes, then continue. Letting resistant dough rest rather than forcing the stretch is what protects it from tearing, giving the gluten genuine additional time to relax.
Top the Pizza
- Transfer the stretched dough to a floured peel. Scatter about 125–135g of the mozzarella mixture evenly over the base, leaving the rim bare. Add small dollops of ricotta, about 30g per pizza in total. Add a few cracks of black pepper. Then arrange a generous layer of the drained heirloom tomato slices across most of the surface, overlapping lightly but not piling them too thick. The tomatoes should cover the pizza well while still leaving small gaps for the cheese to bubble through. Keeping the tomatoes to one shingled layer, rather than stacking multiple layers, is what lets each slice bake through and lightly concentrate rather than steaming under the weight of the slices above it.
Bake
- Launch the pizza onto the hot steel or stone. Bake for 7–10 minutes, rotating once if needed, until the crust is well-risen, blistered, and browned with some charred spots, the underside is baked through and crisp, the cheese is melted and bubbling, and the tomatoes look softened, glossy, and just lightly concentrated, not collapsed into sauce. If the bottom is done but the top needs more color, use the broiler / upper heat briefly for 30–60 seconds, watching carefully. The tomatoes should still read as slices after baking. If baked too long, they slump, flood the top, and lose the Caprese-style look. That specific visual checkpoint — glossy slices, not collapsed sauce — protects the pizza's whole intended look, since pushing the bake even a little longer would break the tomatoes down past the point of holding their own shape.
Finish
- Transfer the pizza to a board. Immediately top with a light handful of arugula, a few basil leaves, a fresh shower of Parmigiano-Reggiano, a light drizzle of olive oil, and a restrained drizzle of balsamic glaze. The balsamic should accent the pizza, not drown it. Too much will dominate the tomatoes and cheese and make the top look muddy. Adding these fresh components only once the pizza is already out of the oven is what keeps the arugula and basil genuinely crisp and vivid, rather than wilting under the crust's own residual heat.
Repeat
- Bake the remaining 3 pizzas the same way, keeping the unused dough covered while you work. Allow the steel or stone a few minutes to recover heat between pizzas if needed. Giving the baking surface real time to recover its heat between pizzas protects each subsequent pie from the slower, paler bake a cooled stone or steel would otherwise produce.
Notes
Salting and draining the tomato slices before they ever meet the dough deserves genuine recognition as the single technique most responsible for whether this pizza's center actually bakes through or turns soggy. That process draws real, measurable moisture out of the tomatoes through basic osmosis, and the recipe's own explicit framing of this as "the key control point" reflects exactly how much this one step determines the finished pizza's texture.
Slicing the tomatoes genuinely thin, rather than in thicker rounds, deserves the same attention this collection gives to any ingredient whose thickness directly affects how much moisture it releases during baking. Thinner slices carry less total liquid and cook through more evenly within this pizza's brief bake time, while thicker slices would remain heavier and considerably harder to bake through cleanly before the crust itself finishes.
Adding the arugula, basil, fresh Parmigiano, and balsamic glaze only after the pizza comes out of the oven deserves genuine respect as a deliberate, functional sequencing choice rather than a presentation preference. Every one of those components would wilt, dull, or cook away if exposed to the oven's heat — holding them back until this final stage is specifically what keeps the finished pizza tasting and looking genuinely fresh.
Keeping the balsamic glaze to a restrained drizzle, rather than a generous pour, deserves attention given how directly the recipe's own notes warn against it dominating the plate. Balsamic glaze carries real, concentrated sweetness and acidity, and too heavy a hand would overwhelm both the tomatoes' own bright flavour and the cheese base beneath them, muddying the whole finished look.