Ingredients
Method
Combine the Dry Ingredients
- In a large bowl, combine the bread flour, fine sea salt, sugar, and active dry yeast. Stir briefly to distribute all four dry components evenly before any liquid is added. The brief mixing ensures the yeast and salt are dispersed through the flour rather than sitting in concentrated contact with each other — salt in direct, undiluted contact with yeast before the liquid is introduced can suppress yeast activity at those points. Bread flour is specified over all-purpose for the same reason it is used in the brioche burger bun recipe: hot dog buns need sufficient structural integrity to hold their elongated shape through proofing and baking without spreading flat, and the higher protein content of bread flour produces the stronger gluten network that keeps the shaped log compact and upright rather than widening and flattening during the second proof.
Mix and Form the Dough
- In a separate bowl or jug, whisk together the warm milk, warm water, and egg until completely combined with no streaks of unincorporated white remaining. Both liquids should be approximately 35°C — warm enough to activate the yeast and help the butter incorporate, but not hot enough to damage the yeast cells or begin setting the egg. Pour the liquid mixture over the dry ingredients and add the softened butter simultaneously. The butter must be genuinely soft — at room temperature for at least 30 minutes — rather than cold or melted. In a brioche-style dough, softened butter is worked progressively into the developing gluten network during kneading, coating the gluten strands and producing the tender, extensible crumb structure characteristic of brioche. Cold butter does not incorporate smoothly and requires aggressive mixing that can over-develop the gluten. Melted butter introduced before gluten development coats the flour particles and inhibits network formation. Room-temperature softened butter is the only correct state for this application. Mix with your hand or a dough scraper until a rough, cohesive dough forms with no dry flour remaining.
Knead to Full Development
- Transfer the rough dough to a clean work surface and knead for 8–10 minutes by hand, or use a stand mixer fitted with a dough hook at medium-low speed for 8 minutes. The dough will be noticeably sticky during the first 3–4 minutes of kneading — stickier than a lean dough without enrichment — and this is expected and correct for a brioche-style dough. The fat from the butter and the lecithin from the egg yolk both increase surface tackiness during early kneading before the gluten network has developed sufficiently to bind them into the structure. Do not add flour to manage the stickiness — flour addition at this stage alters the recipe's hydration balance and produces a denser, less tender bun. Continue kneading through the stickiness: as the gluten develops and the butter is fully incorporated over the 8–10 minute period, the dough progressively tightens, smooths, and begins to pull away from the work surface more cleanly. The finished dough should feel smooth, slightly glossy, elastic, and supple — a small piece stretched between your fingers should reach translucency without tearing, confirming the gluten development sufficient for the shaped log to hold its form during the second proof and baking.
First Rise
- Shape the kneaded dough into a smooth ball and place in a lightly greased bowl. Turn once to coat all surfaces in oil. Cover with plastic wrap or a damp kitchen towel and allow to rise at room temperature — ideally 24–26°C — for 1–2 hours until clearly doubled in size. The enrichment from the butter, egg, and sugar moderates the yeast's fermentation rate compared to a lean dough — the surrounding fat molecules create a slightly more challenging environment for yeast activity, producing a rise time at the longer end compared to plain bread dough. The first rise develops the flavour complexity that distinguishes a properly fermented enriched bread from one that was rushed — the organic compounds produced during the 1–2 hour fermentation contribute the subtle depth that makes even a simply flavoured brioche noticeably more interesting than the same recipe would be if under-fermented.
Divide and Shape into Logs
- Turn the risen dough out onto a lightly floured work surface. Divide into 4 equal portions — each approximately 105g. Weigh them for consistency: equal weight produces buns that expand evenly and bake in the same time. The hot dog bun shaping technique differs fundamentally from the burger bun shaping — where burger buns are shaped into balls and flattened, hot dog buns are shaped into elongated logs through a specific rolling technique that produces the characteristic cylindrical shape. Working with one piece at a time, gently press and flatten each piece with your palm into a rough rectangle approximately 10–12cm long and 7–8cm wide. The flattening is light — just enough to produce a rectangular base for rolling, not aggressive enough to fully degas the dough. Starting from the long side nearest to you, roll the dough away from you firmly and tightly, pressing the roll against the work surface as you go to maintain tension. The rolling motion should be deliberate and consistent — a loose roll produces a bun with irregular gaps in the crumb; a tight, even roll produces a uniform, close-grained crumb structure. As you reach the far edge, press the seam firmly against the dough surface with the heel of your hand to seal it completely — an unsealed seam will open during proofing and baking, producing a visible split along the length of the bun. Once sealed, lightly roll the log back and forth on the surface with your palms, applying gentle even pressure and gradually working outward from the centre to lengthen it to approximately 15–18cm. The ends should be slightly tapered — apply a little more pressure toward each end during the rolling-out phase.
Second Rise
- Place the shaped buns seam-side down on a parchment-lined baking sheet. Unlike burger buns, do not flatten hot dog buns after shaping — the elongated log shape requires height as well as length, and flattening would eliminate the rounded top profile that characterises a proper hot dog bun. Space the buns with at least 5–6cm between each one to allow for expansion during proofing without the buns pressing against each other and merging. Cover loosely with lightly greased plastic wrap or a clean cloth. Allow to proof at room temperature for 45–60 minutes until visibly puffy, noticeably expanded in both height and width, and soft and airy to a very gentle press. The buns should look clearly larger than when shaped but still retain their elongated log identity — they should not have spread flat or become dome-shaped, which would indicate either an overly wet dough or insufficient gluten development from under-kneading. Begin preheating the oven to 190°C (375°F) in the final 15–20 minutes of the second proof.
Egg Wash and Bake
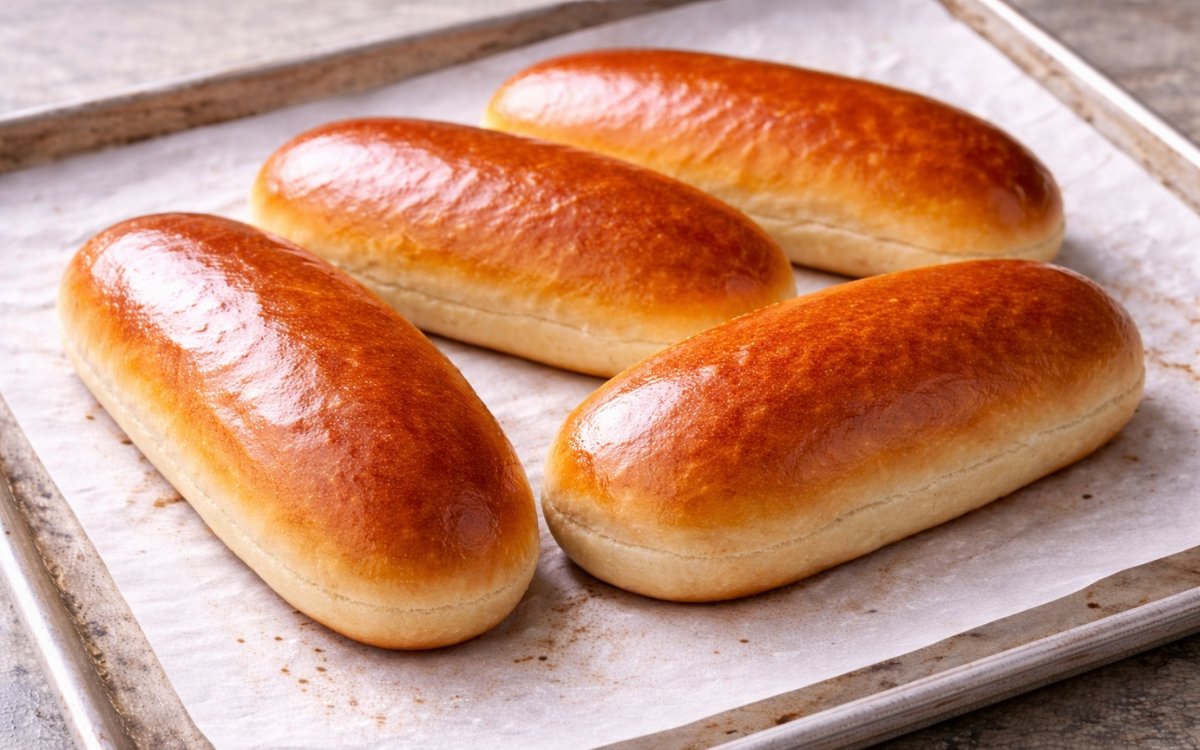
- In a small bowl, whisk the egg with a small splash of milk until completely smooth and uniform. Using a pastry brush, apply a thin, even coat of egg wash across the top surface and sides of each proofed bun. The egg wash on a brioche hot dog bun produces the characteristic deep golden, slightly glossy finish that is the visual identity of a quality enriched bread — the egg's proteins and the milk's sugars caramelise during baking in a Maillard reaction that produces both colour and a subtle complexity at the crust surface. Apply with light, even strokes from front to back rather than side-to-side, which can shift the bun on the tray and deflate the proofed gas structure. Bake for 16–18 minutes until the tops and sides are evenly, deeply golden brown and the buns sound slightly hollow when tapped on the base — a dull, solid sound indicates the interior is not yet fully baked. Transfer to a wire rack immediately. For the optional butter finish, brush the warm top surface of each bun with melted butter within the first 2 minutes of removing from the oven — the warm bun absorbs the butter into the surface, preventing the crust from hardening as it cools and producing the characteristically soft, yielding top that distinguishes a brioche bun from a standard bread roll.
Notes
The hot dog bun shaping is the technique that most separates this recipe from the burger bun version — the log roll with sealed seam requires more care than the ball-and-flatten method but is not difficult once understood. The key variables are: the tightness of the initial roll (tighter produces a more uniform crumb), the completeness of the seam seal (any gap will open during baking), and the evenness of the subsequent length extension (more pressure toward the ends to taper slightly). A bun where the seam opens during baking is cosmetically imperfect but not structurally compromised — it will hold a hot dog correctly and taste identical. For a cleaner result, ensure the seam is pressed firmly and completely before rolling out to length.
The length target of 15–18cm is calibrated for a standard hot dog or bratwurst. A standard hot dog is approximately 15cm. If your hot dogs or bratwursts are longer — some artisan bratwursts reach 20cm — adjust the bun length accordingly by rolling to a longer dimension during shaping.
The butter finish immediately after baking is the single step that most elevates these buns toward their best possible result. Butter applied to a hot surface melts and absorbs into the crumb's outer layer within seconds, and the fat prevents the subsequent formation of the firmer, slightly stiff crust that develops as an unenriched surface cools and the surface starch retrogradrates. The result is a bun that remains soft and slightly yielding to the touch even when cooled to room temperature — the texture that makes an excellent brioche bun immediately identifiable.