Ingredients
Method
Poach and Shred the Chicken
- Add the chicken breasts, water, onion, garlic, bay leaf, salt, and peppercorns to a saucepan. Bring just to a gentle simmer over medium heat. As soon as the liquid is simmering, reduce the heat to low and cook gently for 14–18 minutes, depending on thickness, until the chicken is fully cooked and reaches 74°C internally. Do not boil aggressively or the chicken will tighten and dry out. Remove the chicken from the liquid and let it cool just enough to handle. Reserve 60ml of the cooking liquid, then shred the chicken into fine strands using two forks or your hands. The filling is best when the chicken is finely shredded rather than chopped into chunks. A genuine gentle poach protects the chicken's own moisture, which matters directly here — this filling has essentially nowhere to hide dry, tough chicken once it's folded into the mashed avocado.
Make the Reina Pepiada Filling
- In a medium bowl, mash the avocados until creamy but still slightly textured. Add the mayonnaise, lime juice, chopped cilantro, finely diced onion, garlic, salt, and black pepper. Mix until smooth and evenly combined. Add the shredded chicken and fold until all the strands are well coated. The filling should be creamy, thick, and spreadable, but still hold its shape. If it feels too tight or dry, add 1–2 tablespoons of the reserved chicken liquid. Taste and adjust with extra salt, pepper, or lime juice if needed. Set aside while you make the arepas. The filling should be rich and creamy, not loose or runny. Mashing the avocado to a texture that's creamy but not fully smooth is what lets the finished filling hold real body — a completely puréed avocado would produce something closer to a thin spread than the thick, moundable filling this dish depends on.
Make the Arepa Dough
- In a large bowl, combine the warm water, warm milk, salt, and melted butter. Stir until the salt is dissolved. Add the masarepa gradually, sprinkling it in with one hand while mixing with the other to prevent lumps. Add the crumbled queso fresco and mix until evenly distributed. Let the dough rest for 8–10 minutes so the masarepa fully hydrates. After resting, knead briefly in the bowl until smooth. The dough should feel soft, moist, and pliable, like smooth modeling clay. It should not crack badly at the edges when pressed. If it feels dry, add an extra tablespoon or two of warm water. If too wet and sticky to shape, add 1 tablespoon more masarepa at a time. Divide the dough into 8 equal portions, about 125–130g each. Roll each into a ball, then flatten into thick discs about 9–10cm wide and roughly 1.5cm thick. Smooth the edges with your palms so there are no deep cracks. Adding the masarepa gradually while mixing, rather than dumping it in all at once, is what prevents dry lumps from forming — pre-cooked cornmeal hydrates quickly, and any lumps that form early tend not to fully smooth out even with continued mixing.
Pan-Cook the Arepas
- Heat a large nonstick skillet or cast-iron pan over medium to medium-low heat. Lightly grease with the neutral oil. Cook the arepas in batches without overcrowding. Cook for 5–7 minutes on the first side until a deep golden crust forms with some darker toasted spots. Flip and cook the second side for another 5–7 minutes. In the final 2 minutes, you can add a small amount of butter to the pan for extra color and flavor if desired. Once both sides are golden, reduce the heat to low, cover the pan loosely if needed, and cook for 3–4 minutes more, turning once, so the centers finish cooking through. The arepas should feel lighter, the crust should be crisp, and the interior should no longer taste raw when tested. Transfer to a rack or plate and let them rest for 3–4 minutes before opening. This short rest allows the interior crumb to settle so they split more cleanly. Medium-low heat throughout gives this thick disc of dough genuine time to cook through to its centre at roughly the same pace the exterior develops its golden crust — pushed at higher heat, the outside would darken well before the interior had properly finished.
Split and Fill the Arepas
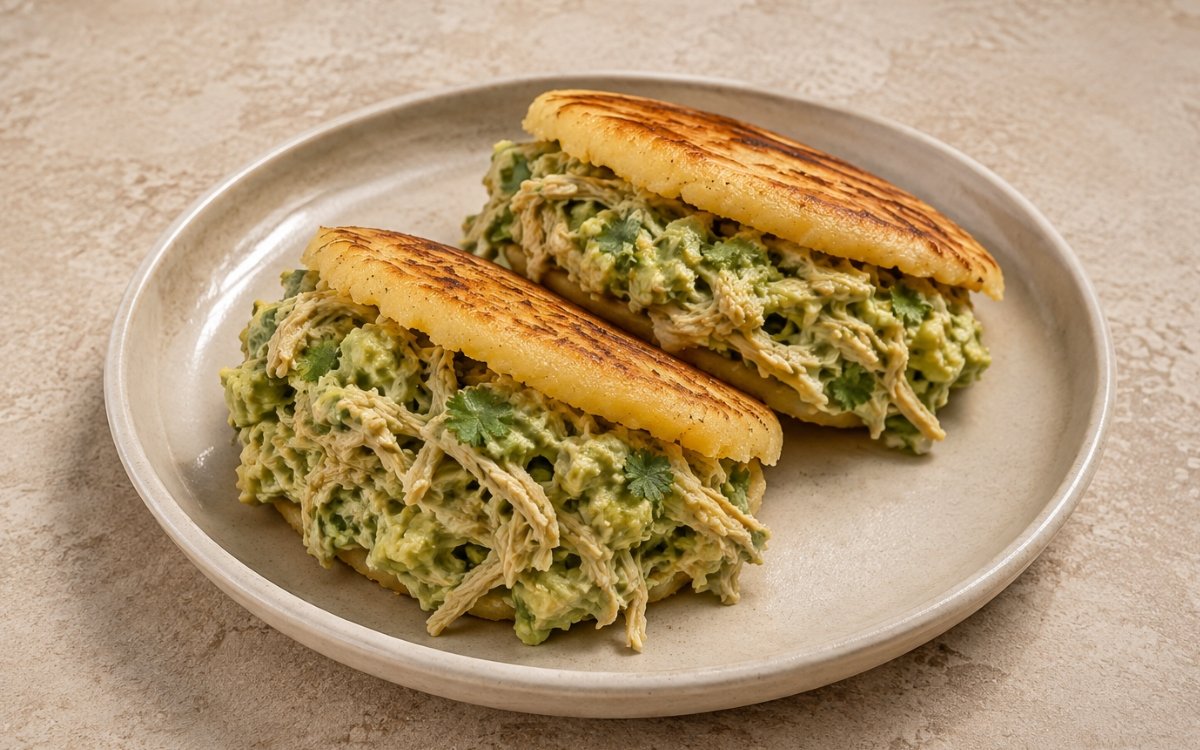
- Using a small serrated knife, cut a slit along one side of each arepa, creating a pocket. Do not cut all the way through. Gently use the knife and your fingers to open the interior slightly and make room for the filling. Stuff each arepa generously with the chicken-avocado filling. For the classic overstuffed look and feel, pack the filling in well so it slightly spills from the opening. Serve immediately while the arepas are still warm and the filling is cool-creamy by contrast. That brief rest taken earlier is what makes this stage possible — a freshly cooked arepa opened immediately, before its crumb has had any time to settle, tends to tear unpredictably rather than splitting into a clean, fillable pocket.
Notes
Poaching the chicken gently deserves genuine respect given how directly its texture affects the finished filling. This dish's whole appeal rests on a rich, creamy, cohesive filling, and dry, overcooked chicken strands would stand out sharply against that creaminess rather than blending into it — the gentle poach specified here protects the chicken's tenderness right through to the moment it's folded into the mashed avocado.
Mashing the avocado to a texture that's creamy but still slightly textured, rather than fully smooth, is worth understanding as a genuine choice about the filling's final body. A completely puréed avocado loses structural substance, producing something thinner and more spread-like; the slightly chunkier mash specified here is what gives the finished filling enough body to mound generously inside the arepa without running or dripping out.
The dough-building technique — masarepa added gradually while mixing, rather than all at once — reflects the same principle used throughout this collection's other masarepa-based recipes. Pre-cooked cornmeal hydrates quickly on contact with liquid, and any lumps that form from an aggressive, all-at-once addition tend to persist even through continued kneading, producing a less smooth, less pliable finished dough.
The brief rest given to the arepas after cooking, before they're ever split open, deserves recognition as a genuinely functional step rather than an optional pause. That short window lets the interior crumb settle and firm slightly, which is specifically what allows a clean, controlled split rather than an unpredictable tear — opening a freshly cooked arepa immediately skips that settling and risks a messier result.